Samsung GT-P5210 User Manual Generic Gt-p5210 Galaxy Tab 3 Jb English User Man - Page 51
Updating Contacts, Managing Photo IDs, Contacts Display Options, Contacts, Delete, Remove, Image
 |
View all Samsung GT-P5210 manuals
Add to My Manuals
Save this manual to your list of manuals |
Page 51 highlights
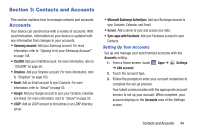
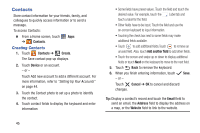
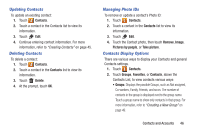
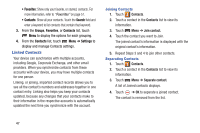
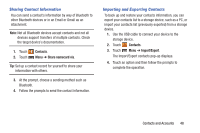
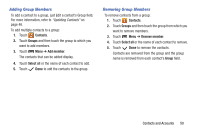
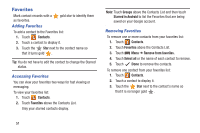
Updating Contacts To update an existing contact: 1. Touch Contacts. 2. Touch a contact in the Contacts list to view its information. 3. Touch Edit. 4. Continue entering contact information. For more information, refer to "Creating Contacts" on page 45. Deleting Contacts To delete a contact: 1. Touch Contacts. 2. Touch a contact in the Contacts list to view its information. 3. Touch Delete. 4. At the prompt, touch OK. Managing Photo IDs To remove or update a contact's Photo ID: 1. Touch Contacts. 2. Touch a contact in the Contacts list to view its information. 3. Touch Edit. 4. Touch the Contact photo, then touch Remove, Image, Pictures by people, or Take picture. Contacts Display Options There are various ways to display your Contacts and general Contacts settings. 1. Touch Contacts. 2. Touch Groups, Favorites, or Contacts, above the Contacts List, to view contacts various ways: • Groups: Displays the possible Groups, such as Not assigned, Co-workers, Family, Friends, and so on. The number of contacts in the group is displayed next to the group name. Touch a group name to show only contacts in that group. For more information, refer to "Creating a New Group" on page 49. Contacts and Accounts 46
-
 1
1 -
2
-
3
-
4
-
5
-
6
-
7
-
8
-
9
-
10
-
11
-
12
-
13
-
14
-
15
-
16
-
17
-
18
-
19
-
20
-
21
-
22
-
23
-
24
-
25
-
26
-
27
-
28
-
29
-
30
-
31
-
32
-
33
-
34
-
35
-
36
-
37
-
38
-
39
-
40
-
41
-
42
-
43
-
44
-
45
-
 46
46 -
 47
47 -
 48
48 -
 49
49 -
 50
50 -
 51
51 -
 52
52 -
 53
53 -
 54
54 -
 55
55 -
 56
56 -
57
-
58
-
59
-
60
-
61
-
62
-
63
-
64
-
65
-
66
-
67
-
68
-
69
-
70
-
71
-
72
-
73
-
74
-
75
-
76
-
77
-
78
-
79
-
80
-
81
-
82
-
83
-
84
-
85
-
86
-
87
-
88
-
89
-
90
-
91
-
92
-
93
-
94
-
95
-
96
-
97
-
98
-
99
-
100
-
101
-
102
-
103
-
104
-
105
-
106
-
107
-
108
-
109
-
110
-
111
-
112
-
113
-
114
-
115
-
116
-
117
-
118
-
119
-
120
-
121
-
122
-
123
-
124
-
125
-
126
-
127
-
128
-
129
-
130
-
131
-
132
-
133
-
134
-
135
-
136
-
137
-
138
-
139
-
140
-
141
-
142
-
143
-
144
-
145
-
146
-
147
-
148
-
149
-
150
-
151
-
152
-
153
-
154
-
155
-
156
-
157
-
158
-
159
-
160
-
161
-
162
-
163
-
164
-
165
-
166
-
167
-
168
-
169
-
170
-
171
-
172
-
173
-
174
-
175
-
176
-
177
-
178
-
179
-
180
-
181
-
182
-
183
-
184
-
185
-
186
-
187
-
188
-
189
-
190
-
191
-
192
-
193
-
194
-
195
-
196
-
197
-
198
-
199
-
200
-
201
-
202
-
203
-
204
-
205
-
206
-
207
-
208
-
209
-
210
-
211
-
212
-
213
-
214
 |
 |