Samsung HD321LJ User Manual (ENGLISH)
Samsung HD321LJ Manual
 |
View all Samsung HD321LJ manuals
Add to My Manuals
Save this manual to your list of manuals |
Samsung HD321LJ manual content summary:
- Samsung HD321LJ | User Manual (ENGLISH) - Page 1
BF68-00160B REV 03 Additional information can be obtained at www.samsunghdd.com SAMSUNG ELECTRONICS CO.,LTD STORAGE SYSTEM DIVISION HEAD OFFICE : 94-1, IM SOO-DONG, GUMI-CITY KYUNG BUK, KOREA 730-350 - Samsung HD321LJ | User Manual (ENGLISH) - Page 2
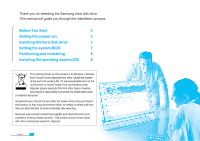
SAMSUNG HARD DISK DRIVE INSTALLATION GUIDE Thank you for selecting the Samsung hard disk drive. This manual will guide you through the installation process. * Samsung does NOT guarantee any data on your drive, please always BACK-UP your precious data. - Samsung HD321LJ | User Manual (ENGLISH) - Page 3
selecting the Samsung hard disk drive. This manual will guide you through the installation process. Before You Start 2 Setting the jumper pin 3 how they can take this item for environmentally safe recycling. Business users should contact their supplier and check the terms and conditions of the - Samsung HD321LJ | User Manual (ENGLISH) - Page 4
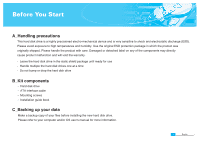
the hard disk drives one at a time - Do not bump or drop the hard disk drive B_Kit components - Hard disk drive - ATA interface cable - Mounting screws - Installation guide book C_Backing up your data Make a backup copy of your files before installing the new hard disk drive. Please refer to your - Samsung HD321LJ | User Manual (ENGLISH) - Page 5
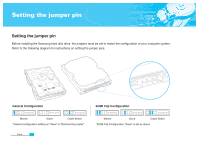
Setting the jumper pin Setting the jumper pin Before installing the Samsung hard disk drive, the jumpers must be set to match the configuration of your computer system. Refer to the following diagram for instructions on setting the jumper pins. General Configuration Master Slave Cable Select * - Samsung HD321LJ | User Manual (ENGLISH) - Page 6
To remedy this problem: First, upgrade the BIOS by contacting your PC or main board manufacturer. Second, set the drive jumpers to the 32GB user who wants to use an HDD capacity of 32GB or higher should upgrade to Windows98/NT/2000 or higher. If you need a jumper, please contact the nearest service - Samsung HD321LJ | User Manual (ENGLISH) - Page 7
Installing the hard disk drive Installing the hard disk drive The followings are of typical computer systems and hard disk drive mounting styles. English 5 Red Red Key Slot DC Power Receptor ATA Interface Connector Power Supply Cable from computer power supply (3-Pin or 4-Pin) - Samsung HD321LJ | User Manual (ENGLISH) - Page 8
disk drive may vary from one computer to another. (Consult your computer manual) d_Insert the HDD into an available 3.5" bay in your computer and it to the chassis using the provided screws. e_Connect Cables. 1.Attach the ATA interface cable to the interface connector on the hard disk drive. 2.Attach - Samsung HD321LJ | User Manual (ENGLISH) - Page 9
. C_To make the computer detect the hard disk drive, select the "auto-detect" option then save and exit the BIOS set up. If your computer supports IDE HDD auto detection, the hard disk drive will automatically be detected. If you select the type from the IDE Adapter Primary Master Slave section - Samsung HD321LJ | User Manual (ENGLISH) - Page 10
OS will automatically recognize the hard drive. Follow the on screen directions when installing your OS. Please refer to your OS and/or computer user's manual for more information. If your OS is windows ME or earlier, take the following steps. A_When the CMOS setup is completed, reboot the system - Samsung HD321LJ | User Manual (ENGLISH) - Page 11
Merci d'avoir choisi un disque dur Samsung. Ce manuel vous présente les différentes étapes de la procédure d'installation. Avant de commencer 2 Réglage des cavaliers leur contrat de vente. Ce produit ne doit pas être éliminé avec les autres déchets commerciaux. French 1 3 Installation Guide - Samsung HD321LJ | User Manual (ENGLISH) - Page 12
pas le disque dur contre un objet et ne le laissez pas tomber à terre. B_Composition du kit - disque dur - câble d'interface ATA - vis de montage - guide d'installation C_Sauvegarde de vos données Réalisez une copie de sauvegarde de vos fichiers avant d'installer le nouveau disque dur. Pour plus de - Samsung HD321LJ | User Manual (ENGLISH) - Page 13
Réglage des cavaliers Réglage des cavaliers Avant d'installer votre disque dur Samsung, vous devez régler les cavaliers pour respecter la configuration de votre système informatique. Reportez-vous aux instructions du diagramme suivant pour régler les cavaliers. General Configuration Master Slave - Samsung HD321LJ | User Manual (ENGLISH) - Page 14
plus de procéder à une mise à niveau vers Windows 98/NT/2000 ou au-delà. Si vous avez besoin d'un cavalier, merci de contacter le service après venteÄou de nous envoyer un e-mail sur l'adresse www.samsunghdd.com 4 French - Samsung HD321LJ | User Manual (ENGLISH) - Page 15
Installation du disque dur Installation du disque dur Les instructions suivantes concernent des ordinateurs classiques dotés de supports de montage de disque dur classiques. French 5 Red Red Key Slot DC Power Receptor ATA Interface Connector Power Supply Cable from computer power supply (3-Pin or - Samsung HD321LJ | User Manual (ENGLISH) - Page 16
disque dur dans un logement de 3,5" et fixez-le avec les vis fournies. e_Branchez les câbles du disque dur. 1.Reliez le câble d'interface ATA au connecteur d'interface sur le disque dur. 2.Reliez le câble d'alimentation au connecteur d'alimentation sur le disque dur. Ces deux connecteurs sont munis - Samsung HD321LJ | User Manual (ENGLISH) - Page 17
Réglage du BIOS de l'ordinateur Réglage du BIOS de l'ordinateur A_Allumez votre ordinateur. Pendant la séquence de démarrage, exécutez le programme de configuration du CMOS (BIOS). Les ordinateurs récents affichent habituellement un message tel que "press DEL to enter SETUP", vous indiquant comment - Samsung HD321LJ | User Manual (ENGLISH) - Page 18
de votre ordinateur et/ou du système d'exploitation. Si votre système d'exploitation est Windows ME ou une version antérieure, suivez les instructions ci-après : A_ Une fois la configuration du CMOS terminée, redémarrez le système avec une disquette de démarrage contenant les programmes FDISK - Samsung HD321LJ | User Manual (ENGLISH) - Page 19
Vielen Dank, dass Sie sich für ein Festplattenlaufwerk von Samsung entschieden haben. Diese Anleitung wird Sie durch den Installationsprozess führen. Bevor Sie beginnen 2 Setzen der Brü . Dieses Produkt darf nicht zusammen mit anderem Gewerbemüll entsorgt werden. German 1 3 Installation Guide - Samsung HD321LJ | User Manual (ENGLISH) - Page 20
dieses nacheinander - Setzen Sie das Laufwerk keinen Stößen aus und lassen Sie es nicht fallen. B_Lieferumfang - Festplattenlaufwerk - ATA -Schnittstellenkabel - Montageschrauben - Installationshandbuch C_Sicherung Ihrer Daten Fertigen Sie ein Backup Ihrer Dateien an bevor Sie eine neue Festplatte - Samsung HD321LJ | User Manual (ENGLISH) - Page 21
Brückenstecker Setzen der Brückenstecker Bevor Sie die Samsung Festplatte installieren müssen die Brückenstecker zur Konfiguration gem Cable Select *General configuration setting as "Slave" is "Remove the jumper" German 3 32GB Clip Configuration Master Slave Cable Select *32GB Clip - Samsung HD321LJ | User Manual (ENGLISH) - Page 22
in einen PC mit einer älteren BIOS-Version zu installieren. Für dieses Problem gibt es zwei Lösungen: Erstens, aktualisieren Sie das BIOS. Kontaktieren Sie Windows98/NT/2000 oder höher aufzurüsten. Wenn Sie einen Jumper benötigen, kontaktieren Sie Ihr nächstgelegenes Servicecenter oder senden Sie - Samsung HD321LJ | User Manual (ENGLISH) - Page 23
Die Installation der Festplatte Die Installation der Festplatte Nachfolgend wird die Installation einer Festplatte in einem typischen Computersystem beschrieben. German 5 Red Red Key Slot DC Power Receptor ATA Interface Connector Power Supply Cable from computer power supply (3-Pin or 4-Pin) - Samsung HD321LJ | User Manual (ENGLISH) - Page 24
einen 3.5" -Laufwerksschacht und befestigen Sie diese mit den mitgelieferten Schrauben. e_Verbinden Sie die Kabel. 1.Stecken Sie das ATA Schnittstellenkabel in den Verbindungsbuchse am Festplattenlaufwerk. 2.Stecken Sie das Stromkabel in die entsprechende Buchse am Festplattenlaufwerk. Beide Buchsen - Samsung HD321LJ | User Manual (ENGLISH) - Page 25
Einstellung des BIOS Einstellung des BIOS A_Schalten Sie Ihren Computer ein. Aktivieren Sie in der Startphase das CMOS(BIOS) Setup-Programm. Neuere Systeme zeigen in der Regel eine Nachricht wie "drücken Sie ENTF, um SETUP zu starten", die Ihnen sagt, wie Sie auf das CMOS(BIOS) Programm zugreifen kö - Samsung HD321LJ | User Manual (ENGLISH) - Page 26
usw.), müssen Siee alle Laufwerke formatieren. ACHTUNG!: Die Programme FDISK und FORMAT löschen alle Daten auf dem Festplattenlaufwerk. Um solche Probleme zu vermeiden, fertigen Sie ein Backup Ihrer Daten an, bevor Sie die Programme FDISK oder FORMAT starten. Installation des Betriebssystems Lesen - Samsung HD321LJ | User Manual (ENGLISH) - Page 27
Gracias por elegir una unidad de disco duro Samsung. Este manual le guiará durante el proceso de instalación. Antes de comenzar 2 Cómo configurar los puentes (jumpers) 4 Cómo instalar la unidad de disco debe eliminarse mezclado con otros residuos comerciales. Spanish 1 3 Installation Guide - Samsung HD321LJ | User Manual (ENGLISH) - Page 28
- Maneje una unidad cada vez. - Evite golpear o dejar caer la unidad. B_Componentes del equipo - unidad de disco duro - cable de conexión ATA - tornillos de montaje - manual de instalación C_Copias de seguridad de sus datos Antes de instalar la nueva unidad de disco duro, haga una copia de seguridad - Samsung HD321LJ | User Manual (ENGLISH) - Page 29
Cómo configurar los puentes (jumpers) Cómo configurar los puentes (jumpers) Antes de instalar la unidad de disco duro Samsung, hay que ajustar los Cable Select *General configuration setting as "Slave" is "Remove the jumper" Spanish 3 32GB Clip Configuration Master Slave Cable Select *32GB - Samsung HD321LJ | User Manual (ENGLISH) - Page 30
Cómo configurar los puentes (jumpers) NOTA: Cuando se intenta instalar una unidad de disco duro de más de 32GB o más, actualice a Windows98/NT/2000 o superior. "Si necesita un conector puente (jumper), por favor contacte con su servicio técnico mas cercano o envíenos un e-mail a www.samsunghdd.com." - Samsung HD321LJ | User Manual (ENGLISH) - Page 31
unidad de disco duro A continuación, encontrará los sistemas informáticos y estilos de montaje de disco duro habituales. Spanish 5 Red Red Key Slot DC Power Receptor ATA Interface Connector Power Supply Cable from computer power supply (3-Pin or 4-Pin) - Samsung HD321LJ | User Manual (ENGLISH) - Page 32
otro. d_Introduzca la unidad de disco duro en una plataforma de 3,5" y fíjela con los tornillos suministrados. e_Conecte los cables. 1.Acople el cable de conexión ATA al conector de la unidad de disco duro. 2.Acople el cable de alimentación al conector de corriente de la unidad de disco duro. Ambos - Samsung HD321LJ | User Manual (ENGLISH) - Page 33
Cómo ajustar la BIOS del sistema Cómo ajustar la BIOS del sistema A_Encienda el sistema del ordenador. Durante la secuencia de inicio, ejecute el programa CMOS(BIOS) Setup. Los sistemas nuevos normalmente muestran en la pantalla un mensaje similar a "press DEL to enter SETUP" (pulse DEL para entrar - Samsung HD321LJ | User Manual (ENGLISH) - Page 34
unidad de disco duro automáticamente. Siga las instrucciones que aparecen en pantalla al instalar su sistema operativo. Para más información, consulte el manual de usuario del sistema operativo o del ordenador. Si su sistema operativo es Windows ME o una versión inferior, siga los pasos siguientes - Samsung HD321LJ | User Manual (ENGLISH) - Page 35
Dank u voor het kiezen van een Samsung hard disk drive. Deze handleiding leidt u door het installatieproces. Voordat u begint 2 Instellen jumperschakelaars 4 Installatie van de hard . Dit product moet niet worden gemengd met ander bedrijfsafval voor verwijdering. Dutch 1 3 Installation Guide - Samsung HD321LJ | User Manual (ENGLISH) - Page 36
ESD beschermende verpakking. - Werk steeds aan één drive tegelijk. - De drive niet stoten of laten vallen. B_Onderdelen - hard disk drive - ATA interfacekabel - bevestigingsschroeven - installatiehandleiding C_Een back-up maken van uw gegevens Maak een back-up van uw bestanden voordat u de nieuwe - Samsung HD321LJ | User Manual (ENGLISH) - Page 37
Instellen jumperschakelaars Instellen jumperschakelaars Voordat de Samsung hard disk drive wordt geïnstalleerd, moeten de jumpers worden ingesteld zodat deze passen bij de configuratie van uw computersysteem. Zie het volgende schema voor instructies over het instellen van de jumperschakelaars. - Samsung HD321LJ | User Manual (ENGLISH) - Page 38
of moederbord voor het uitvoeren van een upgrade van het BIOS. 2: stel de jumpers van de drive in op de 32 Gb configuratie en installeer de disk manager of een hogere versie. Indien u een jumper nodig heeft, kunt u contact op nemen met het service center of uw dealer of stuur een mail via www. - Samsung HD321LJ | User Manual (ENGLISH) - Page 39
Installatie van de hard disk drive Installatie van de hard disk drive Ga als volgt te werk bij de meeste computersystemen en hard disk drive inbouwtypes. Dutch 5 Red Red Key Slot DC Power Receptor ATA Interface Connector Power Supply Cable from computer power supply (3-Pin or 4-Pin) - Samsung HD321LJ | User Manual (ENGLISH) - Page 40
. d_Plaats de HDD in een 3,5 inch bay en zet de HDD vast met de bijgeleverde schroeven. e_Sluit de kabels aan. 1.Bevestig de ATA interfacekabel in de interfaceaansluiting op de hard disk drive. 2.Bevestig de stroomkabel aan de stroomaansluiting op de hard disk drive. Beide aansluitingen zijn zodanig - Samsung HD321LJ | User Manual (ENGLISH) - Page 41
BIOS instellen (deze procedure kan verschillen per model computer of BIOS) BIOS instellen (deze procedure kan verschillen per model computer of BIOS) A_Schakel uw computersysteem in. Voer tijdens het opstarten het SMOS(BIOS) setup-programma uit. Nieuwere systemen geven meestal een melding zoals " - Samsung HD321LJ | User Manual (ENGLISH) - Page 42
Partitioneren en formatteren Het besturing systeem (OS) installeren Partitioneren en formatteren De nieuw geïnstalleerde hard disk drive moet worden gepartitioneerd en geformatteerd voordat deze kan worden gebruikt. Indien uw besturing systeem (OS) Windows 2000, XP of een hogere versie is, zal uw - Samsung HD321LJ | User Manual (ENGLISH) - Page 43
Grazie per aver scelto un drive per disco rigido Samsung. Questo manuale vi guiderà durante la procedura d'installazione. 1. Prima di iniziare 2 2. Impostazione del pin del ponticello 4 prodotto non deve essere smaltito unitamente ad altri rifiuti commerciali. Italian 1 3 Installation Guide - Samsung HD321LJ | User Manual (ENGLISH) - Page 44
dell'utilizzo. - Toccare i drive uno alla volta. - Non urtare o far cadere il drive. B_Componenti del kit - disco rigido - cavo d'interfaccia ATA - viti per il montaggio - manuale per l'installazione C_Back up dei dati Fare una copia di back up dei propri file prima di installare il nuovo disco - Samsung HD321LJ | User Manual (ENGLISH) - Page 45
Impostazione del pin del ponticello Prima di installare il disco rigido Samsung, i ponticelli devono essere impostati in modo da coincidere con Cable Select *General configuration setting as "Slave" is "Remove the jumper" Italian 3 32GB Clip Configuration Master Slave Cable Select *32GB Clip - Samsung HD321LJ | User Manual (ENGLISH) - Page 46
Si verifica una situazione di system hang quando si tenta di installare un driver con una capacità superiore a 32GB in un PC in cui sono produttore del PC o della scheda madre. In secondo luogo impostate i drive jumper nella configurazione a 32GB clip ed installate il software per la gestione del - Samsung HD321LJ | User Manual (ENGLISH) - Page 47
disco rigido Le fasi seguenti sono tipiche dell'installazione dei sistemi operativi e dell'installazione del disco rigido. Italian 5 Red Red Key Slot DC Power Receptor ATA Interface Connector Power Supply Cable from computer power supply (3-Pin or 4-Pin) - Samsung HD321LJ | User Manual (ENGLISH) - Page 48
. d_Inserire il disco rigido nello scomparto da 3,5" e fissarlo con le viti fornite. e_Connettere i cavi. 1.Attaccare il cavo d'interfaccia ATA al connettore d'interfaccia sul disco rigido. 2.Attaccare il cavo d'alimentazione al connettore d'alimentazione sul disco rigido. Entrambi i connettori sono - Samsung HD321LJ | User Manual (ENGLISH) - Page 49
Impostazione del BIOS Impostazione del BIOS A_Avviare il sistema operativo. Durante la sequenza di startup avviare il programma CMOS(BIOS) per l'installazione. Solitamente i sistemi più recenti visualizzano un messaggio simile a "premere DEL per inizializzare il SETUP" e mostrano come accedere al - Samsung HD321LJ | User Manual (ENGLISH) - Page 50
. Seguire le istruzioni sullo schermo durante l'installazione del sistema operativo. Per ulteriori informazioni far riferimento al sistema operativo e/o al manuale dell'utente. Se il vostro sistema operativo è windows ME o una versione precedente, seguire i passaggi seguenti A_Una volta terminata - Samsung HD321LJ | User Manual (ENGLISH) - Page 51
drive de disco rígido da Samsung. Este manual dar-lhe-á todas as instruções necessárias ao longo do processo de instalação. 1. Antes de começar 2 2. Configurar o jumper 4 3. Instalar a drive de á ser misturado com outros resíduos comerciais para eliminação. Portuguese 1 3 Installation Guide - Samsung HD321LJ | User Manual (ENGLISH) - Page 52
a sujeite a choques. B_Componentes do kit - drive de disco rígido - cabo de interface ATA - parafusos de montagem - guia de instalação C_Fazer cópias de segurança dos dados (Back-up de disco rígido. Consulte o manual de instruções do seu computador e/ou do sistema operativo para mais informações - Samsung HD321LJ | User Manual (ENGLISH) - Page 53
Antes de instalar a drive de disco rígido da Samsung, deve configurar os jumpers de acordo com a configuração do seu sistema informático. Consulte o diagrama seguinte para as instruções de configuração dos jumpers. General Configuration Master Slave Cable Select *General configuration setting - Samsung HD321LJ | User Manual (ENGLISH) - Page 54
, contactando o fabricante do seu PC ou da placa principal. Em segundo lugar, defina os jumpers da drive de acordo com a configuração do clip de 32GB e instale o software de ou superior. If you need a jumper, please contact the nearest service center or mail us via www.samsunghdd.com. 4 Portuguese - Samsung HD321LJ | User Manual (ENGLISH) - Page 55
-se os passos gerais para a montagem de uma drive disco rígido na maioria dos sistemas informáticos. Portuguese 5 Red Red Key Slot DC Power Receptor ATA Interface Connector Power Supply Cable from computer power supply (3-Pin or 4-Pin) - Samsung HD321LJ | User Manual (ENGLISH) - Page 56
e de que têm uma forma compatível com as respectivas fichas de entrada. 1.Ligue o cabo de interface ATA à tomada de interface na drive de disco rígido. (inserir imagem de cabo de interface ATA) 2.Ligue o cabo de alimentação à tomada de alimentação na drive de disco rígido. Ambas as tomadas só podem - Samsung HD321LJ | User Manual (ENGLISH) - Page 57
Configurar o sistema BIOS Configurar o sistema BIOS A_Ligue o seu sistema informático. Durante a sequência de arranque, corra o programa de configuração CMOS(BIOS). Os sistemas mais recentes apresentam tipicamente uma mensagem semelhante a "press DEL to enter SETUP", para mostrar como aceder ao - Samsung HD321LJ | User Manual (ENGLISH) - Page 58
, ou superior, o seu sistema operativo reconhecerá automaticamente a drive de disco rígido. Siga as instruções no ecrã para instalar o sistema operativo. Consulte o manual de instruções do sistema operativo e/ou do computador para mais informações. Se usar o sistema operativo Windows ME ou uma vers - Samsung HD321LJ | User Manual (ENGLISH) - Page 59
Thank you for selecting the Samsung hard disk drive. This manual will guide you through the installation process. - Samsung HD321LJ | User Manual (ENGLISH) - Page 60
-
 1
1 -
 2
2 -
 3
3 -
 4
4 -
 5
5 -
 6
6 -
 7
7 -
8
-
9
-
10
-
11
-
12
-
13
-
14
-
15
-
16
-
17
-
18
-
19
-
20
-
21
-
22
-
23
-
24
-
25
-
26
-
27
-
28
-
29
-
30
-
31
-
32
-
33
-
34
-
35
-
36
-
37
-
38
-
39
-
40
-
41
-
42
-
43
-
44
-
45
-
46
-
47
-
48
-
49
-
50
-
51
-
52
-
53
-
54
-
55
-
56
-
57
-
58
-
59
-
60
 |
 |

BF68-00160B REV03
Additional information can be obtained at
www.samsunghdd.com
SAMSUNG ELECTRONICS CO.,LTD
STORAGE SYSTEM DIVISION
HEAD OFFICE : 94-1, IM SOO-DONG, GUMI-CITY KYUNG BUK, KOREA 730-350