Samsung HG40NC460KF User Manual Ver.1.0 (English)
Samsung HG40NC460KF Manual
 |
View all Samsung HG40NC460KF manuals
Add to My Manuals
Save this manual to your list of manuals |
Samsung HG40NC460KF manual content summary:
- Samsung HG40NC460KF | User Manual Ver.1.0 (English) - Page 1
LED TV Installation manual imagine the possibilities Thank you for purchasing this Samsung product. To receive more complete service, please register your product at www.samsung.com/register Model Serial No. [HC460-ZA]Install-Guide-X0ENG.indd 1 2014-06-05 10:39:04 - Samsung HG40NC460KF | User Manual Ver.1.0 (English) - Page 2
4 inches 4 inches 4 inches Additional Information ✎✎ The appearance of the TV and its accessories may differ from the illustrations in this manual, depending on the TV. ✎✎ Be careful when the you touch the TV. Some parts can be hot. [HC460-ZA]Install-Guide-X0ENG.indd 2 2014-06-05 10:39:04 - Samsung HG40NC460KF | User Manual Ver.1.0 (English) - Page 3
the RJP (Remote Jack Pack 10 yy Setting the Hotel Option Data...12 yy Installing the Wall Mount...31 yy Securing the TV to the Wall...32 yy Anti-theft Kensington Lock...33 yy Specifications...34 yy Dimensions...35 [HC460-ZA]Install-Guide-X0ENG.indd 3 3 English 2014-06-05 10:39:04 - Samsung HG40NC460KF | User Manual Ver.1.0 (English) - Page 4
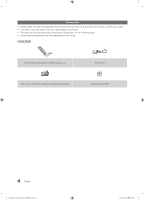
Please make sure the following items are included with your LED TV. If any items are missing, contact your dealer. ✎✎ The List of Parts Remote Control (AA59-00817A) & Batteries (AAA x 2) Safety Guide / Quick Setup Guide (Not available in all locations) Power Cord Holder-Wire stand 1(EA) 4 English - Samsung HG40NC460KF | User Manual Ver.1.0 (English) - Page 5
DO NOT USE CHEMICALS GREASE OIL ✎✎ Place a soft cloth over the table to protect the TV, and then place the TV on the cloth screen-side down. ✎✎ Insert the Stand Guide into the slot on the bottom of the TV. C x4 (M4 x 12) ✎✎ NOTE • Make sure to distinguish between the front and back of - Samsung HG40NC460KF | User Manual Ver.1.0 (English) - Page 6
TV, lets you control the TV without the remote control. Selecting the Media Play Selecting the Menu Select a source. Function menu Return Power off Remote control sensor TV Controller The image is drawn as if you are facing the front side of the TV Your TV enters leave your TV in standby - Samsung HG40NC460KF | User Manual Ver.1.0 (English) - Page 7
Service connection. 2 PC/ DVI AUDIO IN: Connects to the audio input jacks on an Amplifier/Home Theater. 3 PC IN: Connect to the video output jack on your computer. 4 ANT IN, (AIR/CABLE) -- To view television channels correctly, the TV HC460-ZA]Install-Guide-X0ENG.indd 7 7 English 2014-06-05 10:39:06 - Samsung HG40NC460KF | User Manual Ver.1.0 (English) - Page 8
Contents Home. Press to display channel and TV information on the TV screen. Exit the menu. Use these buttons according to the directions on screen (to perform a function, display a screen, etc.). Use these buttons in a specific feature. 8 English [HC460-ZA]Install-Guide-X0ENG.indd 8 2014-06-05 10 - Samsung HG40NC460KF | User Manual Ver.1.0 (English) - Page 9
: AAA) Match the polarity of the batteries to the symbol in the batter compartment. ✎✎ NOTE • Use the remote control within 23~33 feet of the TV. • Bright light may affect the performance of the remote control. Avoid using near fluorescent lights or neon signs. • The color and shape of the remote - Samsung HG40NC460KF | User Manual Ver.1.0 (English) - Page 10
RJP Rear USB HDMI S-VIDEO RCA AUDIO/PC TV Rear Panel (5V 0.5A) / CLONING RS/232 3 VIDEO AUDIO AV IN EX-LINK HDMI IN (DVI) 1 Video / Audio Cable 2 HDMI Cable PC / DVI AUDIO IN ANT IN PC IN 10 English [HC460-ZA]Install-Guide-X0ENG.indd 10 2014-06-05 10:39 - Samsung HG40NC460KF | User Manual Ver.1.0 (English) - Page 11
TV to the HDMI port of the RJP. 3. Connect the EX-LINK port of the TV to the RS/232 port of the RJP. ✎✎ This Samsung TV TV. The RJP communicates with the TV via RS232. The RJP communicates with the TV the TV will TV automatically manually supported by the AV jack only. HDMI Music mode is - Samsung HG40NC460KF | User Manual Ver.1.0 (English) - Page 12
corner of the menu. 2. Press the left or right arrow button on the Samsung remote. Only the Hospitality Mode menu item is displayed. 3. Press the left the values in one TV, you can clone those values to multiple TVs. See USB Cloning on page 19. 12 English [HC460-ZA]Install-Guide-X0ENG.indd 12 2014 - Samsung HG40NC460KF | User Manual Ver.1.0 (English) - Page 13
: Lets you set the Power On Volume manually. See Power On Volume below. • Last Saved : When the TV is turned on, it returns to the accessible, but additional channel Programme number update is not supported) Picture Menu Lock OFF Enable or disable the Guide-X0ENG.indd 13 2014-06-05 10:39:08 - Samsung HG40NC460KF | User Manual Ver.1.0 (English) - Page 14
or set the clock manually when the TV is in stand-alone samsung.bmp or samsung.avi. ... Hospitality Logo Display Time (3/5/7 seconds). - Clone the current TV options to a USB memory device. - Clone the saved TV options on a USB memory device to the TV Guide-X0ENG.indd 14 2014-06-05 10:39:08 - Samsung HG40NC460KF | User Manual Ver.1.0 (English) - Page 15
TV SW Update Service Pattern ATV Cable AGC Gain DTV OpenCable AGC Gain Contact Samsung TV manual TV to the TV : • support. OFF : Turns off CAS support. LYNK DRM : Select to turn on S-LYNK DRM CAS support only. Enter Self Diagnosis Menu. • Picture Test: Use to check for picture problems. If the problem - Samsung HG40NC460KF | User Manual Ver.1.0 (English) - Page 16
Welcome Message to ON to display the message when the TV is powered on. Welcome Message OFF Edit Welcome Message characters long and edit it in the Hotel Service menu. -- Welcome Message supports the following characters: ✎✎ Capital Letters from A -Guide-X0ENG.indd 16 2014-06-05 10:39:08 - Samsung HG40NC460KF | User Manual Ver.1.0 (English) - Page 17
appears and there is a logo file on the USB device, check the file format. yy Logo File Format -- The TV supports only BMP and AVI format. -- The file name must be samsung.bmp or samsung.avi. -- The maximum resolution of the BMP format is 1280 x 720. -- The maximum file size for AVI format is - Samsung HG40NC460KF | User Manual Ver.1.0 (English) - Page 18
Failed: Copy operation was not successful. • No USB: USB is not connected. Clone TV to USB Clone USB to TV Setting Auto Initialize OFF The clone folder will be labeled T-NT14LAKUCB. ✎✎ The cloned values on the next page. 18 English [HC460-ZA]Install-Guide-X0ENG.indd 18 2014-06-05 10:39:09 - Samsung HG40NC460KF | User Manual Ver.1.0 (English) - Page 19
Pop-up Screen External Source Banner Auto source Anynet+Return Source Energy saving Welcome Message Edit Welcome Message Hospitality Logo [HC460-ZA]Install-Guide-X0ENG.indd 19 Cloning Support Yes Yes Yes Yes Yes Yes Yes Yes Yes Yes Yes N/A N/A N/A Yes Yes Yes Yes Yes N/A Yes N/A Yes Yes Yes Yes Yes - Samsung HG40NC460KF | User Manual Ver.1.0 (English) - Page 20
Reset Security Mode USB HDMI DRM Mode Self Diagnosis for TV SW Update Service Pattern ATV Cable AGC Gain DTV OpenCable AGC Gain Contact Samsung TV reset Cloning Support Yes Yes Yes Yes Yes Yes Yes Yes Yes No US and US Hospita ALL 20 English [HC460-ZA]Install-Guide-X0ENG.indd 20 2014-06-05 10:39:09 - Samsung HG40NC460KF | User Manual Ver.1.0 (English) - Page 21
MUTE button and the EXIT button simultaneously for more than 7 seconds. When you stop pressing the buttons, the ID codes of the TV and Remote are reset to "0". "Remote control code is set to 0." appears on the TV. [HC460-ZA]Install-Guide-X0ENG.indd 21 21 English 2014-06-05 10:39:09 - Samsung HG40NC460KF | User Manual Ver.1.0 (English) - Page 22
, Setup, and Hotel Setup. This lets you set nearly all of the menu values on your hospitality TVs to the same, standard settings. If you allow guests access to the guest side menus, for example the Turn Off DivX® Video On Demand 22 English [HC460-ZA]Install-Guide-X0ENG.indd 22 2014-06-05 10:39:09 - Samsung HG40NC460KF | User Manual Ver.1.0 (English) - Page 23
Service Reset. Self Diagnosis for TV SW Update Service Pattern ATV cable AGC Gain DTV OpenCable AGC Gain Contact Samsung TV Reset OFF Default Default If you select Factory Reset, the TV 0 Cable 0 Change Settings Scan Again 23 English [HC460-ZA]Install-Guide-X0ENG.indd 23 2014-06-05 10:39:10 - Samsung HG40NC460KF | User Manual Ver.1.0 (English) - Page 24
channels, set the Clock Mode to Manual, and then set the date and time on the TV manually. -- Set DST On or Off to apply or not apply daylight saving time to the TV. -- Select your time zone on the map appears. 24 English [HC460-ZA]Install-Guide-X0ENG.indd 24 2014-06-05 10 - Samsung HG40NC460KF | User Manual Ver.1.0 (English) - Page 25
: 1. Insert a USB drive containing the SW upgrade into the USB port on the side of the TV. 2. Press the MENU button to display the menu. USB (5V 0.5A) Press the u or d button to select Support, and then press the ENTER E button. / CLONING 3. Press the u or d button to select SW Upgrade, and - Samsung HG40NC460KF | User Manual Ver.1.0 (English) - Page 26
Editor (Smoovie TV Only) The Enter the "Channel Bank Editor". Hospitality Mode SI Vendor Standalone SIRCH OFF Service d SI Vendor Smoovie d SI Vendor Smoovie SI Vendor d Smoovie - Samsung HG40NC460KF | User Manual Ver.1.0 (English) - Page 27
P&P (including Air or Cable auto tune) Enter the Hotel menu Select the channel type 2 After P&P, the TV displays the Hotel menu - ATV or ADTV for Air - CATV or CDTV for cable Select the channel type Editor screen. 27 English [HC460-ZA]Install-Guide-X0ENG.indd 27 2014-06-05 10:39:11 - Samsung HG40NC460KF | User Manual Ver.1.0 (English) - Page 28
On, Channel Editor will display no digital channels. You must set Dynamic SI to Off before you can edit digital channels in Channel Editor. • The guide at the bottom of the Channel Editor menu displays the remote buttons you need to press to apply Channel Editor functions. 1 Using the remote's up - Samsung HG40NC460KF | User Manual Ver.1.0 (English) - Page 29
/aD_ Space ◄► ab gh mn st A/a c Dodne e Cafncel 1 2 3 i j a Dkelete l { S4pace 5 R Re6turn opqr 789 uvwxy z 0 Space ◄► Done Cancel a Delete { Space R Return 29 English [HC460-ZA]Install-Guide-X0ENG.indd 29 2014-06-05 10:39:12 - Samsung HG40NC460KF | User Manual Ver.1.0 (English) - Page 30
shown in the example below. In the example, there are two external sources connected to the TV, HDMI2 (DVI) and AV. -- You can assign a new analog channel to an external source a 997 a a a Delete b Select All U Page E Select 30 English [HC460-ZA]Install-Guide-X0ENG.indd 30 2014-06-05 10:39:12 - Samsung HG40NC460KF | User Manual Ver.1.0 (English) - Page 31
is not liable for these kinds of accidents. • Samsung is not liable for product damage or personal injury when a non-VESA or non-specified wall mount is used or the consumer fails to follow the product installation instructions. • Do not mount the TV at more than a 15 degree tilt. • Always have - Samsung HG40NC460KF | User Manual Ver.1.0 (English) - Page 32
follows. To Avoid the TV from Falling 1. Put TV. 4. Verify all connections are properly secured. Periodically check connections for any sign of fatigue for failure. If you have any doubt about the security of your connections, contact a professional installer. 32 English [HC460-ZA]Install-Guide - Samsung HG40NC460KF | User Manual Ver.1.0 (English) - Page 33
manual provided with the Kensington Lock for additional information on proper use. The Kensington Lock is not supplied by Samsung. ✎✎ Please find a "K" icon on the rear of the TV lock. ✎✎ These are general instructions. For exact instructions, see the User manual supplied with the locking device. - Samsung HG40NC460KF | User Manual Ver.1.0 (English) - Page 34
(9.1 kg) 21.8 lbs (9.9 kg) ✎✎ Design and specifications are subject to change without prior notice. ✎✎ This device is a Class B digital apparatus. 34 English [HC460-ZA]Install-Guide-X0ENG.indd 34 2014-06-05 10:39:13 - Samsung HG40NC460KF | User Manual Ver.1.0 (English) - Page 35
7.7 3.6 HG48NC460 42.6 41.6 23.4 25.1 26.7 8.0 3.6 • Jack panel detail / Rear view 6 4 5 1 2 HG40NC460 7.9 7.9 HG48NC460 7.9 7.9 1 2 3 3 4 22.9 7.9 26.3 11.2 (Unit: inches) 5 6 6.3 10.7 8.2 12.6 [HC460-ZA]Install-Guide-X0ENG.indd 35 35 English 2014-06-05 10:39:13 - Samsung HG40NC460KF | User Manual Ver.1.0 (English) - Page 36
18.5 • Base Stand detail HG40NC460 (Unit: inches) 15.1 HG48NC460 (Unit: inches) 12.3 18.5 21.9 15.1 14.1 12.3 21.9 21.9 36 English [HC460-ZA]Install-Guide-X0ENG.indd 36 8 7.7 6.4 8 8.9 7.7 6.4 6.4 8.9 8.9 6 6 4.9 6 6.0 6 7.1 4.9 7.1 6.0 2014-06-05 10:39:13 - Samsung HG40NC460KF | User Manual Ver.1.0 (English) - Page 37
TV. Not responsible for typographical or printed errors. © 2014 Samsung Electronics SAMSUNG Authorized Service Center, please call toll-free: -- In the United States : 1-866-894-0524 -- In Canada : 1-800-213-8513 Disconnecting Device Instructions Guide-X0ENG.indd 37 37 English 2014-06-05 10:39:13 - Samsung HG40NC460KF | User Manual Ver.1.0 (English) - Page 38
This page is intentionally left blank. [HC460-ZA]Install-Guide-X0ENG.indd 38 2014-06-05 10:39:13 - Samsung HG40NC460KF | User Manual Ver.1.0 (English) - Page 39
.samsung.com/ca_fr/support (French) Address Samsung Electronics Canada Inc. 2050 Derry Road West, Mississauga, Ontario L5N 0B9 Canada U.S.A 1-800-SAMSUNG (726-7864) www.samsung.com/us/support Samsung Electronics America, Inc. 85 Challenger Road Ridgefield Park, NJ 07660 [HC460-ZA]Install-Guide
-
 1
1 -
 2
2 -
 3
3 -
 4
4 -
 5
5 -
 6
6 -
 7
7 -
8
-
9
-
10
-
11
-
12
-
13
-
14
-
15
-
16
-
17
-
18
-
19
-
20
-
21
-
22
-
23
-
24
-
25
-
26
-
27
-
28
-
29
-
30
-
31
-
32
-
33
-
34
-
35
-
36
-
37
-
38
-
39
 |
 |

LED TV
Installation manual
imagine the possibilities
Thank you for purchasing this Samsung product.
To receive more complete service, please
register your product at
www.samsung.com/register
Model
Serial No.
[HC460-ZA]Install-Guide-X0ENG.indd
1
2014-06-05
°° 10:39:04