Samsung HT-WX70 Quick Guide (easy Manual) (ver.1.0) (English) - Page 25
DivX (R) Registration, Setting the Speaker Mode, Setting the Delay Time - surround sound
 |
View all Samsung HT-WX70 manuals
Add to My Manuals
Save this manual to your list of manuals |
Page 25 highlights
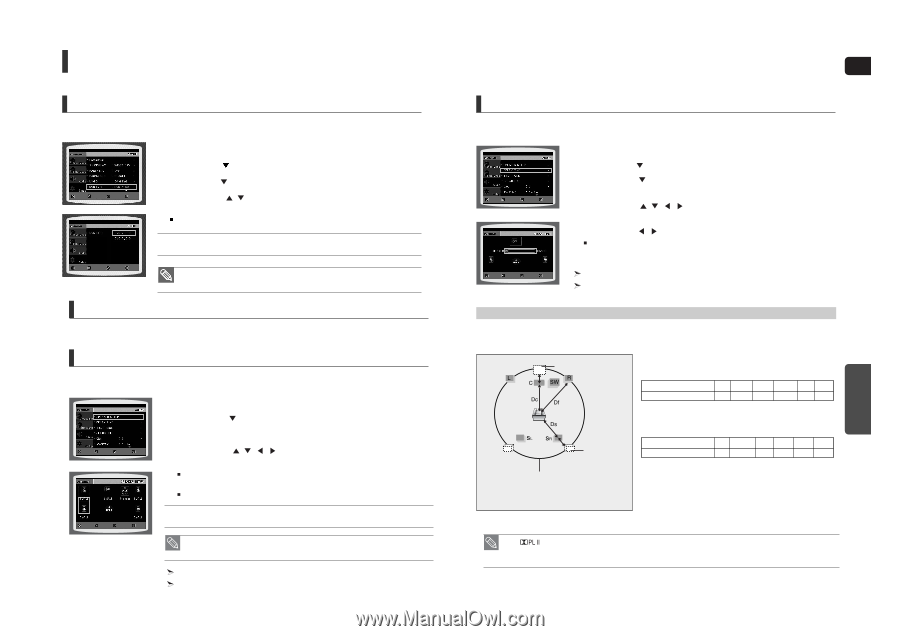
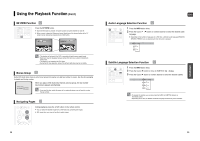
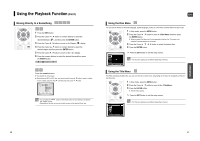
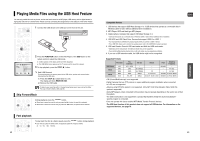
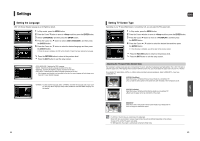
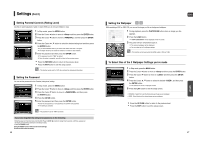
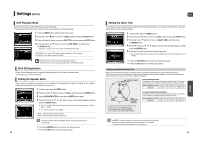
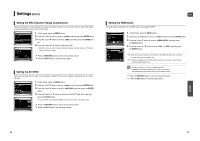
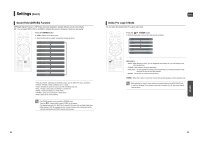
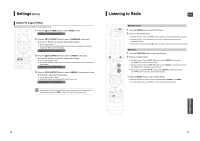
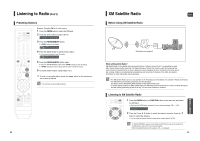
Settings (Con't) DVD Playback Mode Some DVD-Audio discs contain DVD-Video as well as DVD-Audio. To play back the DVD-Video portion of the DVD-Audio disc, set the unit to DVD-Video mode. 1 Press the MENU button while the disc tray is open. 2 Press the Cursor button to move to and then press the ENTER button. 3 Press the Cursor button to move to and then press the ENTER button. MOVE ENTER RETURN EXIT 4 Press the Cursor , button to move to and then press the ENTER button. Set steps 1 ~ 4 again if you want to switch to DVD AUDIO Play mode. • DVD VIDEO : set to play the DVD video contents contained on a DVD audio disc. • DVD AUDIO : set to play the default DVD audio. MOVE ENTER RETURN EXIT • DVD Play mode is set to DVD Audio as factory default setting. • Powering off the main unit will automatically switch to the DVD Audio mode. DivX (R) Registration Please use the Registration code to register this player with the DivX (R) video on demand format. To learn more, go to www.divx.com/vod. Setting the Speaker Mode Signal outputs and frequency responses from the speakers will automatically be adjusted according to your speaker configuration and whether certain speakers are used or not. 1 In Stop mode, press the MENU button. 2 Press the Cursor button to move to and then press the ENTER button. 3 In the , press the the ENTER button again. MOVE ENTER RETURN EXIT 4 Press the Cursor , , , button to move to the desired speaker and then press the ENTER button. For C, SL, and SR, each time the button is pressed, the mode switches alternately as follows : SMALL ➝ NONE. For L and R, the mode is set to SMALL. MOVE CHANGE RETURN EXIT • SMALL : Select this when using the speakers. • NONE : Select this when no speaker is connected. • Depending on PRO LOGIC and STEREO settings, the speaker mode may vary (see page 55). Press the RETURN button to return to the previous level. Press the EXIT button to exit the setup screen. 48 ENG Setting the Delay Time If the speakers cannot be placed at equal distances from the listening position, you can adjust the delay time of the audio signals from the center and rear speakers. MOVE ENTER RETURN EXIT 1 In Stop mode, press the MENU button. 2 Press the Cursor button to move to and then press the ENTER button. 3 Press the Cursor button to move to and then press the ENTER button. 4 Press the Cursor , , , button to move to the desired speaker and then press the ENTER button. 5 Press the Cursor , button to set the Delay time. You can set the delay time for C between 00 and 05mSEC and for SL and SR between 00 and 15mSEC. MOVE CHANGE RETURN EXIT Press the RETURN button to return to the previous level. Press the EXIT button to exit the setup screen. Setting up the Speaker Delay Time When 5.1CH Surround Sound is played, you can enjoy the best sound if the distance between you and each speaker is the same. Since the sounds arrive at the listening position at different times depending on the placement of speakers, you can adjust this difference by adding a delay effect to the sound of the Center and Surround Speakers. Ideal CENTER SPEAKER placement Setting CENTER SPEAKER If the distance of Dc is equal to or longer than the distance of Df in the figure, set the mode as 0ms. Otherwise, change the setting according to the table. Distance between Df and Dc 0 inch 13.6 inches 27.2 inches 40.8 inches 4.5 feet 5.6 feet Delay Time 0 ms 1 ms 2 ms 3 ms 4 ms 5 ms Ideal SURROUND SPEAKER placement It is desirable to place all speakers within this circle. Df: The distance from FRONT SPEAKER Dc: The distance from CENTER SPEAKER Ds: The distance from SURROUND SPEAKER Setting REAR (SURROUND) SPEAKERS If the distance of Df is equal to the distance of Ds in the figure, set the mode as 0ms. Otherwise, change the setting according to the table. Distance between Df and Dc 0 inch 40.8 inches 6.7 feet 10.0 feet 13.4 feet 16.7 feet Delay Time 0 ms 3 ms 6 ms 9 ms 12 ms 15 ms SETUP • With (Dolby Pro Logic II), the delay time may be different for each mode. • With AC-3 and DTS, the delay time can be set between 00 and 15mSEC. • The Center channel is only adjustable on 5.1 channel discs. 49
-
 1
1 -
2
-
3
-
4
-
5
-
6
-
7
-
8
-
9
-
10
-
11
-
12
-
13
-
14
-
15
-
16
-
17
-
18
-
19
-
 20
20 -
 21
21 -
 22
22 -
 23
23 -
 24
24 -
 25
25 -
 26
26 -
 27
27 -
 28
28 -
 29
29 -
 30
30 -
31
-
32
-
33
-
34
-
35
-
36
-
37
 |
 |