Samsung LN40B650 Quick Guide (ENGLISH)
Samsung LN40B650 - 39.9" LCD TV Manual
 |
UPC - 036725229365
View all Samsung LN40B650 manuals
Add to My Manuals
Save this manual to your list of manuals |
Samsung LN40B650 manual content summary:
- Samsung LN40B650 | Quick Guide (ENGLISH) - Page 1
to display menu. You can set the picture size by selecting 'Picture → Picture Options → Size'. And press the ▲ or ▼ button to select the screen format you want. (16:9 / Zoom1 / Zoom2 / Wide Fit / 4:3 / Screen Fit) O Alternately, you can press the P.SIZE button on the remote control repeatedly to - Samsung LN40B650 | Quick Guide (ENGLISH) - Page 2
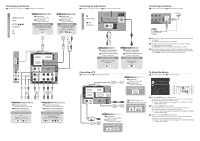
audio device SP Conexión de un dispositivo de audio / FR Branchement d'un appareil audio HD connection (up to 1080p ètres de base sont automatiquement régl AUDIO OUT PC OUT EN Press the SOURCE button on the Remote Control You can select the TV mode or an input source connected to the TV set
-
 1
1 -
 2
2
 |
 |
Configuring the Picture Menu
SP
Configuración del menú de imagen /
FR
Configuration du menu Picture
Mode
SP
Modo /
FR
Mode
❑
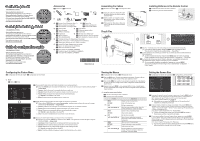
Accessories
SP
Accesorios /
FR
Accessoires
1
EN
Remote Control & Batteries (AAA x 2)
SP
Mando a distancia y 2 pilas AAA
FR
Télécommande et deux piles AAA
2
EN
Power Cord
SP
Cable de alimentación
FR
Cordon d’alimentation
3
EN
Cleaning Cloth
SP
Paño de limpieza
FR
Chiffon de nettoyage
4
EN
Cover-Bottom
SP
Cubierta del agujero inferior
FR
Couvre base
5
EN
Program CD
SP
CD del programa
FR
CD de programmation
6
EN
Warranty Card / Safety Guide
SP
Tarjeta de garantía / Guía de seguridad
FR
Carte de garantie / Guide de sécurité
7
EN
TV-Holder & Screw X1 (Depending on the model)
SP
Soporte del televisor y tornillos X1 (Depende del Modelo)
FR
Support pour téléviseur et vis X1 (Selon le modèle)
8
EN
Holder-Wire Cable (Depending on the model)
SP
Soporte de cables (Depende del Modelo)
FR
Câble porte-fil (Selon le modèle)
9
EN
Stand Screw X4 (LN40B650, LN46B650)
SP
Tornillo del soporte X4 (LN40B650, LN46B650)
FR
Vis de pied X4 (LN40B650, LN46B650)
Plug & Play
EN
When the TV is initially powered on, basic settings proceed automatically and subsequently.
If you want to reset this feature. Press the
MENU
button to display the menu.
You can set the Plug & Play by selecting ‘Setup → Plug & Play’.
SP
Cuando el televisor se enciende por primera vez, los valores se inician correlativamente de
forma automática.
Si desea reiniciar esta función. Pulse el botón
MENU
para ver el menú en pantalla.
Puede configurar la función Plug & Play seleccionando ‘Configuración → Plug & Play’.
FR
Au moment de la mise sous tension initiale du téléviseur, les paramètres de base sont
automatiquement réglés. D’autres sont réglés en cours d’utilisation.
Si vous souhaitez réinitialiser ce paramètre. Appuyez sur la touche
MENU
.
Vous pouvez configurer la fonction Plug & Play en sélectionnant ‘Configuration →
Prêt à I’emploi’.
N
N
N
1-800-SAMSUNG (7267864)
Samsung Electronics America, Inc.
105 Challenger Road Ridgefield Park, NJ 07660-0511
Samsung Electronics Canada Inc., Customer Service
55 Standish Court Mississauga, Ontario L5R 4B2
Call center hours of operation (Mon-Sun 9AM-12AM EST).
To register this product please visit
www.samsung.com/global/register.
Quick Setup Guide
STOP
Please do not return
this unit
If you are having problems operating
this TV,
Please call;
1-800-SAMSUNG (1-800-726-7864)
For web support please visit
www.samsung.com/support
Setting the Screen Size
SP
Configuración del tamaño de la pantalla /
FR
Configuration du format de l’écran
EN
If you want to change the size of the image on your screen.
Press the
MENU
button to
display menu. You can set the picture size by selecting ‘Picture → Picture Options →
Size’.
And press the ▲ or ▼ button to select the screen format you want.
(16:9 / Zoom1 / Zoom2 / Wide Fit / 4:3 / Screen Fit)
Alternately, you can press the
P.SIZE
button on the remote control
repeatedly to change the picture size.
O
SP
Si desea cambiar el tamaño de la imagen en la pantalla. Pulse el botón
MENU
para
visualizar el menú. También se puede configurar el modo de la imagen seleccionando
‘Imagen → Opciones de imagen → Tamaño’. Pulse los botones ▲ o ▼ para seleccionar
el formato de pantalla que desee.
(16:9 / Zoom1 / Zoom2 / Ajuste ancho / 4:3 / Ajuste pantalla)
También se puede pulsar varias veces el botón
P.SIZE
del mando a
distancia para cambiar el tamaño de la imagen.
O
FR
Si vous désirez modifier le format de l’image à l’écran, appuyez sur la touche
MENU
.
Le menu s’affiche. Vous pouvez choisir le format de l’image en sélectionnant ‘Image →
Options d’image → Format’. Appuyez ensuite sur les touches ▲ ou ▼ pour sélectionner
le format d’écran désiré.
(16:9 / Zoom1 / Zoom2 / Format large / 4:3 / Plein écran)
Vous pouvez également appuyer plusieurs fois sur la touche
P.SIZE
de la
télécommande pour changer le format de l’image.
O
1-800-SAMSUNG (7267864)
Samsung Electronics America, Inc.
105 Challenger Road Ridgefield Park, NJ 07660-0511
Samsung Electronics Canada Inc., Service à la clientèle
55 Standish Court Mississauga, Ontario L5R 4B2
Heures d’ouverture du centre d’appel : du lundi au
dimanche, de 9 h à 12 h (HNE)
Pour enregistrer ce produit, veuillez visiter
www.samsung.com/global/register.
Guide de configuration rapide
ARRÊT
Veuillez ne pas
retourner cet appareil.
Si vous avez des problèmes avec ce téléviseur :
composez le :
1-800-SAMSUNG (1-800-726-7864)
Pour obtenir de l’assistance en ligne, visitez :
www.samsung.com/support
1-800-SAMSUNG (7267864)
Samsung Electronics America, Inc.
105 Challenger Road Ridgefield Park, NJ 07660-0511
Samsung Electronics Canada Inc., Servicio de atención al cliente
55 Standish Court Mississauga, Ontario L5R 4B2
Horario de atención del centro de servicio (Lun-dom 9 AM-12 AM ESTE).
Para registrar este producto, visite
www.samsung.com/global/register.
STOP
No devuelva esta
unidad
Si tiene problemas con el funcionamiento
del televisor,
llame a:
1-800-SAMSUNG (1-800-726-7864)
Para obtener ayuda a través de la web, visite
www.samsung.com/support
Guía rápida de configuración
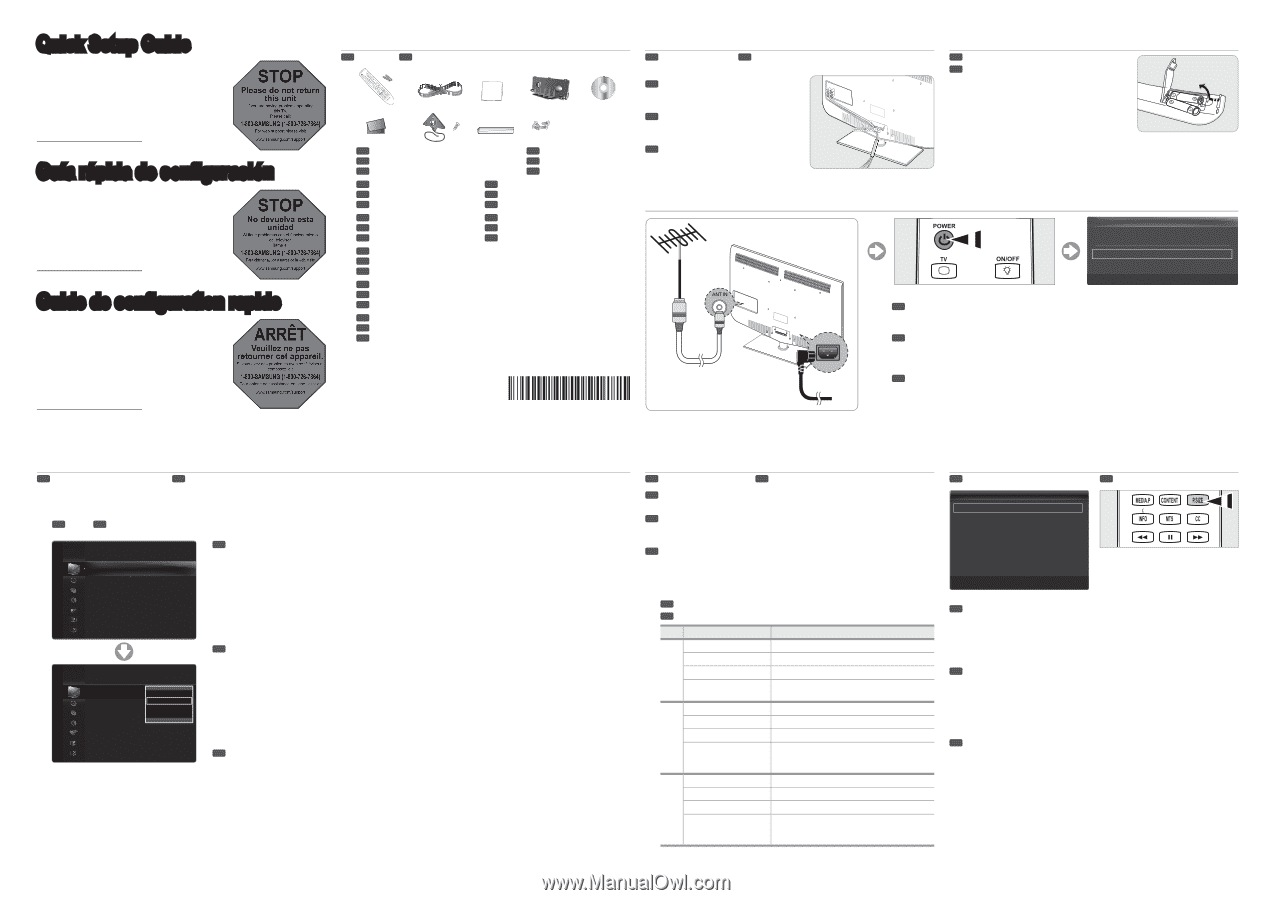
Viewing the Menus
SP
Visualización de los menús /
FR
Affichage des menus
EN
Press the
MENU
button. The main menu appears on the screen. The menu’s left side
has icons: Picture, Sound, Channel, Setup, Input, Application, Support
SP
Pulse el botón
MENU
. Se muestra el menú principal en la pantalla. En el lado izquierdo
del menú hay los iconos: Imagen, Sonido, Canal, Configuración, Entrada, Aplicaciones,
Soporte técnico
FR
Appuyez sur la touche
MENU
. Le menu principal s’affiche à l’écran. La partie gauche
du menu comprend des icônes: Image, Son, Chaîne, Configuration, Entrée, Application,
Support technique
Using the remote control buttons
SP
Uso de los botones del mando a distancia
FR
Les touches de la télécommande
Button
Operations
EN
MENU
Display the main on-screen menu.
RETURN
Return to the previous menu.
EXIT
Exit the on-screen menu.
▲/▼/◄/►/
ENTER
E
Move the cursor and select an item. Select the
currently selected item. Confirm the setting.
SP
MENU
Mostrar el menú de pantalla principal.
RETURN
Volver al menú anterior.
EXIT
Salir del menú en pantalla.
▲/▼/◄/►/
ENTER
E
Mover el cursor y seleccionar una opción.
Seleccionar la opción marcada. Confirmar la
configuración.
FR
MENU
Affiche le menu à l’écran principal.
RETURN
Permet de retourner au menu précédent.
EXIT
Quitte le menu de l’écran.
▲/▼/◄/►/
ENTER
E
Permet de déplacer le curseur et de choisir un
élément. Permet de sélectionner l’élément en
surbrillance. Confirme le réglage.
❑
Assembling the Cables
SP
Montaje de los cables /
FR
Assemblage des câbles
EN
Enclose the cables in the Holder-Wire Cable
so that the cables are not visible through the
transparent stand.
SP
Sujete los cables con el soporte de cables
para que éstos no sean visibles a través del
soporte transparente.
FR
Faites passer les câbles dans le câble porte-
fil pour ne pas les voir au travers du support
transparent.
Installing Batteries in the Remote Control
SP
Instalación de las pilas en el mando a distancia
FR
Insertion des piles dans la télécommande
BN68-01901A-00
EN
You can select the type of picture which best corresponds to your viewing requirements.
Press the
TOOLS
button to display the
Tools
menu. You can also set the picture mode by selecting
Tools →
Picture Mode
.
Dynamic:
Selects the picture for increased definition in a bright room.
Standard:
Selects the picture for the optimum display in a normal environment.
Natural:
Selects the picture for an optimum and eye-comfortable display.
Natural
is not available in PC mode.
Movie:
Selects the picture for viewing movies in a dark room.
T
■
■
■
N
■
SP
Puede seleccionar el tipo de imagen que mejor cumpla sus requisitos de visualización.
Pulse el botón
TOOLS
para ver el menú
Herramientas
. También puede configurar el modo de la imagen
seleccionando
Herramientas → Imagen Modo
.
Dinámico:
Selecciona la visualización con una definición mejorada, en una habitación luminosa.
Normal:
Selecciona la visualización óptima de la imagen, en un entorno normal.
Natural:
Selecciona la visualización óptima y más confortable de la imagen.
Natural
no está disponible en los modo PC.
Cine:
Selecciona la visualización para ver películas en una sala oscura.
T
■
■
■
N
■
FR
Vous pouvez choisir le type d’image qui correspond le mieux à vos exigences.
Appuyez sur la touche
TOOLS
pour afficher le menu
Outils
. Il est également possible de régler l’image en
choisissant
Outils → Image mode.
Dynamique:
Choisit l’image offrant une meilleure définition dans une pièce claire.
Standard:
Choisit la meilleure image possible dans un environnement normal.
Naturel:
Sélectionne une qualité d’image optimale qui réduit la fatigue visuelle.
Naturel
n’est pas disponible en mode PC.
Movie:
Choisit une définition d’image pour regarder des films dans une pièce sombre.
T
■
■
■
N
■
Mode
: Standard
▶
Backlight
: 7
Contrast
: 95
Brightness
: 45
Sharpness
: 50
Color
: 50
Tint (G/R)
: G50/R50
Advanced Settings
Picture
Mode
: Standard
Backlight
: 7
Contrast
: 95
Brightness
: 45
Sharpness
: 50
Color
: 50
Tint (G/R)
: G50/R50
Advanced Settings
Picture
Dynamic
Standard
Natural
Movie
Color Tone
: Normal
▶
Size
: 16:9
Digital NR
: Auto
HDMI Black Level
: Normal
Film Mode
: Off
Blue Only Mode
: Off
Auto Motion Plus 120Hz
: Medium
U
Move
E
Enter
R
Return
Picture Options
Plug & Play
E
Enter
Select Language of the OSD.
Language
: English
▶
1
2
3
4
5
6
7
8
9
(M4xL16)
(M4xL16)