Samsung ML-2165W User Manual (user Manual) (ver.1.0) (English) - Page 124
Setting the access point using the WPS button
 |
View all Samsung ML-2165W manuals
Add to My Manuals
Save this manual to your list of manuals |
Page 124 highlights
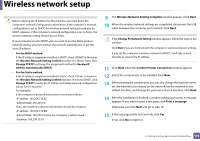
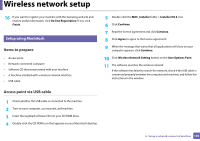
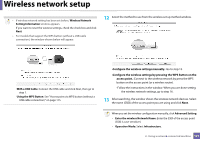
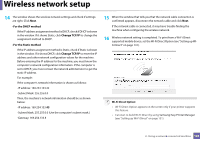
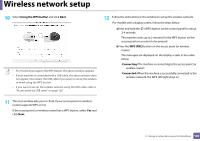
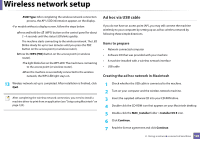
Wireless network setup • Network Name(SSID): The default Network Name is the model name and the maximum length is 22 characters (not including "Direct-xx-"). • Network Key is the numeric string, and the size is 8 ~ 64 characters. 17 When the wireless network settings are completed, disconnect the USB cable between the computer and machine. 18 Wireless network set up is completed. After the installation is finished, click Quit. After completing the wireless network connection, you need to install a machine driver to print from an application (see "Installation for Macintosh" on page 83). Setting the access point using the WPS button For models that have a WPS button, you can set the wireless network using the WPS button (without a USB connection) and access point (or a router) WPS button. • Software CD that was provided with your machine • A machine installed with a wireless network interface Creating the infrastructure network 1 Turn on your computer, access point, and machine. 2 Insert the supplied software CD into your CD-ROM drive. 3 Double-click the CD-ROM icon that appears on your Macintosh desktop. 4 Double-click the MAC_Installer folder > Installer OS X icon. 5 Click Continue. 6 Read the license agreement and click Continue. 7 Click Agree to agree to the license agreement. 8 When the message that warns that all applications will close on your computer appears, click Continue. 9 Click the Wireless Network Setting button on the User Options Pane. Items to prepare • Access point (or wireless router) • Network-connected computer 2. Using a network-connected machine 124
-
 1
1 -
2
-
3
-
4
-
5
-
6
-
7
-
8
-
9
-
10
-
11
-
12
-
13
-
14
-
15
-
16
-
17
-
18
-
19
-
20
-
21
-
22
-
23
-
24
-
25
-
26
-
27
-
28
-
29
-
30
-
31
-
32
-
33
-
34
-
35
-
36
-
37
-
38
-
39
-
40
-
41
-
42
-
43
-
44
-
45
-
46
-
47
-
48
-
49
-
50
-
51
-
52
-
53
-
54
-
55
-
56
-
57
-
58
-
59
-
60
-
61
-
62
-
63
-
64
-
65
-
66
-
67
-
68
-
69
-
70
-
71
-
72
-
73
-
74
-
75
-
76
-
77
-
78
-
79
-
80
-
81
-
82
-
83
-
84
-
85
-
86
-
87
-
88
-
89
-
90
-
91
-
92
-
93
-
94
-
95
-
96
-
97
-
98
-
99
-
100
-
101
-
102
-
103
-
104
-
105
-
106
-
107
-
108
-
109
-
110
-
111
-
112
-
113
-
114
-
115
-
116
-
117
-
118
-
 119
119 -
 120
120 -
 121
121 -
 122
122 -
 123
123 -
 124
124 -
 125
125 -
 126
126 -
 127
127 -
 128
128 -
 129
129 -
130
-
131
-
132
-
133
-
134
-
135
-
136
-
137
-
138
-
139
-
140
-
141
-
142
-
143
-
144
-
145
-
146
-
147
-
148
-
149
-
150
-
151
-
152
-
153
-
154
-
155
-
156
-
157
-
158
-
159
-
160
-
161
-
162
-
163
-
164
-
165
-
166
-
167
-
168
-
169
-
170
-
171
-
172
-
173
-
174
-
175
-
176
-
177
-
178
-
179
-
180
-
181
-
182
-
183
-
184
-
185
-
186
-
187
-
188
-
189
-
190
-
191
-
192
-
193
-
194
-
195
-
196
-
197
-
198
-
199
-
200
-
201
-
202
-
203
-
204
-
205
-
206
-
207
-
208
-
209
-
210
-
211
 |
 |