Samsung ML-3712DW User Manual (user Manual) (ver.1.02) (English) - Page 122
HP Jetdirect - Socket
 |
View all Samsung ML-3712DW manuals
Add to My Manuals
Save this manual to your list of manuals |
Page 122 highlights
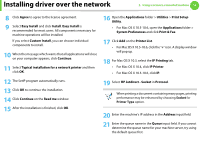
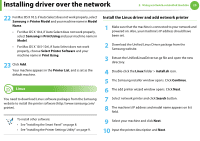
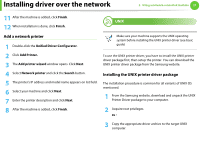
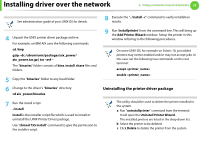
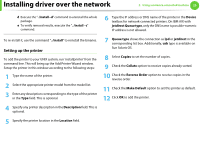
Installing driver over the network 2. Using a network-connected machine 19 8 Click Agree to agree to the license agreement. 9 Select Easy Install and click Install. Easy Install is recommended for most users. All components necessary for machine operations will be installed. If you select Custom Install, you can choose individual components to install. 10 When the message which warns that all applications will close on your computer appears, click Continue. 11 Select Typical installation for a network printer and then click OK. 12 The SetIP program automatically runs. 13 Click OK to continue the installation. 14 Click Continue on the Read me window. 15 After the installation is finished, click OK. 16 Open the Applications folder > Utilities > Print Setup Utility. • For Mac OS X 10.5-10.6, open the Applications folder > System Preferences and click Print & Fax. 17 Click Add on the Printer List. • For Mac OS X 10.5-10.6, click the "+" icon. A display window will pop up. 18 For Mac OS X 10.3, select the IP Printing tab. • For Mac OS X 10.4, click IP Printer. • For Mac OS X 10.5-10.6, click IP. 19 Select HP Jetdirect - Socket in Protocol. When printing a document containing many pages, printing performance may be enhanced by choosing Socket for Printer Type option. 20 Enter the machine's IP address in the Address input field. 21 Enter the queue name in the Queue input field. If you cannot determine the queue name for your machine server, try using the default queue first.
-
 1
1 -
2
-
3
-
4
-
5
-
6
-
7
-
8
-
9
-
10
-
11
-
12
-
13
-
14
-
15
-
16
-
17
-
18
-
19
-
20
-
21
-
22
-
23
-
24
-
25
-
26
-
27
-
28
-
29
-
30
-
31
-
32
-
33
-
34
-
35
-
36
-
37
-
38
-
39
-
40
-
41
-
42
-
43
-
44
-
45
-
46
-
47
-
48
-
49
-
50
-
51
-
52
-
53
-
54
-
55
-
56
-
57
-
58
-
59
-
60
-
61
-
62
-
63
-
64
-
65
-
66
-
67
-
68
-
69
-
70
-
71
-
72
-
73
-
74
-
75
-
76
-
77
-
78
-
79
-
80
-
81
-
82
-
83
-
84
-
85
-
86
-
87
-
88
-
89
-
90
-
91
-
92
-
93
-
94
-
95
-
96
-
97
-
98
-
99
-
100
-
101
-
102
-
103
-
104
-
105
-
106
-
107
-
108
-
109
-
110
-
111
-
112
-
113
-
114
-
115
-
116
-
 117
117 -
 118
118 -
 119
119 -
 120
120 -
 121
121 -
 122
122 -
 123
123 -
 124
124 -
 125
125 -
 126
126 -
 127
127 -
128
-
129
-
130
-
131
-
132
-
133
-
134
-
135
-
136
-
137
-
138
-
139
-
140
-
141
-
142
-
143
-
144
-
145
-
146
-
147
-
148
-
149
-
150
-
151
-
152
-
153
-
154
-
155
-
156
-
157
-
158
-
159
-
160
-
161
-
162
-
163
-
164
-
165
-
166
-
167
-
168
-
169
-
170
-
171
-
172
-
173
-
174
-
175
-
176
-
177
-
178
-
179
-
180
-
181
-
182
-
183
-
184
-
185
-
186
-
187
-
188
-
189
-
190
-
191
-
192
-
193
-
194
-
195
-
196
-
197
-
198
-
199
-
200
-
201
-
202
-
203
-
204
-
205
-
206
-
207
-
208
-
209
-
210
-
211
-
212
-
213
-
214
-
215
-
216
-
217
-
218
-
219
-
220
-
221
-
222
-
223
-
224
-
225
-
226
-
227
-
228
-
229
-
230
-
231
-
232
-
233
-
234
-
235
-
236
-
237
-
238
-
239
-
240
-
241
-
242
-
243
-
244
-
245
 |
 |