Samsung ML-3712DW User Manual (user Manual) (ver.1.02) (English) - Page 133
Machines without an display screen
 |
View all Samsung ML-3712DW manuals
Add to My Manuals
Save this manual to your list of manuals |
Page 133 highlights
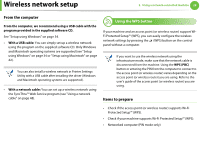
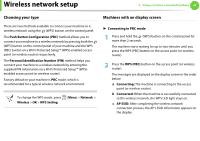
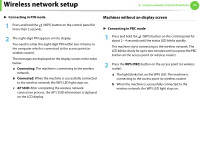
Wireless network setup 2. Using a network-connected machine 30 ► Connecting in PIN mode 1 Press and hold the (WPS) button on the control panel for more than 2 seconds. 2 The eight-digit PIN appears on the display. You need to enter the eight-digit PIN within two minutes to the computer which is connected to the access point (or wireless router). The messages are displayed on the display screen in the order below: a Connecting: The machine is connecting to the wireless network. b Connected: When the machine is successfully connected to the wireless network, the WPS LED light stays on. c AP SSID: After completing the wireless network connection process, the AP's SSID information is diplayed on the LCD display. Machines without an display screen ► Connecting in PBC mode 1 Press and hold the (WPS) button on the control panel for about 2 - 4 seconds until the status LED blinks quickly. The machine starts connecting to the wireless network. The LED blinks slowly for up to two minutes until you press the PBC button on the access point (or wireless router). 2 Press the WPS (PBC) button on the access point (or wireless router). a The light blinks fast on the WPS LED. The machine is connecting to the access point (or wireless router). b When the machine is successfully connected to the wireless network, the WPS LED light stays on.
-
 1
1 -
2
-
3
-
4
-
5
-
6
-
7
-
8
-
9
-
10
-
11
-
12
-
13
-
14
-
15
-
16
-
17
-
18
-
19
-
20
-
21
-
22
-
23
-
24
-
25
-
26
-
27
-
28
-
29
-
30
-
31
-
32
-
33
-
34
-
35
-
36
-
37
-
38
-
39
-
40
-
41
-
42
-
43
-
44
-
45
-
46
-
47
-
48
-
49
-
50
-
51
-
52
-
53
-
54
-
55
-
56
-
57
-
58
-
59
-
60
-
61
-
62
-
63
-
64
-
65
-
66
-
67
-
68
-
69
-
70
-
71
-
72
-
73
-
74
-
75
-
76
-
77
-
78
-
79
-
80
-
81
-
82
-
83
-
84
-
85
-
86
-
87
-
88
-
89
-
90
-
91
-
92
-
93
-
94
-
95
-
96
-
97
-
98
-
99
-
100
-
101
-
102
-
103
-
104
-
105
-
106
-
107
-
108
-
109
-
110
-
111
-
112
-
113
-
114
-
115
-
116
-
117
-
118
-
119
-
120
-
121
-
122
-
123
-
124
-
125
-
126
-
127
-
 128
128 -
 129
129 -
 130
130 -
 131
131 -
 132
132 -
 133
133 -
 134
134 -
 135
135 -
 136
136 -
 137
137 -
 138
138 -
139
-
140
-
141
-
142
-
143
-
144
-
145
-
146
-
147
-
148
-
149
-
150
-
151
-
152
-
153
-
154
-
155
-
156
-
157
-
158
-
159
-
160
-
161
-
162
-
163
-
164
-
165
-
166
-
167
-
168
-
169
-
170
-
171
-
172
-
173
-
174
-
175
-
176
-
177
-
178
-
179
-
180
-
181
-
182
-
183
-
184
-
185
-
186
-
187
-
188
-
189
-
190
-
191
-
192
-
193
-
194
-
195
-
196
-
197
-
198
-
199
-
200
-
201
-
202
-
203
-
204
-
205
-
206
-
207
-
208
-
209
-
210
-
211
-
212
-
213
-
214
-
215
-
216
-
217
-
218
-
219
-
220
-
221
-
222
-
223
-
224
-
225
-
226
-
227
-
228
-
229
-
230
-
231
-
232
-
233
-
234
-
235
-
236
-
237
-
238
-
239
-
240
-
241
-
242
-
243
-
244
-
245
 |
 |