Samsung ML-3712DW User Manual (user Manual) (ver.1.02) (English) - Page 140
Change TCP/IP, Wireless Network Setting Complete, Confirm Printer Connection
 |
View all Samsung ML-3712DW manuals
Add to My Manuals
Save this manual to your list of manuals |
Page 140 highlights
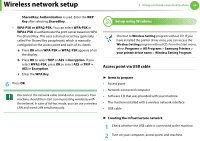
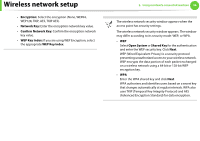
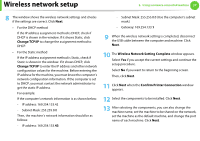
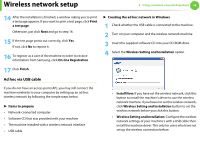
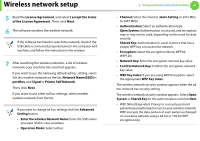
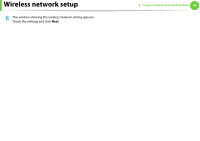
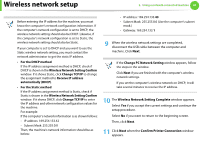
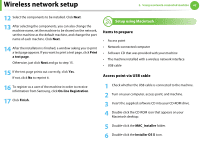
Wireless network setup 2. Using a network-connected machine 37 8 The window shows the wireless network settings and checks if the settings are correct. Click Next. • For the DHCP method If the IP address assignment method is DHCP, check if DHCP is shown in the window. If it shows Static, click Change TCP/IP to change the assignment method to DHCP. • For the Static method If the IP address assignment method is Static, check if Static is shown in the window. If it shows DHCP, click Change TCP/IP to enter the IP address and other network configuration values for the machine. Before entering the IP address for the machine, you must know the computer's network configuration information. If the computer is set to DHCP, you must contact the network administrator to get the static IP address. For example: If the computer's network information is as shown below: - IP address: 169.254.133.42 - Subnet Mask: 255.255.0.0 Then, the machine's network information should be as follows: - IP address: 169.254.133.43 - Subnet Mask: 255.255.0.0 (Use the computer's subnet mask.) - Gateway: 169.254.133.1 9 When the wireless network setting is completed, disconnect the USB cable between the computer and machine. Click Next. 10 The Wireless Network Setting Complete window appears. Select Yes if you accept the current settings and continue the setup procedure. Select No if you want to return to the beginning screen. Then, click Next. 11 Click Next when the Confirm Printer Connection window appears. 12 Select the components to be installed. Click Next. 13 After selecting the components, you can also change the machine name, set the machine to be shared on the network, set the machine as the default machine, and change the port name of each machine. Click Next.
-
 1
1 -
2
-
3
-
4
-
5
-
6
-
7
-
8
-
9
-
10
-
11
-
12
-
13
-
14
-
15
-
16
-
17
-
18
-
19
-
20
-
21
-
22
-
23
-
24
-
25
-
26
-
27
-
28
-
29
-
30
-
31
-
32
-
33
-
34
-
35
-
36
-
37
-
38
-
39
-
40
-
41
-
42
-
43
-
44
-
45
-
46
-
47
-
48
-
49
-
50
-
51
-
52
-
53
-
54
-
55
-
56
-
57
-
58
-
59
-
60
-
61
-
62
-
63
-
64
-
65
-
66
-
67
-
68
-
69
-
70
-
71
-
72
-
73
-
74
-
75
-
76
-
77
-
78
-
79
-
80
-
81
-
82
-
83
-
84
-
85
-
86
-
87
-
88
-
89
-
90
-
91
-
92
-
93
-
94
-
95
-
96
-
97
-
98
-
99
-
100
-
101
-
102
-
103
-
104
-
105
-
106
-
107
-
108
-
109
-
110
-
111
-
112
-
113
-
114
-
115
-
116
-
117
-
118
-
119
-
120
-
121
-
122
-
123
-
124
-
125
-
126
-
127
-
128
-
129
-
130
-
131
-
132
-
133
-
134
-
 135
135 -
 136
136 -
 137
137 -
 138
138 -
 139
139 -
 140
140 -
 141
141 -
 142
142 -
 143
143 -
 144
144 -
 145
145 -
146
-
147
-
148
-
149
-
150
-
151
-
152
-
153
-
154
-
155
-
156
-
157
-
158
-
159
-
160
-
161
-
162
-
163
-
164
-
165
-
166
-
167
-
168
-
169
-
170
-
171
-
172
-
173
-
174
-
175
-
176
-
177
-
178
-
179
-
180
-
181
-
182
-
183
-
184
-
185
-
186
-
187
-
188
-
189
-
190
-
191
-
192
-
193
-
194
-
195
-
196
-
197
-
198
-
199
-
200
-
201
-
202
-
203
-
204
-
205
-
206
-
207
-
208
-
209
-
210
-
211
-
212
-
213
-
214
-
215
-
216
-
217
-
218
-
219
-
220
-
221
-
222
-
223
-
224
-
225
-
226
-
227
-
228
-
229
-
230
-
231
-
232
-
233
-
234
-
235
-
236
-
237
-
238
-
239
-
240
-
241
-
242
-
243
-
244
-
245
 |
 |