| Section |
Page |
| User's Guide_Basic |
1 |
| Contents |
2 |
| Contents |
2 |
| 1. Introduction |
2 |
| 5 Key benefits |
2 |
| 7 Features by models |
2 |
| 8 Useful to know |
2 |
| 9 About this user’s guide |
2 |
| 10 Safety information |
2 |
| 16 Machine overview |
2 |
| 19 Control panel overview |
2 |
| 22 Turning on the machine |
2 |
| 23 Installing the driver locally |
2 |
| 24 Reinstalling the driver |
2 |
| 24 Reinstalling the driver |
2 |
| 2. Menu overview and basic setup |
2 |
| 28 Menu overview |
2 |
| 30 Printing a demo page |
2 |
| 31 Changing the display language |
2 |
| 32 Media and tray |
2 |
| 43 Basic printing |
2 |
| 43 Basic printing |
2 |
| 3. Maintenance |
2 |
| 50 Ordering supplies and accessories |
2 |
| 51 Available supplies |
2 |
| 52 Available accessories |
2 |
| 53 Available maintenance parts |
2 |
| 54 Redistributing toner |
2 |
| 56 Replacing the toner cartridge |
2 |
| 58 Upgrading a memory module |
2 |
| 60 Monitoring the supplies life |
2 |
| 61 Setting the toner low alert |
2 |
| 62 Cleaning the machine |
2 |
| 62 Cleaning the machine |
2 |
| 4. Troubleshooting |
2 |
| 67 Tips for avoiding paper jams |
2 |
| 68 Clearing paper jams |
2 |
| 74 Understanding the status LED |
2 |
| 77 Understanding display messages |
2 |
| 77 Understanding display messages |
2 |
| 5. Appendix |
2 |
| 83 Specifications |
2 |
| 93 Regulatory information |
3 |
| 104 Copyright |
3 |
| 1. Introduction |
4 |
| Key benefits |
5 |
| Features by models |
7 |
| Useful to know |
8 |
| About this user’s guide |
9 |
| Conventions |
9 |
| General icons |
9 |
| Safety information |
10 |
| Important safety symbols |
10 |
| Operating environment |
10 |
| Operating method |
11 |
| Installation / Moving |
12 |
| Maintenance / Checking |
13 |
| Supply usage |
14 |
| Machine overview |
16 |
| Accessories |
16 |
| Front view |
17 |
| Rear view |
18 |
| Control panel overview |
19 |
| Type A |
19 |
| Type B |
20 |
| Type C |
21 |
| Turning on the machine |
22 |
| Installing the driver locally |
23 |
| Windows |
23 |
| Reinstalling the driver |
24 |
| Windows |
24 |
| 2. Menu overview and basic setup |
25 |
| Menu overview |
26 |
| Printing a demo page |
28 |
| Changing the display language |
29 |
| Media and tray |
30 |
| Tray overview |
30 |
| Loading paper in the tray/ optional tray |
31 |
| Loading in multi-purpose tray |
33 |
| Printing on special media |
35 |
| Setting the paper size and type |
40 |
| Basic printing |
41 |
| Printing |
41 |
| Canceling a print job |
42 |
| Opening printing preferences |
43 |
| Using help |
44 |
| Eco printing |
44 |
| 3. Maintenance |
47 |
| Ordering supplies and accessories |
48 |
| Available supplies |
49 |
| Available accessories |
50 |
| Available maintenance parts |
51 |
| Redistributing toner |
52 |
| Replacing the toner cartridge |
54 |
| Upgrading a memory module |
56 |
| Installing a memory module |
56 |
| Monitoring the supplies life |
58 |
| Setting the toner low alert |
59 |
| Cleaning the machine |
60 |
| Cleaning the outside |
60 |
| Cleaning the inside |
60 |
| Cleaning the pickup roller |
62 |
| 4. Troubleshooting |
63 |
| Tips for avoiding paper jams |
64 |
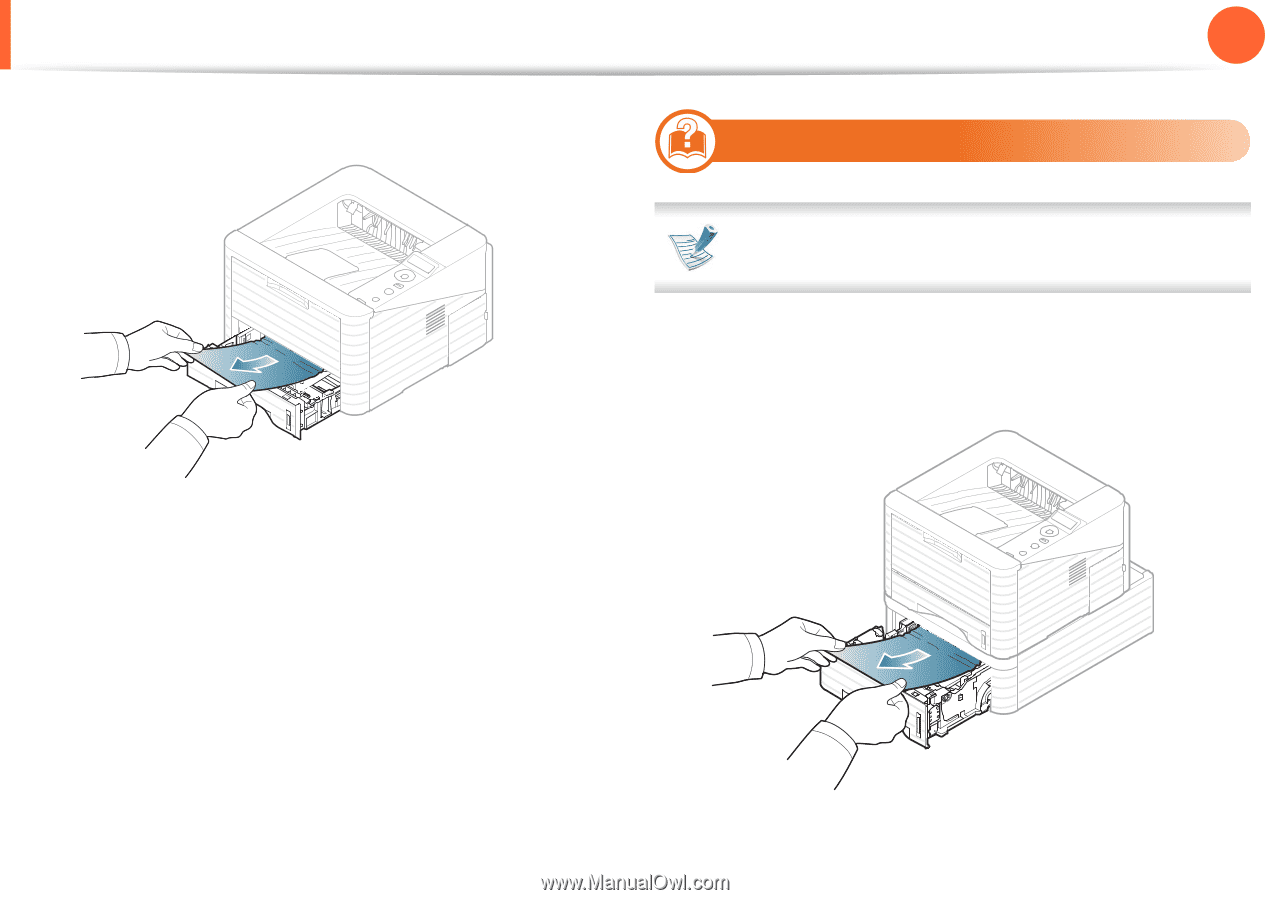
| Clearing paper jams |
65 |
| In tray 1 |
65 |
| In optional tray2 |
66 |
| In the multi-purpose tray |
67 |
| Inside the machine |
67 |
| In the exit area |
68 |
| In the duplex unit area |
69 |
| Understanding the status LED |
71 |
| Status LED |
72 |
| Jam LED/ WPS LED |
73 |
| Understanding display messages |
74 |
| Checking display messages |
74 |
| 5. Appendix |
79 |
| Specifications |
80 |
| General specifications |
80 |
| Print media specifications |
82 |
| System requirements |
85 |
| Network environment |
88 |
| Regulatory information |
90 |
| Laser safety statement |
90 |
| Taiwan only |
90 |
| Ozone safety |
91 |
| Power saver |
91 |
| Recycling |
91 |
| China only |
91 |
| Correct disposal of this product (Waste electrical & electronic equipment) |
92 |
| Radio frequency emissions |
92 |
| United states of america |
93 |
| Taiwan only |
94 |
| Russia only |
95 |
| Germany only |
95 |
| Turkey only |
95 |
| Replacing the fitted plug (for UK only) |
95 |
| Declaration of conformity (European countries) |
96 |
| Regulatory compliance statements |
98 |
| Israel only |
99 |
| China only |
100 |
| Copyright |
101 |
| A |
102 |
| accessories |
102 |
| ordering 52 |
102 |
| C |
102 |
| cleaning |
102 |
| inside 62 |
102 |
| outside 62 |
102 |
| pickup roller 64 |
102 |
| cleaning a machine 62 |
102 |
| control panel 19 |
102 |
| convention 9 |
102 |
| D |
102 |
| default settings |
102 |
| tray setting 42 |
102 |
| display screen 20, 21 |
102 |
| E |
102 |
| eco button 19, 20, 21 |
102 |
| eco printing 46 |
102 |
| error message 77 |
102 |
| F |
102 |
| favorites settings, for printing 45 |
102 |
| features 5 |
102 |
| print media feature 85 |
102 |
| front view 17 |
102 |
| G |
102 |
| general icons 9 |
102 |
| J |
102 |
| jam |
102 |
| clearing paper 68 |
102 |
| tips for avoiding paper jams 67 |
102 |
| L |
102 |
| Linux |
102 |
| system requirements 90 |
102 |
| loading |
102 |
| paper in multi-purpose tray 35 |
102 |
| paper in the tray1 33 |
102 |
| special media 37 |
102 |
| local |
102 |
| driver installation 23 |
102 |
| driver reinstalling 24 |
102 |
| M |
102 |
| Macintosh |
102 |
| system requirements 89 |
102 |
| maintenance parts 53 |
102 |
| memory |
102 |
| installing memory module 58 |
102 |
| memory upgrading 58 |
102 |
| menu overview 28 |
102 |
| multi-purpose tray |
102 |
| loading 35 |
102 |
| tips on using 35 |
102 |
| using special media 37 |
102 |
| N |
102 |
| network |
102 |
| installing environment 91 |
102 |
| O |
102 |
| optional tray 52 |
102 |
| loading paper 33 |
102 |
| ordering 52 |
102 |
| P |
102 |
| Parallel |
102 |
| ordering 52 |
102 |
| print media |
102 |
| card stock 41 |
102 |
| envelope 38 |
102 |
| labels 40 |
102 |
| output support 85 |
103 |
| preprinted paper 42 |
103 |
| setting the paper size 42 |
103 |
| setting the paper type 42 |
103 |
| special media 37 |
103 |
| transparency 40 |
103 |
| Printing 43 |
103 |
| printing |
103 |
| printing a document |
103 |
| Windows 43 |
103 |
| R |
103 |
| rear view 18 |
103 |
| regulatiory information 93 |
103 |
| S |
103 |
| safety |
103 |
| information 10 |
103 |
| symbols 10 |
103 |
| specifications 83 |
103 |
| print media 85 |
103 |
| stop button 19, 20, 21 |
103 |
| supplies |
103 |
| available supplies 51 |
103 |
| monitoring the supplies life 60 |
103 |
| ordering 51 |
103 |
| replacing toner cartridge 56 |
103 |
| T |
103 |
| toner cartridge |
103 |
| redistributing toner 54 |
103 |
| replacing the cartridge 56 |
103 |
| tray |
103 |
| adjusting the width and length 32 |
103 |
| changing the tray size 32 |
103 |
| loading paper in multi-purpose tray 35 |
103 |
| ordering an optional tray 52 |
103 |
| setting the paper size and type 42 |
103 |
| U |
103 |
| understanding the status LED 74 |
103 |
| Unix |
103 |
| system requirements 90 |
103 |
| using help 46 |
103 |
| W |
103 |
| Windows |
103 |
| driver installation for USB cable connected 23, 24 |
103 |
| system requirements 88 |
103 |
| User's Guide_Advanced |
104 |
| Contents |
105 |
| Contents |
105 |
| 1. Software installation |
105 |
| 5 Installation for Macintosh |
105 |
| 7 Reinstallation for Macintosh |
105 |
| 8 Installation for Linux |
105 |
| 10 Reinstallation for Linux |
105 |
| 10 Reinstallation for Linux |
105 |
| 2. Using a network-connected machine |
105 |
| 12 Useful network programs |
105 |
| 13 Wired network setup |
105 |
| 17 Installing driver over the network |
105 |
| 24 IPv6 configuration |
105 |
| 27 Wireless network setup |
105 |
| 27 Wireless network setup |
105 |
| 3. Useful setting menus |
105 |
| 56 Information |
105 |
| 57 Layout |
105 |
| 58 Paper |
105 |
| 59 Graphic |
105 |
| 60 System setup |
105 |
| 63 Emulation |
105 |
| 64 Network |
105 |
| 65 Admin setup |
105 |
| 65 Admin setup |
105 |
| 4. Special features |
105 |
| 67 Altitude adjustment |
105 |
| 68 Changing the font setting |
105 |
| 69 Changing the default print settings |
105 |
| 70 Setting your machine as a default machine |
105 |
| 71 Using advanced print features |
105 |
| 79 Using Direct Printing Utility (Windows only) |
105 |
| 81 Using memory/hard drive features |
105 |
| 83 Macintosh printing |
105 |
| 85 Linux printing |
105 |
| 87 Unix printing |
105 |
| 87 Unix printing |
105 |
| 5. Maintenance |
105 |
| 90 Storing the toner cartridge |
105 |
| 92 Tips for moving & storing your machine |
105 |
| 93 Useful management tools |
105 |
| 93 Useful management tools |
106 |
| 6. Troubleshooting |
106 |
| 105 Paper feeding problems |
106 |
| 106 Power and cable connecting problems |
106 |
| 107 Printing problems |
106 |
| 111 Printing quality problems |
106 |
| 119 Operating system problems |
106 |
| 119 Operating system problems |
106 |
| Contact SAMSUNG worldwide |
106 |
| Contact SAMSUNG worldwide |
106 |
| Glossary |
106 |
| 1. Software installation |
107 |
| Installation for Macintosh |
108 |
| Reinstallation for Macintosh |
110 |
| Installation for Linux |
111 |
| Installing the Unified Linux Driver |
111 |
| Installing the Smart Panel |
111 |
| Installing the Printer Settings Utility |
112 |
| Reinstallation for Linux |
113 |
| 2. Using a network-connected machine |
114 |
| Useful network programs |
115 |
| SyncThru™ Web Service |
115 |
| SyncThru™ Web Admin Service |
115 |
| SetIP |
115 |
| Wired network setup |
116 |
| Printing a network configuration report |
116 |
| Setting IP address |
116 |
| Installing driver over the network |
120 |
| Windows |
120 |
| Macintosh |
121 |
| Linux |
123 |
| UNIX |
124 |
| IPv6 configuration |
127 |
| Activating IPv6 |
127 |
| Setting IPv6 addresses |
128 |
| Using SyncThru™ Web Service |
129 |
| Wireless network setup |
130 |
| Getting started |
130 |
| Choosing the installation type |
130 |
| Using the WPS button |
131 |
| Using the menu button |
135 |
| Setup using Windows |
137 |
| Setup using Macintosh |
145 |
| Using a network cable |
151 |
| Turning the Wi-Fi network on/off |
154 |
| Troubleshooting |
154 |
| 3. Useful setting menus |
158 |
| Information |
159 |
| Layout |
160 |
| Paper |
161 |
| Graphic |
162 |
| System setup |
163 |
| Emulation |
166 |
| Network |
167 |
| Admin setup |
168 |
| 4. Special features |
169 |
| Altitude adjustment |
170 |
| Changing the font setting |
171 |
| Changing the default print settings |
172 |
| Setting your machine as a default machine |
173 |
| Using advanced print features |
174 |
| Printing to a file (PRN) |
174 |
| Understanding special printer features |
175 |
| Using Direct Printing Utility (Windows only) |
182 |
| What is Direct Printing Utility? |
182 |
| Printing |
182 |
| Using the right-click menu |
183 |
| Using memory/hard drive features |
184 |
| From the printer driver |
184 |
| From the control panel |
184 |
| Macintosh printing |
186 |
| Printing a document |
186 |
| Changing printer settings |
186 |
| Printing multiple pages on one sheet |
186 |
| Printing on both sides of the paper |
187 |
| Using help |
187 |
| Linux printing |
188 |
| Printing from applications |
188 |
| Printing files |
189 |
| Configuring Printer Properties |
189 |
| Unix printing |
191 |
| Proceeding the print job |
191 |
| Changing the machine settings |
191 |
| 5. Maintenance |
193 |
| Storing the toner cartridge |
194 |
| Handling instructions |
194 |
| Toner cartridge usage |
194 |
| Estimated cartridge life |
195 |
| Tips for moving & storing your machine |
196 |
| Useful management tools |
197 |
| Samsung AnyWeb Print |
197 |
| Using SyncThru™ Web Service |
197 |
| Using Samsung Easy Printer Manager (Windows only) |
200 |
| Using Samsung Printer Status (Windows only) |
202 |
| Using Smart Panel (Macintosh and Linux only) |
203 |
| Using the Linux Unified Driver Configurator |
204 |
| 6. Troubleshooting |
208 |
| Paper feeding problems |
209 |
| Power and cable connecting problems |
210 |
| Printing problems |
211 |
| Printing quality problems |
215 |
| Operating system problems |
223 |
| Common Windows problems |
223 |
| Common Macintosh problems |
224 |
| Common Linux problems |
225 |
| Common PostScript problems |
226 |
| Contact SAMSUNG worldwide |
227 |
| Glossary |
231 |
| Index |
244 |
| C |
244 |
| Changing 68 |
244 |
| D |
244 |
| direct printing utility 79 |
244 |
| driver installation |
244 |
| Unix 21 |
244 |
| F |
244 |
| features |
244 |
| machine features 55 |
244 |
| font setting 68 |
244 |
| G |
244 |
| general settings 57, 58, 59, 60, 63 |
244 |
| glossary 127 |
244 |
| L |
244 |
| LCD display |
244 |
| browsing the machine status 56 |
244 |
| Linux |
244 |
| common Linux problems 121 |
244 |
| driver installation for network connected 20 |
244 |
| driver installation for USB cable connected 8 |
244 |
| driver reinstallation for USB cable connected 10 |
244 |
| printer properties 86 |
244 |
| printing 85 |
244 |
| unifled driver configurator 100 |
244 |
| using SetIP 15 |
244 |
| M |
244 |
| machine information 56 |
244 |
| machine setup |
244 |
| machine status 56 |
244 |
| Macintosh |
244 |
| common Macintosh problems 120 |
244 |
| driver installation for network connected 18 |
244 |
| driver installation for USB cable connected 5 |
244 |
| driver reinstallation for USB cable connected 7 |
244 |
| printing 83 |
244 |
| using SetIP 14 |
244 |
| N |
244 |
| network |
244 |
| driver installation |
244 |
| Linux 20 |
244 |
| Macintosh 18 |
244 |
| UNIX 21 |
244 |
| Windows 17 |
244 |
| general setup 64 |
244 |
| introducing network programs 12 |
244 |
| IPv6 configuration 24 |
244 |
| SetIP program 13, 14, 15, 49 |
244 |
| N-up printing |
244 |
| Macintosh 83 |
244 |
| O |
244 |
| overlay printing |
244 |
| create 76 |
244 |
| delete 77 |
244 |
| print 77 |
244 |
| P |
244 |
| placing a machine |
244 |
| adjusting the altitude 67 |
244 |
| PostScript driver |
244 |
| troubleshooting 122 |
244 |
| print resolution set |
244 |
| Linux 85 |
244 |
| printer preferences |
244 |
| Linux 86 |
244 |
| Printer Status |
244 |
| general information 98, 99 |
244 |
| printing |
245 |
| changing the default print settings 69 |
245 |
| Linux 85 |
245 |
| Macintosh 83 |
245 |
| multiple pages on one sheet of paper |
245 |
| Macintosh 83 |
245 |
| printing on both sides of paper |
245 |
| Macintosh 84 |
245 |
| printing to a file 71 |
245 |
| UNIX 87 |
245 |
| using direct printing utility 79 |
245 |
| printing a document |
245 |
| Linux 85 |
245 |
| Macintosh 83 |
245 |
| UNIX 87 |
245 |
| problems |
245 |
| paper feeding problems 105 |
245 |
| power problems 106 |
245 |
| printing problems 107 |
245 |
| printing quality problems 111 |
245 |
| R |
245 |
| reports |
245 |
| machine information 56, 60 |
245 |
| S |
245 |
| service contact numbers 123 |
245 |
| SetIP program 13, 49 |
245 |
| special print features 66 |
245 |
| supplies |
245 |
| estimated toner cartridge life 91 |
245 |
| SyncThru Web Service |
245 |
| general information 93 |
245 |
| T |
245 |
| toner cartridge |
245 |
| estimated life 91 |
245 |
| handling instructions 90 |
245 |
| non-Samsung and refilled 90 |
245 |
| storing 90 |
245 |
| U |
245 |
| UNIX |
245 |
| driver installation for network connected 21 |
245 |
| printing 87 |
245 |
| USB cable |
245 |
| driver installation 5, 8 |
245 |
| driver reinstallation 7, 10 |
245 |
| using help 84 |
245 |
| W |
245 |
| watermark |
245 |
| create 75 |
245 |
| delete 75 |
245 |
| edit 75 |
245 |
| Windows |
245 |
| common Windows problems 119 |
245 |
| driver installation for network connected 17 |
245 |
| using SetIP 13, 49 |
245 |
| wireless |
245 |
| ad hoc mode 27 |
245 |
| computer 28 |
245 |
| control panel 27 |
245 |
| Infrastructure mode 27 |
245 |
| installation 27 |
245 |
| USB cable 34 |
245 |
| WPS |
245 |
| disconnectiong 30 |
245 |
| PBC mode 29 |
245 |
| WPS (the machine does not have a display screen) |
245 |
| PBC 30 |
245 |
| PIN 31 |
245 |
| wireless network |
245 |

 1
1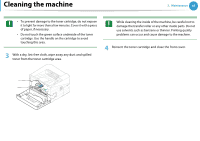 61
61 62
62 63
63 64
64 65
65 66
66 67
67 68
68 69
69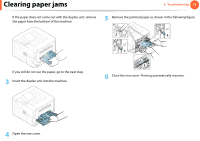 70
70 71
71