Samsung MW7592W Service Manual
Samsung MW7592W Manual
 |
View all Samsung MW7592W manuals
Add to My Manuals
Save this manual to your list of manuals |
Samsung MW7592W manual content summary:
- Samsung MW7592W | Service Manual - Page 1
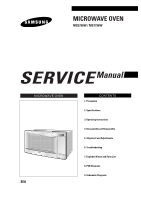
MICROWAVE OVEN MS5796W / MS7796W SERVICE Manual MICROWAVE OVEN SEA CONTENTS 1. Precaution 2. Specifications 3. Operating Instructions 4. Disassembly and Reassembly 5. Alignment and Adjustments 6. Troubleshooting 7. Exploded Views and Parts List 8. PCB Diagrams 9. Schematic Diagrams - Samsung MW7592W | Service Manual - Page 2
and latches, (5) evidence of dropping or abuse. (c) Before turning on microwave power for any service test or inspection within the microwave generating compartments, check the magnetron, wave guide or transmission line, and cavity for proper alignment, integrity, and connections. (d) Any defective - Samsung MW7592W | Service Manual - Page 3
manual. This product complies with Federal Performance Standard 21 CFR Subchapter J (DHHS). 2. Microwave emission check should be performed to prior to servicing if the oven is operative. 3. If the oven operates with the door open : Instruct instrument's ground lead last. Samsung Electronics 1-1 - Samsung MW7592W | Service Manual - Page 4
Pretaution 1-2 Special Servicing Precautions (Continued) 17. When checking the continuity of the witches or transformer, always make sure that the tool during operation. PRECAUTION Servicemen should remove their watches whenever working close to or replacing the magnetron. 1-2 Samsung Electronics - Samsung MW7592W | Service Manual - Page 5
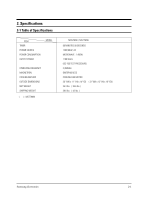
OM75PH(31)ESS COOLING FAN MOTOR 2011/32(W) x 1111/16(H) x 1429/32(D) ( 217/8(W) x 125/16(H) x 1621/32(D)) 35.3 lbs. ( 38.6 lbs. ) 38.6 lbs ( 43 lbs. ) Samsung Electronics 2-1 - Samsung MW7592W | Service Manual - Page 6
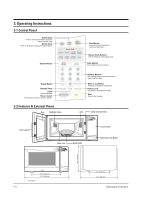
3. Operating Instructions 3-1 Control Panel Gentle Cook Press to see help to start cooking. 3-2 Features & External Views Door Ventilation Holes Light Safety Interlock Holes Door Latches Glass Tray Guide Roller Control Panel Open Door Push Button 297 / (313) mm 3-1 ( ) : MS7796W 370 / ( - Samsung MW7592W | Service Manual - Page 7
magnetron and lamp. 2. Remove the air cover. 3. Remove screws securing the magnetron to the wave guide. 4. Take out the magnetron very carefully. 5. Remove tow screws from the back panel of fan leads. 3. Remove the mounting bolts. 4. Reconnect the leads correctly and firmly. Samsung Electronics 4-1 - Samsung MW7592W | Service Manual - Page 8
0.5mm or less. 4-3-3 Removal of Key Door & Spring Remove pin hinge from Door "E" Detach spring from Door "E" and key door. 4-2 Door "E" Door "E" Key Door Spring Samsung Electronics - Samsung MW7592W | Service Manual - Page 9
of the door, reassemble it and follow the instructions below for proper installation and adjustment so as to of Drive Motor 1. Take out the glass tray and the guide roller from the cavity. 2. Turn the oven upside down to Samsung Electronics Screw Drive Motor Drive Motor Cover Base Plate 4-3 - Samsung MW7592W | Service Manual - Page 10
is recommended for smoother removal. 3. When installing new membrane key board, make sure that the surface of escutcheon base is cleaned sufficiently so that any problems (shorted contacts or uneven surface) can be avoided. Window Display Membrane Panel 4-4 Screw Screw - Samsung MW7592W | Service Manual - Page 11
terminals should indicate one ohm or less. 4. A continuity check between each filament terminal and magnetron case should read open. Magnetron Antenna Gasket Plate Cooling Fins Samsung Electronics 5-1 - Samsung MW7592W | Service Manual - Page 12
. Primary Interlock Switch Interlock Monitor Switch Body Latch Lever Door Door Sensing Switch Primary switch Monitor switch (COM-NC) Door Sensing S/W Door Open ¥ 0 ¥ Door Closed 0 ¥ 0 5-2 Samsung Electronics - Samsung MW7592W | Service Manual - Page 13
rise is marginal. NOTE 2 : Output power in watts is computed by multiplying the temperature rise (step 5) by a factor of 91 times the of centigrade temperature. Samsung Electronics 5-3 - Samsung MW7592W | Service Manual - Page 14
measure arnear the opening of magnetron, the surface of the air guide and the surface of the wave guide as shown in the following photo.( but avoid the high voltage the identical parts are replaced as listed in this manual notift that fact to ; CENTRAL SERVICE CENTER 5-12-2 At least once a year have - Samsung MW7592W | Service Manual - Page 15
6. Troubleshooting PRECAUTION! 1. CHECK GROUNDING BEFORE CHECKING FOR TROUBLE. 2. BE CAREFUL OF THE these switches must be replaced at the same time. (refer to adjustment instructions) Check continuity of power relay contacts and if it has continuity, replace PCB main. Samsung Electronics 6-1 - Samsung MW7592W | Service Manual - Page 16
Troubleshooting 6-2 Electrical Mulifunction(continued) SYMPTOM Oven lamp and fan motor turn on Oven can program but timer does not start. Microwave output wrap or cover with a lid. Stir once or twice while cooking foods such as soup, cocoa, or milk. Replace turntable motor. 6-2 Samsung Electronics - Samsung MW7592W | Service Manual - Page 17
6-3 Gas Sensor Troubleshooting AUTO COOK (SENSOR ONLY) The Auto Cook function uses a special gas sensor which detects both humidity (steam) and hydrocarbons (food minutes. E1 Exceeds of T1 time limit (Gas sensor) First press the cancel key and check the food londition. Samsung Electronics 6-3 - Samsung MW7592W | Service Manual - Page 18
B2 C5 C4 C6 C7 M21 B1 M7 B3 M9 C3 C2 M20 M12 C1 B4 B2 M14 M13 M15 M30 M19 M16 M17 M18 7-1 Samsung Electronics - Samsung MW7592W | Service Manual - Page 19
05MT 1 M16 DE74-20015G TRAY-COOKING T6,PI318,1115G,MW5896W 1 M17 DE92-90189P ASSY-GUIDE ROLLER MW5896W 1 M18 DE67-60081A COUPLER PPS,-,-,-,3RD-1.0/1.3 1 M19 DE61-50579A FOOT PP,H8 60HZ,AC17V/7 1 : Option Parts : Warning :Electrostatically Sensitive Devices Samsung Electronics 7-2 - Samsung MW7592W | Service Manual - Page 20
15A/7.5A,50mohm 1 M 5 DE31-00001A MOTOR-FAN SMF-789UA,120V,60HZ,2550RPM,MW7592W 1 M 6 DE47-20173A THERMOSTAT PW-2N(90/60)30,187Y,250V7.5A,9 -COOKING GLASS,T6,PI360,1.2CUFT,NEG 1 M17 DE97-00009A ASSY-GUIDE ROLLER MW7896W,D16.5,BLK,XARAC 1 M18 DE67-60082A COUPLER PPS,T5 Samsung Electronics - Samsung MW7592W | Service Manual - Page 21
-S/W Specification PP(FB53WH),-,39.2G,NTR,-,3RD-W MW5592W 125/250VAC,16A,200GF,SPST-NO 125/250VAC,16A,200GF,SPDT PP(FB53WH),-,-,-,3.5G,NTR,3RD-W MW5592W Samsung Electronics Q'ty Remarks 1 2 1 1 7-4 - Samsung MW7592W | Service Manual - Page 22
-HOLDER 4 MGT 4 TNS-HV 5 B-PLTE 2 BD-LAT 1 CN-BOX 1 CV/AIR 1 MGT-B/TCO 2 MO/FAN 1 P-C-EA 3 PN/OUT 1 S-M-EA 1 MGT-TCO 2 M/DRIV 2 O/PANEL 11 DIODE 1- Samsung Electronics - Samsung MW7592W | Service Manual - Page 23
8. P.C.B Diagrams 8-1 P.C.B Diagrams Samsung Electronics 8-1 - Samsung MW7592W | Service Manual - Page 24
C06,C13 AC01 XTL1 CN09 CN04 CN03 CN06 CN08 IC05 IC02 J01,J02,J04,J05,J06 J07,J08,J10,J11,J12 J13,J14,J15,J16 8-2 Samsung Electronics - Samsung MW7592W | Service Manual - Page 25
VARISTOR RED DM D/MOTOR GND WARNING POWER MUST BE DISCONNECTED BEFORE SERVICING THIS APPLIANCE H. V. TRANSFORMER 120V BLK H.V.DIODE COM NO NC RED BLK MONITOR SWITCH BLK CENTER WHT BLU RED POWER RELAY Samsung Electronics MAGNETRON FA F RED HIGH VOLTAGE DIODE TO CHASSIS HIGH
-
 1
1 -
 2
2 -
 3
3 -
 4
4 -
 5
5 -
 6
6 -
 7
7 -
8
-
9
-
10
-
11
-
12
-
13
-
14
-
15
-
16
-
17
-
18
-
19
-
20
-
21
-
22
-
23
-
24
-
25
 |
 |
MICROWAVE OVEN
MS5796W / MS7796W
SERVICE
Manual
MICROWAVE OVEN
CONTENTS
1. Precaution
2. Specifications
3. Operating Instructions
4. Disassembly and Reassembly
5. Alignment and Adjustments
6. Troubleshooting
7. Exploded Views and Parts List
8. PCB Diagrams
9. Schematic Diagrams
SEA