Samsung NE63T8711SG/AA Installation Guide
Samsung NE63T8711SG/AA Manual
 |
View all Samsung NE63T8711SG/AA manuals
Add to My Manuals
Save this manual to your list of manuals |
Samsung NE63T8711SG/AA manual content summary:
- Samsung NE63T8711SG/AA | Installation Guide - Page 1
Electric Range Installation manual NE63*8***** Install_NE63T8911_AA_DG68-01257A-00_EN.indd 1 2020-03-26 6:27:49 - Samsung NE63T8711SG/AA | Installation Guide - Page 2
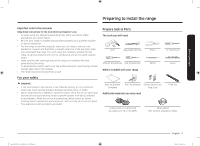
serious burns to 9 children or adults. 11 13 About this manual 13 READ THESE INSTRUCTIONS COMPLETELY AND CAREFULLY. 13 Important note to the installer 15 • Read all instructions contained in these installation instructions before installing the range. • Remove all packing materials from - Samsung NE63T8711SG/AA | Installation Guide - Page 3
to the consumer Keep these instructions for the local electrical inspector installed and grounded properly by a qualified installer or service technician. • For the range to ventilate properly your safety WARNING • If the information in this manual is not followed exactly, a fire or electrical shock - Samsung NE63T8711SG/AA | Installation Guide - Page 4
min 30" (76.2 cm) B : Acceptable electrical outlet area IMPORTANT: If your cabinets are over 363⁄4" high, you must install this range on a hard, heat resistant support that raises the surface of the range so that it is about even with the countertop. 2020-03-26 6:27:50 - Samsung NE63T8711SG/AA | Installation Guide - Page 5
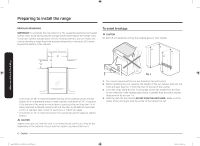
Preparing to install the range CAUTION You must use the rear filler kit to install the range in a freestanding cutout cabinet. For more information, see "Optional rear filler kit" as shown below. NOTE If you install the product in a kitchen island, you must maintain minimum 2-1/2" from cutout to - Samsung NE63T8711SG/AA | Installation Guide - Page 6
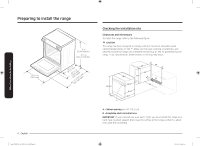
Preparing toPrinesptaarlilntghetorainsgteall the range Preparing to install the range Minimum dimensions IMPORTANT: To eliminate the risk of burns or fire caused by reaching over heated surface units, avoid having cabinet storage space located above the surface units. If you have cabinet storage - Samsung NE63T8711SG/AA | Installation Guide - Page 7
the knockout hole to keep the edge from damaging the cable. • Because range terminals are not accessible after the range is in position, a flexible service conduit or cord must be used. NOTE If the power connection is plugged in improperly, the following message appears on the display. • LCD, PMOLED - Samsung NE63T8711SG/AA | Installation Guide - Page 8
Connecting the power Step 2. Accessing the power cord connection Loosen and then remove the rear access cover screw with a screwdriver. Remove the rear access cover by pull right and then out. The terminal block will then be accessible. Terminal block Access cover Specified rating of power-supply- - Samsung NE63T8711SG/AA | Installation Guide - Page 9
Step 3. Installing the power cord For power cord installations, hook the strain relief over the power cord hole (13⁄8") located below the rear of the drawer body. Insert the power cord through the strain relief and tighten the device. Conduit connection plate Power cord Strain relief • You must - Samsung NE63T8711SG/AA | Installation Guide - Page 10
Connecting the power CAUTION You must check voltage after connecting power cord. Live 1 - Neutral Live 2 - Neutral Live 1 - Live 2 120 V 120 V 208 V / 240 V Installing a 4-wire power cord WARNING The neutral wire of the supply circuit must be connected to the neutral terminal located in the - Samsung NE63T8711SG/AA | Installation Guide - Page 11
Step 4. Installing the conduit Remove the conduit connection plate and rotate it as shown below. The conduit hole (11⁄8") must be used. 11⁄8" 13⁄8" 13⁄8" 11⁄8" 1. Prepare the conduit cord as shown in Figure 1. 2. Install the conduit cord as shown in Figure 2. Figure 1 1" 3⁄8" 1" 3⁄8" - Samsung NE63T8711SG/AA | Installation Guide - Page 12
Connecting the power CAUTION You must check voltage after connecting power cord. Live 1 - Neutral Live 2 - Neutral Live 1 - Live 2 120 V 120 V 208 V / 240 V Installing a 4-wire conduit • Aluminum building wire may be used but it must be rated for the correct amperage and voltage to make the - Samsung NE63T8711SG/AA | Installation Guide - Page 13
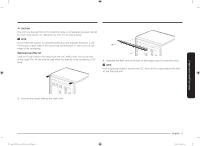
the risk of tipping, you must secure the appliance by properly installing the Anti-Tip device packed with the appliance. • Refer to the installation instructions supplied with the bracket. • If the anti-tip device is not installed properly, an adult or child stepping on or sitting on the range - Samsung NE63T8711SG/AA | Installation Guide - Page 14
1. Install the bracket using the template The Anti-Tip bracket is packaged with a template. The instructions include information necessary to complete the installation. Read and follow the instructions on the sheet (template) for range installation. 2. Level the range Level the range by adjusting - Samsung NE63T8711SG/AA | Installation Guide - Page 15
bracket engages the back brace and prevents tip-over. • Turn on the electrical power. Check the range for proper operation as described in the user manual. Anti-Tip bracket Leveling leg Installing the range Install_NE63T8911_AA_DG68-01257A-00_EN.indd 15 English 15 2020-03-26 6:27:52 - Samsung NE63T8711SG/AA | Installation Guide - Page 16
Please be advised that the Samsung warranty does NOT cover service calls to explain product operation, correct improper installation, US ONLINE AT www.samsung.com/us/support www.samsung.com/ca/support (English) www.samsung.com/ca_fr/support (French) DG68-01257A-00 Install_NE63T8911_AA_DG68-01257A- - Samsung NE63T8711SG/AA | Installation Guide - Page 17
Estufa eléctrica Manual de instalación NE63*8***** Install_NE63T8911_AA_DG68-01257A-00_MES.indd 1 2020-03-26 6:27:38 - Samsung NE63T8711SG/AA | Installation Guide - Page 18
LEA ESTAS INSTRUCCIONES EN SU TOTALIDAD Y CUIDADOSAMENTE. Nota importante para el instalador • Lea todas las instrucciones contenidas en este manual antes de instalar la estufa. • Retire de la estufa todos los materiales de empaque de los compartimientos del horno antes de conectar la alimentaci - Samsung NE63T8711SG/AA | Installation Guide - Page 19
gabinetes de almacenamiento sobre la cubierta. • La estufa no debe colocarse sobre una base. Para su seguridad ADVERTENCIA • Si la información de este manual no es seguida con exactitud, se podrían producir incendios o descargas eléctricas que causen daños a la propiedad, lesiones personales o la - Samsung NE63T8711SG/AA | Installation Guide - Page 20
Preparación paPrareipnastralcaiór nlapeasrtaufinastalar la estufa Preparación para instalar la estufa 2915/16 pulgadas (761.0 mm) 36 pulgadas (914.4 mm) mín. 363/4 pulgadas (933.45 mm) máx. 267 /(16672p1u81.l71g/(am17d62m4CaPp89os)u1u.n6e(l/1g4rmm2atpad5aumanc0logs)i.3jmaaadmbpailmesert)taamente - Samsung NE63T8711SG/AA | Installation Guide - Page 21
Preparación para instalar la estufa PRECAUCIÓN Debe usar el kit de relleno trasero para instalar la estufa en un gabinete de recorte independiente. Para más información, consulte "Kit de relleno trasero opcional" como se muestra a continuación. NOTA Si instala el producto en una isla de cocina, - Samsung NE63T8711SG/AA | Installation Guide - Page 22
Preparación paPrareipnastralcaiór nlapeasrtaufinastalar la estufa Preparación para instalar la estufa Dimensiones mínimas IMPORTANTE: Para eliminar el riesgo de quemaduras o de incendio causado por alcanzar elementos por encima de las unidades de superficie calientes, evite colocar gabinetes de - Samsung NE63T8711SG/AA | Installation Guide - Page 23
Cómo conectar la corriente eléctrica Paso 1. Cumplimiento de los requisitos de conexión eléctrica PRECAUCIÓN Para seguridad de las personas, no utilice cables prolongadores con este electrodoméstico. Retire el fusible de la casa o corte la electricidad con el disyuntor antes de comenzar la - Samsung NE63T8711SG/AA | Installation Guide - Page 24
Cómo conectar la corriente eléctrica Paso 2. Acceso a la conexión del cable de alimentación Afloje y luego retire el tornillo de la cubierta de acceso posterior con un destornillador. Retire la cubierta de acceso posterior jalando hacia la derecha y luego hacia afuera. Habrá quedado abierto el - Samsung NE63T8711SG/AA | Installation Guide - Page 25
Paso 3. Instalación del cable de alimentación Cuando se realicen instalaciones de cables de alimentación, enganche el sujetador de cables con amortiguador de esfuerzo sobre el orificio del cable de alimentación (13⁄8") ubicado debajo de la parte trasera del cuerpo del cajón. Inserte el cable de - Samsung NE63T8711SG/AA | Installation Guide - Page 26
Cómo conectar la corriente eléctrica PRECAUCIÓN Debe verificar el voltaje después de conectar el cable de alimentación. Fase 1 - Neutro Fase 2 - Neutro Fase 1 - Fase 2 120 V 120 V 208 V / 240 V Instalación de un cable de alimentación de 4 conductores ADVERTENCIA ADVERTENCIA El conductor neutral - Samsung NE63T8711SG/AA | Installation Guide - Page 27
Paso 4. Instalación del conducto Retire la placa de conexión del conducto y rótela como se muestra a continuación. Se debe utilizar el orificio de conducto (11⁄8"). 11⁄8" 13⁄8" 13⁄8" 11⁄8" 1. Prepare el cable de conducto como se muestra en la Figura 1. 2. Instale el cable de conducto como se - Samsung NE63T8711SG/AA | Installation Guide - Page 28
Cómo conectar la corriente eléctrica PRECAUCIÓN Debe verificar el voltaje después de conectar el cable de alimentación. Fase 1 - Neutro Fase 2 - Neutro Fase 1 - Fase 2 120 V 120 V 208 V / 240 V Instalación de un conducto de 4 conductores • Se puede utilizar alambre de construcción de aluminio - Samsung NE63T8711SG/AA | Installation Guide - Page 29
Instalación de la estufa Paso 5. Colocación de la cubierta de acceso Para volver a colocar la cubierta de acceso en la parte trasera de la estufa, inserte las dos pestañas de la parte trasera de la cubierta en las cavidades ubicadas debajo de la abertura y luego inserte y ajuste el tornillo de la - Samsung NE63T8711SG/AA | Installation Guide - Page 30
Instalación de la estufa 1. Instale la ménsula utilizando la plantilla. La ménsula anti inclinación se encuentra empacada junto con una plantilla. Las instrucciones incluyen la información necesaria para completar la instalación. Lea y siga las instrucciones en la hoja (plantilla) para la instalaci - Samsung NE63T8711SG/AA | Installation Guide - Page 31
e imposibilita el vuelco. • Encienda la corriente eléctrica. Controle el funcionamiento correcto de la estufa tal como se describe en el manual del usuario. Ménsula anti inclinación Pata niveladora Instalación de la estufa Install_NE63T8911_AA_DG68-01257A-00_MES.indd 15 Español 15 2020-03-26 - Samsung NE63T8711SG/AA | Installation Guide - Page 32
Consumer Electronics CANADA LLAME AL 1-800-SAMSUNG (726-7864) 1-800-SAMSUNG (726-7864) O VISÍTENOS EN LÍNEA EN www.samsung.com/us/support www.samsung.com/ca/support (English) www.samsung.com/ca_fr/support (French) DG68-01257A-00 Install_NE63T8911_AA_DG68-01257A-00_MES.indd 16 2020-03-26 6:27:42 - Samsung NE63T8711SG/AA | Installation Guide - Page 33
Cuisinière électrique Manuel d'installation NE63*8***** Install_NE63T8911_AA_DG68-01257A-00_CFR.indd 1 2020-03-26 6:27:28 - Samsung NE63T8711SG/AA | Installation Guide - Page 34
ou des blessures mortelles chez l'enfant et l'adulte. 13 15 A propos de ce manuel LISEZ ENTIÈREMENT ET ATTENTIVEMENT CES INSTRUCTIONS. Remarque importante destinée à l'installateur • Lisez l'intégralité des consignes d'installation avant d'installer la cuisinière. • Retirez tous les éléments - Samsung NE63T8711SG/AA | Installation Guide - Page 35
ère Remarque importante destinée à l'utilisateur Conservez précieusement ces instructions afin que la personne chargée du contrôle électrique puisse à tête plate Accessoires fournis Crayon Niveau Modèle de support antibasculement Support antibasculement Vis (courtes : x2, longues : x2) Mat - Samsung NE63T8711SG/AA | Installation Guide - Page 36
) B : emplacement autorisé pour la prise électrique IMPORTANT : si vos meubles mesurent plus de 363/4" de hauteur, vous devez installer cette cuisinière sur un support solide et résistant à la chaleur, qui permet de relever la surface de la cuisinière de sorte qu'elle arrive à peu près au niveau du - Samsung NE63T8711SG/AA | Installation Guide - Page 37
Préparation avant l'installation de la cuisinière ATTENTION Vous devez utiliser le kit de fileur arrière pour installer la cuisinière dans un meuble avec découpage pour encastrement. Pour en savoir plus, reportez-vous à la section « Kit de fileur arrière en option » ci-après. REMARQUE Si vous - Samsung NE63T8711SG/AA | Installation Guide - Page 38
Préparation avant l'installation de la cuisinière Dimensions minimales IMPORTANT : pour éliminer tout risque de brûlure ou d'incendie lors de l'accès à l'espace situé au-dessus des éléments de cuisson chauds, évitez d'y aménager tout meuble de rangement. Si un meuble de rangement est situé au- - Samsung NE63T8711SG/AA | Installation Guide - Page 39
de la cuisinière sont inaccessibles une fois la cuisinière installée, il est nécessaire d'utiliser une gaine ou un cordon de service flexible. REMARQUE Si les fils d'alimentation sont mal branchés, le message suivant apparaît à l'écran. • LCD, PMOLED : Wire installation fail (mauvais branchement des - Samsung NE63T8711SG/AA | Installation Guide - Page 40
Mise sous tension Étape 2 : accès au branchement du cordon d'alimentation Desserrez puis retirez la vis du panneau d'accès situé à l'arrière à l'aide d'un tournevis. Retirez le panneau d'accès situé à l'arrière en le tirant bien droit pour le faire sortir. Vous pourrez alors accéder au bornier. - Samsung NE63T8711SG/AA | Installation Guide - Page 41
Étape 3 : installation du cordon d'alimentation Pour l'installation du cordon d'alimentation, accrochez le réducteur de tension sur l'orifice du cordon d'alimentation (13/8") situé sous la partie arrière du tiroir. Insérez le cordon d'alimentation dans le réducteur de tension et serrez ce dernier. - Samsung NE63T8711SG/AA | Installation Guide - Page 42
Mise sous tension ATTENTION Vous devez vérifier la tension après avoir branché le cordon d'alimentation. Phase 1 - Neutre Phase 2 - Neutre Phase 1 - Phase 2 120 V 120 V 208 V / 240 V Installation d'un cordon d'alimentation à 4 fils AVERTISSEMENT La prise neutre du circuit d'alimentation doit ê - Samsung NE63T8711SG/AA | Installation Guide - Page 43
trou de la gaine (11/8"). Faites ensuite passer le cordon de la gaine dans le réducteur de tension, puis serrez l'anneau de serrage. Réinstallez le support. Installation d'une gaine à 3 fils • Un fil de bâtiment en aluminium peut être utilisé mais il devra être doté de l'intensité et de la tension - Samsung NE63T8711SG/AA | Installation Guide - Page 44
Mise sous tension ATTENTION Vous devez vérifier la tension après avoir branché le cordon d'alimentation. Phase 1 - Neutre Phase 2 - Neutre Phase 1 - Phase 2 120 V 120 V 208 V / 240 V Installation d'une gaine à 4 fils • Un fil de bâtiment en aluminium peut être utilisé mais il devra être doté de - Samsung NE63T8711SG/AA | Installation Guide - Page 45
la cuisinière elle-même. *approximativement 21/32" (16,5 mm) Support antibasculement La vis doit pénétrer dans le bois ou le béton REMARQUE Desserrez le pied de mise à niveau pour installer le support anti-basculement. Un dégagement d'au moins 21/32" (16,5 mm) est - Samsung NE63T8711SG/AA | Installation Guide - Page 46
Installation de la cuisinière 1. Installation du support à l'aide du modèle Le support anti-basculement s'accompagne d'un modèle. Les consignes comportent les informations nécessaires à l'exécution de l'installation. Lisez et suivez les consignes figurant sur la fiche ( - Samsung NE63T8711SG/AA | Installation Guide - Page 47
ère ne bascule pas. • Mettez l'appareil sous tension. Vérifiez que la cuisinière fonctionne correctement comme indiqué dans le manuel d'utilisation. Support antibasculement Pied de mise à niveau Install_NE63T8911_AA_DG68-01257A-00_CFR.indd 15 Français 15 2020-03-26 6:27:32 Installation de la - Samsung NE63T8711SG/AA | Installation Guide - Page 48
que la garantie Samsung n'inclut pas les déplacements du service après-vente pour expliquer le fonctionnement de l'appareil, corriger SITE INTERNET www.samsung.com/us/support www.samsung.com/ca/support (English) www.samsung.com/ca_fr/support (French) DG68-01257A-00 Install_NE63T8911_AA_DG68-
-
 1
1 -
 2
2 -
 3
3 -
 4
4 -
 5
5 -
 6
6 -
 7
7 -
8
-
9
-
10
-
11
-
12
-
13
-
14
-
15
-
16
-
17
-
18
-
19
-
20
-
21
-
22
-
23
-
24
-
25
-
26
-
27
-
28
-
29
-
30
-
31
-
32
-
33
-
34
-
35
-
36
-
37
-
38
-
39
-
40
-
41
-
42
-
43
-
44
-
45
-
46
-
47
-
48
 |
 |
Electric Range
Installation manual
NE63*8*****
Install_NE63T8911_AA_DG68-01257A-00_EN.indd
1
2020-03-26
°° 6:27:49