Samsung P207 User Manual (user Manual) (ver.f5) (English)
Samsung P207 - SGH Cell Phone Manual
 |
View all Samsung P207 manuals
Add to My Manuals
Save this manual to your list of manuals |
Samsung P207 manual content summary:
- Samsung P207 | User Manual (user Manual) (ver.f5) (English) - Page 1
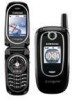
SGH-P207 Series PORTABLE Tri/DualMode TELEPHONE User Guide Please read this manual before operating your phone, and keep it for future reference. UCEC5.02_WBp207_033005_F5 - Samsung P207 | User Manual (user Manual) (ver.f5) (English) - Page 2
Samsung or its respective suppliers relating to the SAMSUNG Phone, including but not limited to, accessories, parts, or software relating there to (the "Phone System"), is proprietary to Samsung disassemble, or otherwise attempt to create source code from the software. No title to or ownership in the - Samsung P207 | User Manual (user Manual) (ver.f5) (English) - Page 3
WITH THE PRODUCT, THE PURCHASER TAKES THE PRODUCT "AS IS", AND SAMSUNG MAKES NO EXPRESS OR IMPLIED WARRANTY OF ANY KIND WHATSOEVER WITH RESPECT TO REQUIREMENTS OF ANY LAW, RULE, SPECIFICATION OR CONTRACT PERTAINING THERETO. NOTHING CONTAINED IN THE INSTRUCTION MANUAL SHALL BE CONSTRUED TO CREATE AN - Samsung P207 | User Manual (user Manual) (ver.f5) (English) - Page 4
- Samsung P207 | User Manual (user Manual) (ver.f5) (English) - Page 5
Voice Mail Box 11 Accessing Your Voice Mail 11 Changing the Voice Mail Number 11 Section 2: Understanding Your Phone . . . . . 13 Features of Your Phone 14 Front View of Your Phone (Open 15 Keys 16 Icons 18 Section 3: Call Functions 21 Making a Call 22 Answering a Call 23 Adjusting the - Samsung P207 | User Manual (user Manual) (ver.f5) (English) - Page 6
99 Checking Memory Status 104 Section 8: Changing Your Settings 107 Sound Settings 108 Display Settings 111 Phone Settings 114 Connection Settings 116 Time & Date 117 Network Services Settings 119 Security Settings 126 Reset Settings 129 Section 9: Multimedia 131 Using the Camera 132 2 - Samsung P207 | User Manual (user Manual) (ver.f5) (English) - Page 7
Browser 160 Using Favorites 163 Downloading Multimedia Files 164 Clearing the Cache 165 Changing the WAP Profiles 166 Section 12: Health and Safety Information . 169 Health and Safety Information 170 Consumer Information on Wireless Phones 191 Battery Standby and Talk Time 191 Battery Precautions - Samsung P207 | User Manual (user Manual) (ver.f5) (English) - Page 8
Table of Contents Section 13: Warranty Information 195 Standard Limited Warranty 196 Intellectual Property Statement 202 Samsung Telecommunications America (STA), L.P. . . 203 Index 204 4 - Samsung P207 | User Manual (user Manual) (ver.f5) (English) - Page 9
1: Getting Started Topics Covered • Activating Your Phone • Setting Up Voice mail This section allows you to start using your phone by activating your service, setting up your voice mail, contacting customer support, or getting an understanding of how this manual is put together. Section 1: Getting - Samsung P207 | User Manual (user Manual) (ver.f5) (English) - Page 10
Section 1 Activating Your Phone When you subscribe to a cellular network, you are provided with a plug-in SIM card loaded with your subscription details, such as your PIN or any optional services available. To Install the SIM card, use the following instructions: Installing the SIM Card Note: The - Samsung P207 | User Manual (user Manual) (ver.f5) (English) - Page 11
Section 1 Activating Your Phone Make sure the gold colored contacts of the card face into the phone. 4. To remove the SIM card, slide it upwards, as shown, and take it out of the socket. 5. Replace the battery so that the tabs on the end align with the slots at the bottom of the phone. Section - Samsung P207 | User Manual (user Manual) (ver.f5) (English) - Page 12
is powered by a rechargeable Li-ion battery. A travel charger comes with your phone for charging the battery. Use only approved batteries and chargers. Ask your local Samsung dealer for further details. The travel charger allows you to use the phone while the battery is charging, but this causes the - Samsung P207 | User Manual (user Manual) (ver.f5) (English) - Page 13
Note: You must fully charge the battery before using your phone for the first time. A discharged battery recharges fully in approximately 200 minutes. To charge the battery: 1. With the battery in position on the phone, plug the connector of the travel charger into the jack at the bottom of the - Samsung P207 | User Manual (user Manual) (ver.f5) (English) - Page 14
turn off the backlight to conserve the remaining battery power. When the battery level is too low, the phone turns off automatically. Turning on Your Phone 1. Press and hold the key until the phone turns on. 2. If the phone asks you to enter a password, enter a password and press the OK soft key or - Samsung P207 | User Manual (user Manual) (ver.f5) (English) - Page 15
Section 1 Dialing Your Voice Mail Box Turning off Your Phone Press and hold the key until the power-off or the key. Press the OK soft key or the key when Voice Server 1 is displayed. Your phone dials the specified number of the voice mail center. 5. When connected, follow the voice prompts from the - Samsung P207 | User Manual (user Manual) (ver.f5) (English) - Page 16
Section 1 number. Use the following procedures to change your voice mail number. 1. In Idle mode, press the Menu soft key to access the Menu mode. 2. Highlight Recent Calls and press the soft key or the key. 3. Highlight Voice Mail and press the soft key or the key. 4. Highlight Voice Mail Number - Samsung P207 | User Manual (user Manual) (ver.f5) (English) - Page 17
Understanding the Display Screen This section outlines some key features of your phone. It also displays the screen and the icons that will are displayed when the phone is in use. This section outlines some key features of your phone. It also displays the screen and the icons that will are displayed - Samsung P207 | User Manual (user Manual) (ver.f5) (English) - Page 18
many significant features. The following list outlines a few of the features included in your phone. User friendly, menu driven access to features and options. • Voicesignal software that supports voice commands and dictation for composing SMS • Instant Messaging capability • Multimedia capability - Samsung P207 | User Manual (user Manual) (ver.f5) (English) - Page 19
Front View of Your Phone (Open) Front View of Your Phone (Open) Section 2: Understanding Your Phone 15 Section 2 - Samsung P207 | User Manual (user Manual) (ver.f5) (English) - Page 20
Front View of Your Phone (Closed) Keys The following list correlates to the from and rear characters. 5. Enters special characters and performs various functions. 6. Charger/PC data link cable jack used to charge your handset or to synchronize data between your handset and PC. 16 Section 2 - Samsung P207 | User Manual (user Manual) (ver.f5) (English) - Page 21
the display. In Menu mode, returns you to the previous menu level. 9. Ends a call. Also switches the phone on or off when held down. 10. In Idle mode, launches the WAP (Wireless Application Protocol) browser. In Menu mode, selects the highlighted menu option or confirms your input. 11. In Idle mode - Samsung P207 | User Manual (user Manual) (ver.f5) (English) - Page 22
In Menu mode, scrolls through the menu options. 17. Service light indicates the handset is on and active. 18. Front LCD display showing the time. 19. The external camera key used to launch the camera - Samsung P207 | User Manual (user Manual) (ver.f5) (English) - Page 23
if you are subscribed to the service. Appears when Silent mode is active or you set the phone to vibrate when you receive a call. Appears when Mute mode is active. For details, see "Switching Off the Microphone (Mute)" on page 29. Shows the level of your battery. The more bars you see, the - Samsung P207 | User Manual (user Manual) (ver.f5) (English) - Page 24
with the remote server is in progress. Back Light The backlight illuminates the display and the keypad. When you press any key or open the phone, the backlight turns on. It goes off when no keys have been presed within a given period of time, depending on the setting in the Back - Samsung P207 | User Manual (user Manual) (ver.f5) (English) - Page 25
Section 3: Call Functions Topics Covered • Making a Call • Answering a Call • Adjusting the Call Volume • Call Log • Silent Mode This section allows you to make or answer a call. It also includes the features and functionality associated with making or answering a call. Section 3: Call Functions 21 - Samsung P207 | User Manual (user Manual) (ver.f5) (English) - Page 26
. Making an International Call 1. Press and hold the key. The + character appears. 2. Enter the country code, area code, and phone number and press the key. Redialing the Last Number The phone stores the number of calls dialed, received, or missed. In Idle mode, press and hold the key to redial the - Samsung P207 | User Manual (user Manual) (ver.f5) (English) - Page 27
answer the incoming call. When the Active Folder option in the Extra Settings menu is activated, you can answer the call simply by opening the phone. Notes: To reject the call, press the Reject soft key or the key. You can mute the ringer by pressing the volume keys on the - Samsung P207 | User Manual (user Manual) (ver.f5) (English) - Page 28
The number of calls missed displays on the Idle screen immediately after a call is missed. To view a missed call immediately: 1. If necessary, open the phone. 2. Press the View soft key or the key. The number for the most recent missed call displays. 3. To scroll through the missed calls, press the - Samsung P207 | User Manual (user Manual) (ver.f5) (English) - Page 29
the Select soft key or the key. 7. Choose the location (SIM Memory or Phone Memory) and press the Select soft key or the key. 8. Enter a the Missed Call feature by selecting Recent Calls then Missed Calls. Call Log The phone stores the numbers of the calls you've dialed, received or missed. You can - Samsung P207 | User Manual (user Manual) (ver.f5) (English) - Page 30
2. To view options, press the Options soft key. Choose from the View, Edit, Delete or Delete All options. Editing Numbers in the Call Log 1. To edit the number, highlight Edit and press the soft key or the key. Make the edits to the number. 2. Press the Save soft key and highlight the entry type. 3. - Samsung P207 | User Manual (user Manual) (ver.f5) (English) - Page 31
reset. • Reset Timers: clears all call data associated. You can select Reset Timers to reset the call timers. You must first enter the phone password and then press the OK soft key or the key. Note: The password of making sounds, your phone will vibrate, flash the service light, or do nothing, - Samsung P207 | User Manual (user Manual) (ver.f5) (English) - Page 32
have a call in progress if your network supports this service. 1. To place a call on hold, simply press the Hold soft key. 2. To reactivate the call, press the Unhold key. Making a Second Call To make a call while you have a call in progress: 1. Enter the phone number that you wish to dial or look - Samsung P207 | User Manual (user Manual) (ver.f5) (English) - Page 33
answer an incoming call while you have a call in progress, if this service is supported by the network and you have set Call Waiting to Activate; see Microphone (Mute) You can temporarily switch off your phone's microphone, so that the person on the phone cannot hear you. For example, you wish to - Samsung P207 | User Manual (user Manual) (ver.f5) (English) - Page 34
Tones Mute Keys and Send Keys options allow you to turn off and on the key tones. If the Mute Keys option is selected, your phone does not transmit the DTMF (Dual Tone Multi-Frequency) tones of the keys, which allows you to press keys without hearing key tones during a call - Samsung P207 | User Manual (user Manual) (ver.f5) (English) - Page 35
that allows up to six people to take part simultaneously in a multi-party call. For further details about subscribing to this service, contact your service provider. Setting up a Conference Call 1. Call the first participant in the normal way. Call the second participant in the normal way. The - Samsung P207 | User Manual (user Manual) (ver.f5) (English) - Page 36
call with that participant ends, but you can continue to talk to the other participants. 4. When you want to end the conference call, close the phone or press the key. 32 Section 3 - Samsung P207 | User Manual (user Manual) (ver.f5) (English) - Page 37
Section 4 Section 4: Menu Navigation Topics Covered • Menu Navigation • Menu Outline This section explains the menu navigation for your phone. It also includes an outline of all the available menus associated with your phone. Section 4: Menu Navigation 33 - Samsung P207 | User Manual (user Manual) (ver.f5) (English) - Page 38
Section 4 Menu Navigation Your phone offers a range of functions that allow you to tailor it to your needs. These functions are arranged in menus and sub-menus. There are two - Samsung P207 | User Manual (user Manual) (ver.f5) (English) - Page 39
press the Menu soft key and enter the number of the menu you want. Note: They may not match the menu number on the phone, depending on the services supported by your SIM card. For example, accessing the Language menu. 1. In Idle mode, press the Menu soft key to access Menu mode. 2. Press - Samsung P207 | User Manual (user Manual) (ver.f5) (English) - Page 40
4 1.6 Call Time 1.6.1 Last Call 1.6.2 Total Received 1.6.3 Total Made 1.6.4 Reset Timers 1.7 Data Volume 1.7.1 Recent Volume 1.7.2 Total Volume 1.7.3 Reset Volume 1.8 Data Call Time 1.8.1 Recent Time 1.8.2 Total Time 1.8.3 Reset Timers 2. Messaging 2.1 IM 2.2 Create New Message 2.2.1 Text Message - Samsung P207 | User Manual (user Manual) (ver.f5) (English) - Page 41
Section 4 2.3.4 Outbox 2.3.5 Draft 2.3.6 My Folders 2.4 Templates 2.5 Chat 2.6 Delete All 2.7 Settings 2.7.1 IM 2.7.2 Text Message 2.7.3 Multimedia Message 2.7.4 Email 2.7.5 Push Message 2.7.6 Broadcast* 2.7.7 Default Text Input Mode 2.8 Memory Status 3. Games 4. Applications 4.1 Alarm 4.1.1 Single - Samsung P207 | User Manual (user Manual) (ver.f5) (English) - Page 42
Section 4 4.2 Calendar 4.3 To Do List 4.4 Calculator 4.5 Currency Exchange 5. MEdia Mall 5.1 Shop Ringtones 5.2 Shop Games 5.3 Shop Graphics 5.4 Shop Multimedia 5.5 Shop Applications 5.6 MEdia Home 6. Multimedia 6.1 Camera 6.1.1 Photo 6.1.2 Video 6.1.3 Photo Album 6.1.4 Video Album 6.1.5 Delete All - Samsung P207 | User Manual (user Manual) (ver.f5) (English) - Page 43
Section 4 7. My MEdia 7.1 MEdia Net 7.1.1 MEdia Net Home 7.1.2 Favorites 7.1.3 http:// 7.1.4 Settings 7.1.5 Clear Cache 7.2 Audio 7.3 Graphics 7.4 Video 7.5 Delete All 7.6 Memory Status 8. Address Book 8.1 Search 8.2 New Entry 8.3 Group Search 8.4 Group Edit 8.5 Speed Dial 8.6 Delete All 8.7 Own - Samsung P207 | User Manual (user Manual) (ver.f5) (English) - Page 44
9.1.3 Shop Ringtones 9.1.4 Alert Type 9.1.5 Keypad Tone 9.1.6 Message Tone 9.1.7 Folder Tone 9.1.8 Power On/Off 9.1.9 Alerts on Call 9.1.0 Extra Tones 9.2 Display Settings 9.2.1 Wallpaper 9.2.2 Front LCD Display 9.2.3 Shop Graphics 9.2.4 Menu Style 9.2.5 Back Light 9.2.6 Service Light 9.2.7 Graphic - Samsung P207 | User Manual (user Manual) (ver.f5) (English) - Page 45
MMS 9.4.5 Cingular IM 9.4.6 Cingular Email 9.4.7 Cingular Syncml 9.4.8 Cingular JAVA 9.4.9 Profile 9 9.4.0 Profile 10 9.5 Time & Date 9.5.1 Set Time 9.5.2 Set Date 9.5.3 World Time 9.5.4 Time Format 9.5.5 Auto Update 9.6 Network Services 9.6.1 Call Forwarding 9.6.2 Call Barring* 9.6.3 Call Waiting - Samsung P207 | User Manual (user Manual) (ver.f5) (English) - Page 46
Section 4 9.6.5 Caller ID 9.6.6 Closed User Group* 9.6.7 Band Selection 9.7 Security 9.7.1 PIN Check 9.7.2 Change PIN 9.7.3 Phone Lock 9.7.4 Change Password 9.7.5 Privacy 9.7.6 SIM Lock 9.7.7 FDN Mode* 9.7.8 Change PIN2* 9.8 Reset Settings * Shows only if supported by your SIM card. 42 - Samsung P207 | User Manual (user Manual) (ver.f5) (English) - Page 47
Alphabet Mode • Entering Numbers • Entering Symbols This section outlines how to select the desired text input mode when entering characters into your phone. This section also describes how to use the T9 predictive text entry system to reduce the amount of key strokes associated with entering text - Samsung P207 | User Manual (user Manual) (ver.f5) (English) - Page 48
Changing the Text Input Mode When you are in a field that allows characters to be entered, you will notice the text input mode indicator on the display. For example, the following screen displays when writing a text message. Section 5 1. To select VoiceModeTM, press the VoiceModeTM displays. key - Samsung P207 | User Manual (user Manual) (ver.f5) (English) - Page 49
words, names, punctuation, and even abbreviations (like LOL and TTYL), instead of keying them in by hand. VoiceMode is seamlessly integrated into your phone's text messaging application, so you can switch from keypad text entry to voice dictation with a push of a button. Section 5 To use VoiceMode - Samsung P207 | User Manual (user Manual) (ver.f5) (English) - Page 50
start adaptation, select OK. (If you or someone else has completed adaptation earlier, the phone will ask if you want to start from scratch or continue adapting the existing models. Select Yes to discard existing adaptation data and start from scratch, or select No to continue adapting the existing - Samsung P207 | User Manual (user Manual) (ver.f5) (English) - Page 51
press Cancel during adaptation, the phone will ask if you want to save the adaptation data. Press Yes to save the data, or No to exit without saving 4. When prompted, press OK to reset adaptation, or Cancel to exit without resetting the adaptation data. Using VoiceMode After adapting VoiceMode, you - Samsung P207 | User Manual (user Manual) (ver.f5) (English) - Page 52
. Press the View soft key to proceed or Cancel to return. 4. To activate VoiceMode, press and hold the button on the right side of the phone. VoiceMode beeps and animates the Listening icon at the top right of the screen to indicate that you can begin speaking. To dictate text using - Samsung P207 | User Manual (user Manual) (ver.f5) (English) - Page 53
in the choice list, it might be because that word is not in the dictation dictionary. In this case, you can spell out the word manually. When you spell a word that is not part of the dictation dictionary, the new word is added to the dictionary. This enables VoiceMode to recognize - Samsung P207 | User Manual (user Manual) (ver.f5) (English) - Page 54
Section 5 3. As you start typing letters, you will see words with similar spellings appear below the text box. Use the up and down navigation keys to scroll the dictionary. While scrolling the dictionary, the words will populate the text box. Use the key to edit the entry in the text box. Changing - Samsung P207 | User Manual (user Manual) (ver.f5) (English) - Page 55
appear in the specified case. Changing the text case will apply to all the words spoken directly after specifying the case. You must manually change the case back to the default. Section 5 Entering Punctuation Characters VoiceMode recognizes most punctuation characters by name. The following is - Samsung P207 | User Manual (user Manual) (ver.f5) (English) - Page 56
Section 5 Starting VoiceSignal To start VoiceSignal 2.0, press the on your phone. VoiceSignal prompts you to "Say a command" and displays the available commands at the bottom of the screen. Note: When you first start VoiceSignal, it voice- - Samsung P207 | User Manual (user Manual) (ver.f5) (English) - Page 57
Section 5 Calling a Name or Number mobile, etc.) you want to call. If the number is not in your contact list, you can say the number itself. To Call A Name Or Number 1. Start VoiceSignal. You hear "Say a command." 2. Say "Call" followed by the name of a person in your contact list, and optionally, - Samsung P207 | User Manual (user Manual) (ver.f5) (English) - Page 58
's navigation keys. For information on turning off choice lists, or customizing their behavior, see the appendix, "VoiceSignal Settings." 6. If the phone recognizes a name that has more than one stored number, it might prompt you "Which number?" Say the label for the number you want, for example - Samsung P207 | User Manual (user Manual) (ver.f5) (English) - Page 59
Section 5 Sending a Message recognizes the digits one, two, three, four, five, six, seven, eight, nine, zero, and "oh." It does not recognize expressions such as "one eight hundred." Instead, say "one eight zero zero." If VoiceSignal doesn't recognize numbers correctly, try adapting digit dialing - Samsung P207 | User Manual (user Manual) (ver.f5) (English) - Page 60
your contact list, first name followed by last name. If you say a name for which there are multiple phone numbers stored, by default VoiceSignal assumes you want to send the message to the mobile phone number. If you want to send a message to a different number (home, work, etc.) you can say the - Samsung P207 | User Manual (user Manual) (ver.f5) (English) - Page 61
contact list, first name followed by last name. Opening an Application Use the "Go To" command to open an application or access a menu on your phone. To Open An Application Or Access A Menu 1. Start VoiceSignal. You hear "Say a command." 2. Say "Go To" or... Say "Go To" followed by the application - Samsung P207 | User Manual (user Manual) (ver.f5) (English) - Page 62
Status Use the Check command to see and hear status information from your phone, including its phone number, current signal strength, network coverage, and battery level. To Check Phone Status 1. Start VoiceSignal. You hear "Say a command." 2. Say "Check" followed by one of items listed in the table - Samsung P207 | User Manual (user Manual) (ver.f5) (English) - Page 63
Section 5 VoiceSignal Settings VoiceSignal Settings Choice Lists If VoiceSignal is not absolutely confident that it has correctly identified a name or number, it can display a choice list of up to three possibilities, and prompt you to confirm the correct one. You can control when choice lists - Samsung P207 | User Manual (user Manual) (ver.f5) (English) - Page 64
number sequence. Adapt Digits: Lets you adapt digits, which can improve voice recognition of phone numbers. Adaptation takes about 60 seconds. Reset Digits: Erases any digit adaptation you have done and resets digit recognition to the factory default. If you have not adapted digits, this option is - Samsung P207 | User Manual (user Manual) (ver.f5) (English) - Page 65
the VoiceSignal user interface by on or off for digits, for example, when confirming a phone number. Names: Turns playback on or off for names. Names software. This option will step you through the functions and options used in VoiceMode. Reset VoiceMode: Erases any VoiceMode enrollment data - Samsung P207 | User Manual (user Manual) (ver.f5) (English) - Page 66
Down key to display alternative word choices for the keys that you have pressed. For example, both "Of" and "Me" have the 6 and 3 keys. The phone displays the most commonly used choice first. 4. Insert a space by pressing the # key and start entering the next word. Adding a New Word into the T9 - Samsung P207 | User Manual (user Manual) (ver.f5) (English) - Page 67
Section 5 Using Alphabet Mode 3. If necessary, clear the word using the key and enter the word you want to add using Alphabet mode. See "Using Alphabet Mode" on page 63. 4. Press the OK soft key or the key. The word is added to the T9 dictionary and becomes the first word for the associated - Samsung P207 | User Manual (user Manual) (ver.f5) (English) - Page 68
Section 5 Keys • Tips for Using Alphabet Mode • To insert a space, press the # key. 64 - Samsung P207 | User Manual (user Manual) (ver.f5) (English) - Page 69
Section 5 Using the Number Mode • To shift case in Alphabet mode, use the key. There are three cases: Capital Lock , Lower case , and Initial Capital . • You can move the cursor by using the Navigation keys. To delete letters, press the key. Press and hold the key to clear the display. Using the - Samsung P207 | User Manual (user Manual) (ver.f5) (English) - Page 70
Section 5 66 - Samsung P207 | User Manual (user Manual) (ver.f5) (English) - Page 71
Section 6: Understanding Your Address Book Topics Covered • Adding a New Address Book Entry • Dialing a Number from the Address Book • Speed Dialing • Finding a Address Book Entry • Editing an Existing Address Book Entry • Deleting an Address Book Entry • Checking the Memory Status This section - Samsung P207 | User Manual (user Manual) (ver.f5) (English) - Page 72
the Select soft key or the key. Three categories are available: ⅷ : Mobile phone number ⅷ : Office number ⅷ : Home number 4. Select a memory location, either SIM Memory or Phone Memory. Note: When you change phones, any numbers stored in your SIM card memory are automatically available with the new - Samsung P207 | User Manual (user Manual) (ver.f5) (English) - Page 73
, select the one you want from the list. 6. Press the OK soft key or key to store the name and number. After storing, the phone displays the phone number and name you just stored. 7. To dial the number, press the key or the key. 8. To use the entry options, press the Options - Samsung P207 | User Manual (user Manual) (ver.f5) (English) - Page 74
key. 4. Enter a name for the number and press the OK soft key or the key. Dialing a Number from the Address Book Once you have stored phone numbers in the Address Book, you can dial them easily and quickly by using the location numbers that were assigned to them in the Address - Samsung P207 | User Manual (user Manual) (ver.f5) (English) - Page 75
from the SIM Card 1. In Idle mode, enter the location number for the phone number you want to dial and press the # key. The list of the entries have selected the number you want. Speed Dialing You can assign up to 8 phone numbers from the Address Book that you use frequently to the number keys (2 to - Samsung P207 | User Manual (user Manual) (ver.f5) (English) - Page 76
Setting up Speed Dial Entries 1. In Idle mode, press the Names soft key. You can also press the Menu soft key to access Menu mode and select the Address Book. 2. Select Speed Dial. 3. Select the key to which you wish to assign the speed dialing number, from the 2 to 9 keys. If you have already - Samsung P207 | User Manual (user Manual) (ver.f5) (English) - Page 77
Finding an Entry in Address Book 3. Press the Options soft key or the key and select Change. 4. Select a number to assign as you would set up the list. 5. When you have finished, press the key. Deleting Speed Dial Entries 1. In Idle mode, press the Names soft key. You can also press the Menu soft - Samsung P207 | User Manual (user Manual) (ver.f5) (English) - Page 78
the entry. The following options are available: Edit: allows you to edit the name and/or number One Entry: to change the name and/or phone number for the selected entry. If you change the name, the number is saved separately with the new name. All Entry: to change only the - Samsung P207 | User Manual (user Manual) (ver.f5) (English) - Page 79
and save or delete. Audio: allows you to select a ring tone from the Default, Downloads, or Listen option. Delete Caller ID: allows you to cancel the Caller ID settings for the memory location, either SIM or Phone, and the location number. Section 6: Understanding Your Address Book 75 Section 6 - Samsung P207 | User Manual (user Manual) (ver.f5) (English) - Page 80
Caller Group: allows you to organize your Address Book entries in caller groups so that the phone alerts you in a specific way when a person from one of your groups calls you. Select one of the 10 groups available. To remove an entry from a group, select the - Samsung P207 | User Manual (user Manual) (ver.f5) (English) - Page 81
Deleting Address Book Entries 7. Once you have found the entry, press the key or the key to dial the number. Alternatively, press the Options soft key to access the Address Book entry options. Editing a Caller Group 1. In Idle mode, press the Names soft key. you can also press the Menu soft key to - Samsung P207 | User Manual (user Manual) (ver.f5) (English) - Page 82
key to delete the entries in the selected memory location(s). 5. Enter the phone password and press the OK soft key or the key. Note: The password is preset to "00000000" at the factory. To change this password, see "Change Password" on page 128. 6. When a confirmation message appears, press the Yes - Samsung P207 | User Manual (user Manual) (ver.f5) (English) - Page 83
Status Checking the Memory Status You can check how many names and numbers are stored in the Address Book, in both the SIM and the phone's memories. You can also see the capacity of both memories. 1. In Idle mode, press the Names soft key. You can also press the Menu soft - Samsung P207 | User Manual (user Manual) (ver.f5) (English) - Page 84
Section 6 80 - Samsung P207 | User Manual (user Manual) (ver.f5) (English) - Page 85
Section 7: Messaging Topics Covered • Using Instant Messenger • Creating and Sending New Messages • Creating a Long Text Message • Retrieving New Messages • Viewing Messages • Deleting Messages • Changing Message Settings • Checking Memory Status This section allows you to send or receive different - Samsung P207 | User Manual (user Manual) (ver.f5) (English) - Page 86
, contact our service provider. Note: Your phone is set to use your service provider's messenger service by default. You can change the configurations for Instant Messenger, such as the default community or auto sign on. Start Your Messenger Note: The p207 handset supports the following Instant - Samsung P207 | User Manual (user Manual) (ver.f5) (English) - Page 87
Press the Options soft key and select Buddy List. The subscribers of the messenger service displays. 7. Select the person you want to talk to. 8. Start the conversation Conversation Log. Creating and Sending New Messages This section guides you through the procedure to send various types of messages - Samsung P207 | User Manual (user Manual) (ver.f5) (English) - Page 88
Note: Use the key to change text input settings. 4. Create your message. 5. When you have finished writing the message, press the Options soft key. Choose from the following options: ⅷ Send to Number: allows you to select from Save and Send or Send Only to the specified number. ⅷ Send to Email: - Samsung P207 | User Manual (user Manual) (ver.f5) (English) - Page 89
URL address in the Favorites folder. ⅷ Add Media: allows you to add one from various default media items, such as Pictures, Animations, Melodies and Downloads. ⅷ Attach: you can add entries from the Name Card (vCard) and an vEvent or vTodo from the Calendar (vCalendar). ⅷ Save Message to: allows - Samsung P207 | User Manual (user Manual) (ver.f5) (English) - Page 90
. You can take a new photo or add one of the photos stored in the phone's memory. Select Take Photo to take a new photo, or Photo Album to add one of the photos stored in the phone's memory, or Downloads to add one of the graphics stored in your graphics folder. For further details - Samsung P207 | User Manual (user Manual) (ver.f5) (English) - Page 91
voice memo or Audio List to add one of the voice memos or sound clips stored in the phone's memory. You can add Downloaded sounds if they are in correct format and your service provider supports them. ⅷ Add Subject: allows you to enter text for the subject. ⅷ Send: allows you to send the message - Samsung P207 | User Manual (user Manual) (ver.f5) (English) - Page 92
Address: allows you to enter the email address of the recipient. ⅷ Address Book: allows you to retrieve a number from your Address Book. 11. Enter a Phone Number or an Email Address, or select a number from the Address Book. 12. When the correct number or address displays, press the OK soft key - Samsung P207 | User Manual (user Manual) (ver.f5) (English) - Page 93
have finished entering the destinations, select Send Message. Your phone sends the message. Creating and Sending an Email 1. In recorded or previously recorded audio stored in the Audio List, or audio stored in the Downloads folder. After selecting the file type you want to add, choose an item from - Samsung P207 | User Manual (user Manual) (ver.f5) (English) - Page 94
ⅷ View Attachment: allows you to view the information included in the email attachment . If you want to remove an attached item, select Attachment View soft key and then the Discard soft key. 7. Select Insert to add a message text from the Text Templates folder, an entry in Address Book, or a URL - Samsung P207 | User Manual (user Manual) (ver.f5) (English) - Page 95
Creating a Long Text Message 17. When you are finished adding the destinations, select Send Email. Your phone sends the email. Using Message Templates Your phone has message templates to allow you to retrieve them when creating a message. You can change the templates as your preferences or send a - Samsung P207 | User Manual (user Manual) (ver.f5) (English) - Page 96
message server and the server will alert you to new messages. Therefore you need to retrieve new messages to your phone and read them on the phone. The default value of Auto Download is On. To change this setting see, "Changing Message Settings" on page 99. Retrieving an MMS Message When a new MMS - Samsung P207 | User Manual (user Manual) (ver.f5) (English) - Page 97
icon ( ) and a text notification. 1. Press the View soft key or the key to view email information. 2. Press the Options soft key and select Retrieve. Your phone retrieves the new emails from the server and displays them on the Inbox list. 3. To read an email, select it on the list. 4. When you - Samsung P207 | User Manual (user Manual) (ver.f5) (English) - Page 98
mode. 2. Select Messaging. Highlight My Messages and select the message folder. The message list opens. The icons on the left of the number indicates the message type ⅷ : indicates SMS ⅷ : indicates MMS ⅷ : indicates email The icons on the right of the message subject indicate the memory location - Samsung P207 | User Manual (user Manual) (ver.f5) (English) - Page 99
the message has listed. ⅷ Move to Myfolder: allows you to move the message to a specific folder. You must create a folder in the My Folders option. ⅷ Move to Phone/SIM : allows you to move the message to the Phone or SIM card's memory. ⅷ Save Address: allows you to save the address from which the - Samsung P207 | User Manual (user Manual) (ver.f5) (English) - Page 100
allows you to reply to the message. ⅷ Forward: allows you to forward the message to other Email addresses or phone numbers. ⅷ Delete: deletes the message. ⅷ Callback: allows you to call the phone numbers from the message text. ⅷ Move to Myfolder: allows you to move the message to one of the folders - Samsung P207 | User Manual (user Manual) (ver.f5) (English) - Page 101
media items, such as sounds or images, from the message into your phone's memory. You can then use the items when writing a message. ⅷ Protection: allows you to lock the message keeping it from being deleted or unlocks the message. Managing Your Own Message Folders You can create up to 5 message - Samsung P207 | User Manual (user Manual) (ver.f5) (English) - Page 102
4. Press the Options soft key and select Rename Folder. 5. Clear the current name and enter a new name. 6. Press the OK soft key or the key. 7. When you have finished, press the key. Deleting a Message Folder 1. In Idle mode, press the Menu soft key to access Menu mode. 2. Select Messaging. - Samsung P207 | User Manual (user Manual) (ver.f5) (English) - Page 103
Left soft key or the key. 7. When you have finished, press the key. Changing Message Settings You can set up various options for using messaging services. 1. In Idle mode, press the Menu soft key to access Menu mode. 2. Select Messaging and highlight Settings. Press the Select soft key or the key - Samsung P207 | User Manual (user Manual) (ver.f5) (English) - Page 104
you a reply through your message center, if your network supports this service. Delivery Report: allows you to activate or deactivate the report outgoing or incoming messages are stored. Choose from In Card or In Phone. Multimedia Message The following options are available: Delivery Report: when - Samsung P207 | User Manual (user Manual) (ver.f5) (English) - Page 105
retrieves new incoming messages from the MMS server without notifications. Off: you need to manually download new messages by using the Retrieve option. On: the phone automatically retrieves new messages from the server. As soon as you receive a message you can use more options while you are reading - Samsung P207 | User Manual (user Manual) (ver.f5) (English) - Page 106
Contact your email service provider for more information. Note: For the IMAP4 protocol, you can set whether or not the phone retrieves emails messages. Your email service provider can give you this information. ⅷ User ID: enter your email ID. ⅷ Password: enter your email password. ⅷ Outgoing Server - Samsung P207 | User Manual (user Manual) (ver.f5) (English) - Page 107
to Self: you can set whether or not your phone sends a copy of the outgoing email to your or not your phone sends a request for a reply along with your message to the recipient. Download Method: you can : Receive: you can select whether the phone receive or reject push-messages from the WAP server - Samsung P207 | User Manual (user Manual) (ver.f5) (English) - Page 108
change the ID and title of an existing channel. Language: allows you to select your preferred language in which to display cell broadcast messages. Please contact your service provider for further details. Default Text Input Mode VoiceMode: allows you to set the VoiceMode option as your default text - Samsung P207 | User Manual (user Manual) (ver.f5) (English) - Page 109
Checking Memory Status Menu mode. 2. Select Messaging. Highlight Memory Status and press the Select soft key or the key. 3. Select the message type you want. For Text Message, scroll through the memory. The displays shows the number of messages you have stored in the SIM card and memory and the - Samsung P207 | User Manual (user Manual) (ver.f5) (English) - Page 110
Section 7 106 - Samsung P207 | User Manual (user Manual) (ver.f5) (English) - Page 111
Changing Your Settings Topics Covered • Sound Settings • Display Settings • Phone Settings • Connection Settings • Time & Date • Network Services Settings • Security Settings • Reset Settings This section explains the menu navigation for your phone. It also includes an outline of all the available - Samsung P207 | User Manual (user Manual) (ver.f5) (English) - Page 112
. Use the Up and Down Navigation keys or the Up and Down keys on the side of the phone to adjust the volume. Shop Ringtones This menu allows you to access the web site preset by your service provider to download melodies. Once you have downloaded melodies, they are saved in the Audio folder. 108 - Samsung P207 | User Manual (user Manual) (ver.f5) (English) - Page 113
This menu allows you to select how the phone informs you that a new SMS, MMS, Email, or Cell Broadcast (CB) message has been received. For the phone does not use the message tone. ⅷ Tone: the phone sounds the selected message tone. ⅷ Vibration: the phone vibrates. ⅷ Light Only: the service light, - Samsung P207 | User Manual (user Manual) (ver.f5) (English) - Page 114
Tone This menu allows you to select the tone that the phone sounds when you open or close the phone. To turn off the sound, select Off. Power On/Off displays the corresponding notification. Extra Tones You can customize additional tones for the phone. 1. To turn a given tone on, press the On soft key - Samsung P207 | User Manual (user Manual) (ver.f5) (English) - Page 115
every minute during an outgoing call to keep you informed of the length of your call. Connect Tone: sets whether or not the phone beeps when your call is connected to the system. Display Settings To customize the settings for the display use the following steps: 1. In Idle mode, - Samsung P207 | User Manual (user Manual) (ver.f5) (English) - Page 116
the image preview screen. Text Display: you can specify whether or not the phone displays the time and date on the Idle screen. Choose Enable or Disable. you to access the web site preset by your service provider to download images. Once you have downloaded images, they are saved in the Graphics - Samsung P207 | User Manual (user Manual) (ver.f5) (English) - Page 117
the set time, then progresses to the back light timming setting. Service Light The light on the front of the phone flashes at regular intervals to indicate when service is available on the phone. This menu allows you to select whether or not the service light is used or in which color it flashes. If - Samsung P207 | User Manual (user Manual) (ver.f5) (English) - Page 118
SIM card used. Note: Depending on your country, service provider, or software version of the phone, the Automatic option may not display. Short Cut The Navigation keys can be used as shortcut keys. In Idle mode, they allow you to access specific menus directly. To assign a shortcut to a key: 1. From - Samsung P207 | User Manual (user Manual) (ver.f5) (English) - Page 119
. The check mark no longer displays. The following options are available: Auto Redial: when this option is checked, the phone makes up to ten attempts to redial a phone number after an unsuccessful call. Active Folder: when this option is checked, incoming calls are activated when opening the folder - Samsung P207 | User Manual (user Manual) (ver.f5) (English) - Page 120
TTY adaptor is inserted into your phone. For additional technical support you may access the following website browser or Instant Messenger, or sending MMS messages or emails. Note: Your phone connects to the network by default. If you change the MMS settings without first checking with your service - Samsung P207 | User Manual (user Manual) (ver.f5) (English) - Page 121
WAP homepage of your service provider. ⅷ Bearer: select the network bearer type for data transmission, either GPRS or DATA. ⅷ Proxy Setting: enter the IP address of the proxy server. ⅷ User Name: enter the user ID required to connect to the network. ⅷ Password: enter the password required to connect - Samsung P207 | User Manual (user Manual) (ver.f5) (English) - Page 122
the key. Time Format You can change the time format to 12 Hours or 24 Hours. Auto Update You can receive time information from your service provider's network. 118 - Samsung P207 | User Manual (user Manual) (ver.f5) (English) - Page 123
Settings Off: you need to manually set the time and date according to the current time zone using the Set Time menu. On: the phone automatically updates the time and date according to the current time zone using the network service. Confirm First: the phone asks for a confirmation before the - Samsung P207 | User Manual (user Manual) (ver.f5) (English) - Page 124
service provider or when your phone is switched off. ⅷ Cancel All: all call forwarding options are canceled. 3. Select the type of calls, Voice Calls or Data forwarded and press the OK soft key ore the key. To enter an international code, press the 0 key until the + sign displays. 5. If you selected - Samsung P207 | User Manual (user Manual) (ver.f5) (English) - Page 125
type of calls, Voice Calls or Data Calls. 4. Press the Activate soft key or the key. 5. Enter your call barring password supplied by your service provider. The phone sends your settings to the network and the network's acknowledgement displays. Deactivating Specific Call Barring Settings 1. From the - Samsung P207 | User Manual (user Manual) (ver.f5) (English) - Page 126
soft key or the key. 5. Enter your call barring password supplied by your service provider. The phone sends our settings to the network and the network's acknowledgment displays. Changing the Barring Password 1. From the Network Services menu screen, select Call Barring. 2. Select Change Barring - Samsung P207 | User Manual (user Manual) (ver.f5) (English) - Page 127
Section 8 Network Services Settings 2. Select the type of calls, Voice Calls or Data Calls. The screen informs you whether call waiting is activated or deactivated. Press the Activate soft key or the key to activate the call waiting feature. The phone sends your settings to the network and the - Samsung P207 | User Manual (user Manual) (ver.f5) (English) - Page 128
does not display on the other person's phone. Send Number: your number is sent each time you make a call. Closed User Group (SIM Dependent) This network service allows incoming and outgoing calls to be restricted to a selected user group. you can create up to 10 user groups. For details about how to - Samsung P207 | User Manual (user Manual) (ver.f5) (English) - Page 129
Section 8 Network Services Settings If you select the Closed User Group menu, you can enter the CUG check with your service provider. Default Group: you may set a default CUG with your service provider. If you have done so, you can enable the Default Group option on your phone. When making a - Samsung P207 | User Manual (user Manual) (ver.f5) (English) - Page 130
Section 8 The country where you purchased your phone determines the default band that it uses. When you travel abroad, you must remember to change to an appropriate band. 1. From the Network Services menu screen, select Band Selection. 2. Select the appropriate option, and press the OK soft key or - Samsung P207 | User Manual (user Manual) (ver.f5) (English) - Page 131
you have entered a new PIN, you are asked to confirm it by entering it again. Phone Lock When the Phone Lock feature is enabled, the phone is locked and you must enter the 4- 8 digit phone password each time the phone is switched on. The password it preset to "00000000" at the factory. To change the - Samsung P207 | User Manual (user Manual) (ver.f5) (English) - Page 132
is preset to "00000000" at the factory. To change this password, see "Change Password" on page 128. SIM Lock When the SIM Lock feature is enabled, your phone only works with the current SIM. You must enter the SIM lock code to unlock the SIM so you can use a different SIM card. Once you have - Samsung P207 | User Manual (user Manual) (ver.f5) (English) - Page 133
Settings You can easily reset your phone to its' default settings. 1. In Idle mode, press the Menu sot key to access Menu mode. 2. Select Settings. Highlight Reset Settings and press the Select soft key or the key. 3. Enter the 4 to 8-digit password and press the OK soft key or the key. Section - Samsung P207 | User Manual (user Manual) (ver.f5) (English) - Page 134
Section 8 Note: The password is preset to "00000000". To change this password, see "Change Password" on page 128. 130 - Samsung P207 | User Manual (user Manual) (ver.f5) (English) - Page 135
Section 9 Section 9: Multimedia Topics Covered • Using the Camera • Using the Audio Recorder • Memory Status This section explains how to use the multimedia files on your phone. You can take a photo or record a video using the built-in camera, and create voice memo's. Section 9: Multimedia 131 - Samsung P207 | User Manual (user Manual) (ver.f5) (English) - Page 136
or set a wallpaper or caller ID image. You can also record videos using your phone as a camcorder. Caution: Do not take photos of people without their permission. Do In Idle mode, press and hold the key on the right side of the phone to turn on the camera. You can also press the Menu soft key to - Samsung P207 | User Manual (user Manual) (ver.f5) (English) - Page 137
Section 9 Using the Camera 4. Press the key to take the photo. 5. Press the Save soft key or the key. To discard the photo, press the Cancel soft key or the key. 6. To use the photo options, press the Options soft key or the key. 7. To return to Capture mode, select Take another. 8. To return to - Samsung P207 | User Manual (user Manual) (ver.f5) (English) - Page 138
Section 9 Frames: allows you to select a decorative frame. Select a frame from the list using the Navigation keys and press the key to save your setting. Timer: allows you to set a time delay before the camera takes the photo. Select the length of delay you want. When you press the or key, the - Samsung P207 | User Manual (user Manual) (ver.f5) (English) - Page 139
flips the image vertically Using the Camera shows the mirror image Section 9 switches from Camera to Video mode. changes the image size. changes the image quality changes the camera shot mode changes the color tone or applies a special effect to the photo. changes the camera to night shot mode. - Samsung P207 | User Manual (user Manual) (ver.f5) (English) - Page 140
Section 9 4. Press the key to start recording. 5. When you have finished recording, press the key. To discard the recording and return to Record mode, press the Cancel soft key or key. 6. To save recording, press the Save soft key or the key. 7. To use the video options, press the Options soft key. - Samsung P207 | User Manual (user Manual) (ver.f5) (English) - Page 141
Section 9 Using the Camera The following options are available: Effects: allows you to change the color tone or apply special effects to the video. Timer: allows you to set a time delay before the camera starts recording a video. Select the length of delay you want. When you press the key. The - Samsung P207 | User Manual (user Manual) (ver.f5) (English) - Page 142
the Select soft key or the key. 4. Select Photo Album and press the Select soft key or the key. When you access this menu, your phone displays the photos in Thumbnail mode, which shows them as small images. Use the Navigation keys to scroll through the photos. 5. To view the photos - Samsung P207 | User Manual (user Manual) (ver.f5) (English) - Page 143
the Select soft key or the key. 4. Select Video Album and press the Select soft key or the key. When you access this menu, your phone displays the Section 9: Multimedia 139 - Samsung P207 | User Manual (user Manual) (ver.f5) (English) - Page 144
Section 9 photos in Thumbnail mode, which shows them as small images. Use the Navigation keys to scroll through the photos. 5. To play the videos on the full screen, press the Options soft key and select Play or the key. To go back to Thumbnail mode, press the soft key or the key. 6. Press the - Samsung P207 | User Manual (user Manual) (ver.f5) (English) - Page 145
message appears. To include the photos or videos that have file protection, use the key to select Include Protection. At the "File Number Reset?" option, select Yes to reset the file number, or No to continue with the file numbering. 6. Press the Yes soft key to confirm the deletion. 7. When you - Samsung P207 | User Manual (user Manual) (ver.f5) (English) - Page 146
Section 9 You can record voice memos. After recording, you can send the memo to other people via the Multimedia Message Service. Record Audio 1. In Idle mode, press the Menu soft key to access the Menu mode. 2. Select Multimedia. Highlight Record Audio, press the Select soft key - Samsung P207 | User Manual (user Manual) (ver.f5) (English) - Page 147
MMS feature. Rename: allows you to change the memo's name. Delete: allows you to delete the memo. 9. When you have finished, press the key. Reviewing Voice Memos 1. In Idle mode, press the Menu soft key to access the Menu mode. 2. Select Multimedia. Highlight the Record Audio and press the Select - Samsung P207 | User Manual (user Manual) (ver.f5) (English) - Page 148
Section 9 6. After playback, the display returns the memo list. 7. When you have finished, press the key. Deleting Voice Memos You can delete your voice memos one by one or all at one time. Deleting A Voice Memo 1. Access the memo list and scroll to the memo you want to delete. 2. Press the Options - Samsung P207 | User Manual (user Manual) (ver.f5) (English) - Page 149
Section 9 Memory Status 2. Select Multimedia. Highlight Memory Status and press the Select soft key or the key The display shows the memory available for Photo, Video, and Record Audio. 3. When you have finished, press the key. Section 9: Multimedia 145 - Samsung P207 | User Manual (user Manual) (ver.f5) (English) - Page 150
Section 9 146 - Samsung P207 | User Manual (user Manual) (ver.f5) (English) - Page 151
Section 10: Personal Assistant Topics Covered • Setting Alarms • Using the Calendar • Using the To Do List • Using the Calculator • Using the Currency Converter The topics covered in this section allow you to schedule appointments, view the calendar, create To-Do lists, set an alarm, and perform - Samsung P207 | User Manual (user Manual) (ver.f5) (English) - Page 152
Setting Alarms You can set the alarm to ring at a specific time. You can also set the phone to switch on automatically and ring the alarm even if the phone is switched off. Setting an Alarm 1. In Idle mode, press the Menu soft key to access the menu mode. 2. Select Applications. Highlight Alarm and - Samsung P207 | User Manual (user Manual) (ver.f5) (English) - Page 153
Menu mode. 2. Select Applications. Highlight Alarm and press the Select soft key or the key. 3. Select Autopower. 4. Select Enable to activate the Autopower feature. The phone will automatically switch on to ring the alarm when the alarm time comes. If the menu option is set to Disable, and the - Samsung P207 | User Manual (user Manual) (ver.f5) (English) - Page 154
the calendar by pressing the Navigation keys and press the key. Alternatively, press the Options soft key and select Go to Date. You can enter manually a specific date and press the key. Note: To skip to the previous or next month, press the Volume keys on the left side of the - Samsung P207 | User Manual (user Manual) (ver.f5) (English) - Page 155
saved. 6. Enter the time for the alarm and press the key. Note: Your phone is preset to a 12-hour format. You can also select the melody for the have finished, press the key. When the time for a memo comes and the phone plays the selected alarm melody, press the View soft key or the key to access - Samsung P207 | User Manual (user Manual) (ver.f5) (English) - Page 156
mode. 2. Select Applications. Highlight Calendar and press the Select soft key or the key. 3. Press the Options soft key and select Search All. The phone displays the first memo. You can view all of the memos, starting with the oldest, regardless of the day. 4. To scroll through the memos, press - Samsung P207 | User Manual (user Manual) (ver.f5) (English) - Page 157
Using the To Do List Deleting Memos You can delete memos on the calendar one by one or all at one time. 1. In Idle mode, press the Menu soft key to access menu mode. 2. Select Applications. Highlight Calendar and press the Select soft key or the key. 3. Select the date for the memo you wish to - Samsung P207 | User Manual (user Manual) (ver.f5) (English) - Page 158
Creating the To Do List 1. In Idle mode, press the Menu soft key to access menu mode. 2. Select Applications. Highlight To Do List and press the Select soft key or the key. 3. Press the New soft key or the . 4. Enter the first task. 5. Press the OK soft key or the . 6. Select a priority level of - Samsung P207 | User Manual (user Manual) (ver.f5) (English) - Page 159
mark, indicating a task has been done, and its priority level indicator; for High, for Normal, and for low. Note: You can change the status of a specific task by pressing the * key. The task is marked as completed as of the current time and date. 3. Scroll to a task from the list and - Samsung P207 | User Manual (user Manual) (ver.f5) (English) - Page 160
a task. Delete All: allows you to delete all tasks. Exit: exits the To do list menu. Using the Calculator You can use the phone as a calculator. The calculator provides basic arithmetic functions: addition, subtraction, multiplication, and division. 1. In Idle mode, press the Menu soft key to access - Samsung P207 | User Manual (user Manual) (ver.f5) (English) - Page 161
Using the Currency Convertor You can figure out currency conversions. 1. In Idle mode, press the Menu soft key to access Menu mode. 2. Select Applications. Highlight Currency Exchange and press the Select soft key or the key. 3. Enter the Exchange Rate amount and press the OK soft key or the key. - Samsung P207 | User Manual (user Manual) (ver.f5) (English) - Page 162
Section 10 158 - Samsung P207 | User Manual (user Manual) (ver.f5) (English) - Page 163
Browser • Using Favorites • Downloading Multimedia Files • Clearing the Cache • Changing the WAP Profiles Your phone is equipped with a WAP (Wireless Application Protocol) browser which allows you to access Internet specified for mobile phones. This section explains how to access the WAP services - Samsung P207 | User Manual (user Manual) (ver.f5) (English) - Page 164
Net Home. your phone is connected to the network and loads the homepage of the Wireless Web service provider. The content of the start-up homepage depends on your Wireless Web service provider. 3. To scroll through the screen, use the Up and Down navigation keys. 4. To exit the browser at any time - Samsung P207 | User Manual (user Manual) (ver.f5) (English) - Page 165
the key, or press the Options soft key and choose Back. 5. To access the browser menu list, press the Menu soft key. 6. To return to the start-up Menu soft key and select the Home option. Entering Text in the WAP Browser When you are prompted to enter text, the currently active text input mode - Samsung P207 | User Manual (user Manual) (ver.f5) (English) - Page 166
Browser to navigate the Wireless Web. To access a menu option, press the menu soft key. A menu list displays. Note: The menus may vary, depending on your version of the WAP Browser to the homepage of the Wireless Web service provider. Go to URL: allows you to manually enter the URL address of a WAP - Samsung P207 | User Manual (user Manual) (ver.f5) (English) - Page 167
Next soft key to view the next images. Certificates: shows the security information when you access the Wireless Web with the secured WAP setting activated. Using Favorites While navigating the WAP browser, you can bookmark the site to quickly and easily access it at a future time. The URL addresses - Samsung P207 | User Manual (user Manual) (ver.f5) (English) - Page 168
. 4. When you have finished, press the key. Downloading Multimedia Files You can buy a variety of multimedia files, such as ringtones, graphics, applications, MMS contents, and so on from the WAP browser and download them to your phone's memory. Your phone has embedded links to the 164 Section 11 - Samsung P207 | User Manual (user Manual) (ver.f5) (English) - Page 169
you with download services, preset by your service provider. 1. In Idle mode, press the Menu soft key to access Menu mode. 2. Select MEdia Mall. Highlight Shop Ringtones, Shop Games, Shop Graphics, Shop Multimedia, or Shop Applications depending on the type of items you want to buy. To access - Samsung P207 | User Manual (user Manual) (ver.f5) (English) - Page 170
set up 10 server profiles for the WAP browser. 1. In Idle mode, press the for each type of network address accessed: GPRS or DATA. The remaining options depend on the Bearer setting. ⅷ User Name: enter the User ID required to connect to the GPRS network. ⅷ Password: enter the password required to - Samsung P207 | User Manual (user Manual) (ver.f5) (English) - Page 171
: enter the PPP server password. ⅷ Dial-up Number: enter the PPP server phone number ⅷ Data Call Type: select a data call type: Analog or ISDN. ⅷ Proxy Status: allows you to activate and deactivate the proxy status. Note: The WAP settings may vary depending on the service provider. Section 11:WAP - Samsung P207 | User Manual (user Manual) (ver.f5) (English) - Page 172
Section 11 168 - Samsung P207 | User Manual (user Manual) (ver.f5) (English) - Page 173
Section 12 Section 12: Health and Safety Information Topics Covered • Health and Safety Information This section outlines the safety precautions associated with using your phone. These safety precautions should be followed to safety use your phone. Section 12: Health and Safety Information 169 - Samsung P207 | User Manual (user Manual) (ver.f5) (English) - Page 174
from industry, government, and academia after extensive reviews of the scientific literature related to the biological effects of RF energy. The exposure limit set by the FCC for wireless mobile phones employs a unit of measurement known as the Specific Absorption Rate (SAR). The SAR is a measure - Samsung P207 | User Manual (user Manual) (ver.f5) (English) - Page 175
established by the FCC. Tests for each model phone are performed in positions and locations (e.g. at the ear and worn on the body) as required by the FCC. Body-worn operations are restricted to Samsung-supplied, approved, or nonSamsung designated accessories that have no metal and must provide at - Samsung P207 | User Manual (user Manual) (ver.f5) (English) - Page 176
be necessary to remove the battery pack to find the number. Once you have the FCC ID number for a particular phone, follow the instructions on the website and it should provide values for typical or maximum SAR for a particular phone. Additional product specific SAR information can also be obtained - Samsung P207 | User Manual (user Manual) (ver.f5) (English) - Page 177
federal health and safety agencies. When the phone is located at greater distances from the user, the exposure to RF is drastically lower any health problems are associated with using wireless phones. There is no proof, however, that wireless phones are absolutely safe. Wireless phones emit low - Samsung P207 | User Manual (user Manual) (ver.f5) (English) - Page 178
users of the health hazard and to repair, replace or recall the phones so that the hazard no longer exists. Although the existing scientific data do not justify FDA regulatory actions, FDA has urged the wireless phone industry to take a number of steps, including the following: • "Support needed - Samsung P207 | User Manual (user Manual) (ver.f5) (English) - Page 179
themselves, the RF exposures that people get from these base stations are typically thousands of times lower than those they can get from wireless phones. Base stations are thus not the primary subject of the safety questions discussed in this document. What are the results of the research done - Samsung P207 | User Manual (user Manual) (ver.f5) (English) - Page 180
poses a health risk? A combination of laboratory studies and epidemiological studies of people actually using wireless phones would provide some of the data that are needed. Lifetime animal exposure studies could be completed in a few years. However, very large numbers of animals would be needed - Samsung P207 | User Manual (user Manual) (ver.f5) (English) - Page 181
studies is hampered by difficulties in measuring actual RF exposure during day-to-day use of wireless phones. Many factors affect this measurement, such as the angle at which the phone is held, or which model of phone is used. What is FDA doing to find out more about the possible health effects of - Samsung P207 | User Manual (user Manual) (ver.f5) (English) - Page 182
will include both laboratory studies and studies of wireless phone users. The CRADA will also include a broad assessment of the wireless phone away from your body or use a wireless phone connected to a remote antenna. Again, the scientific data do not demonstrate that wireless phones are harmful. - Samsung P207 | User Manual (user Manual) (ver.f5) (English) - Page 183
teenagers using wireless phones. Reducing the time of wireless phone use and increasing the distance between the user and the RF source from wireless phones, there is no reason to believe that hands-free kits reduce risks. Hands-free kits can be used with wireless phones for convenience and - Samsung P207 | User Manual (user Manual) (ver.f5) (English) - Page 184
the head from those emissions reduce risks. Some products that claim to shield the user from RF absorption use special phone cases, while others involve nothing more than a metallic accessory attached to the phone. Studies have shown that these products generally do not work as advertised. Unlike - Samsung P207 | User Manual (user Manual) (ver.f5) (English) - Page 185
IEEE in 2000. FDA continues to monitor the use of wireless phones for possible interactions with other medical devices. Should harmful interference be conduct testing to assess the interference and work to resolve the problem. Additional information on the safety of RF exposures from various - Samsung P207 | User Manual (user Manual) (ver.f5) (English) - Page 186
wireless phones, one that every user must uphold. When driving a car, driving is your first responsibility. When using your wireless phone phone with one of the many hands free accessories available today. 3. Position your wireless phone within easy reach. Be able to access your wireless phone - Samsung P207 | User Manual (user Manual) (ver.f5) (English) - Page 187
Dial 9-1-1 or other local emergeny number in the case of fire, traffic accident or medical emergencies. Remember, it is a free call on your wireless phone! 9. Use your wireless phone to help others in emergencies. If you see an auto accident, crime in progress or other serious emergency where lives - Samsung P207 | User Manual (user Manual) (ver.f5) (English) - Page 188
it may cause interference or danger. When connecting the phone or any accessory to another device, read its user's guide for detailed safety instructions. Do not connect incompatible products. As with other mobile radio transmitting equipment, users are advised that for the satisfactory operation of - Samsung P207 | User Manual (user Manual) (ver.f5) (English) - Page 189
not be shielded against the RF signals from your wireless phone. Consult the manufacturer to discuss alternatives. Pacemakers Pacemaker manufacturers that interference is taking place, switch your phone off immediately. Hearing Aids Some digital wireless phones may interfere with some hearing aids. - Samsung P207 | User Manual (user Manual) (ver.f5) (English) - Page 190
explosive atmosphere and obey all signs and instructions. Sparks in such areas could cause an explosion or fire resulting in bodily injury or even death. Users are advised to switch the phone off while at a refueling point (service station). Users are reminded of the need to observe restrictions - Samsung P207 | User Manual (user Manual) (ver.f5) (English) - Page 191
adequate signal strength. Emergency calls may not be possible on all wireless phone networks or when certain network services and/or phone features are in use. Check with local service providers. To make an emergency call: 1. If the phone is not on, switch it on. 2. Key in the emergency number for - Samsung P207 | User Manual (user Manual) (ver.f5) (English) - Page 192
you can make an emergency call. Consult this document and your local cellular service provider. When making an emergency call, remember to give all the necessary information as accurately as possible. Remember that your phone may be the only means of communication at the scene of an accident; do - Samsung P207 | User Manual (user Manual) (ver.f5) (English) - Page 193
batteries, antennas and chargers. The use of any unauthorized accessories may be dangerous and void the phone warranty if said accessories cause damage or a defect to the phone. Although your phone should service the phone or install the phone in a vehicle. Faulty installation or service may - Samsung P207 | User Manual (user Manual) (ver.f5) (English) - Page 194
these instructions may lead to the suspension or denial of telephone services to the offender, or legal action, or both. Product Performance Getting the Most Out of Your Signal Reception The quality of each call you make or receive depends on the signal strength in your area. Your phone informs - Samsung P207 | User Manual (user Manual) (ver.f5) (English) - Page 195
is damaged. • Speak directly into the phone's receiver. • Avoid exposing your phone and accessories to rain or liquid spills. If your phone does get wet, immediately turn the power off and remove the battery. If it is inoperable, call Customer Care for service. Availability of Various Features/Ring - Samsung P207 | User Manual (user Manual) (ver.f5) (English) - Page 196
noticeably shorter than normal, it is time to buy a new battery. • If left unused, a fully charged battery will discharge itself over time. • Use only Samsung-approved batteries and recharge your battery only with Samsung-approved chargers. When a charger is not in use, disconnect it from the power - Samsung P207 | User Manual (user Manual) (ver.f5) (English) - Page 197
batteries, contact your nearest Samsung authorized service center. Always recycle. Do not dispose of batteries in a fire. Care and Maintenance Your phone years • Keep the phone and all its parts and accessories out of the reach of small children's. • Keep the phone dry. Precipitation, humidity and - Samsung P207 | User Manual (user Manual) (ver.f5) (English) - Page 198
replacement antenna. Unauthorized antennas or modified accessories may damage the phone and violate regulations governing radio devices. • If the phone, battery, charger or any accessory is not working properly, take it to your nearest qualified service facility. The personnel there will assist - Samsung P207 | User Manual (user Manual) (ver.f5) (English) - Page 199
Section 13 Section 13: Warranty Information Topics Covered • Standard Limited Warranty Section 13: Warranty Information 195 - Samsung P207 | User Manual (user Manual) (ver.f5) (English) - Page 200
") that SAMSUNG's Phones and accessories ("Products") are free from defects in material and workmanship under normal use and service for the period commencing upon the date of purchase and continuing for the following specified period of time after that date: Section 13 Phone Batteries Leather - Samsung P207 | User Manual (user Manual) (ver.f5) (English) - Page 201
cover any battery if (i) the battery has been charged by a battery charger not specified or approved by SAMSUNG for charging the battery, (ii) any of the seals on the battery are broken or show evidence of tampering, or (iii) the battery has been used in equipment other than the SAMSUNG phone for - Samsung P207 | User Manual (user Manual) (ver.f5) (English) - Page 202
longer. All replaced parts, components, boards and equipment shall become the property of SAMSUNG. If SAMSUNG determines that any Product is not covered by this Limited Warranty, Purchaser must pay THE PRODUCT WITH THE REQUIREMENTS OF ANY LAW, RULE, SPECIFICATION OR CONTRACT PERTAINING THERETO. 198 - Samsung P207 | User Manual (user Manual) (ver.f5) (English) - Page 203
Standard Limited Warranty NOTHING CONTAINED IN THE INSTRUCTION MANUAL SHALL BE CONSTRUED TO CREATE AN EXPRESS WARRANTY AN IMPLIED WARRANTY LASTS, SO THE ABOVE LIMITATION MAY NOT APPLY TO YOU. IN ADDITION, SAMSUNG SHALL NOT BE LIABLE FOR ANY DAMAGES OF ANY KIND RESULTING FROM THE PURCHASE, USE, OR - Samsung P207 | User Manual (user Manual) (ver.f5) (English) - Page 204
OR EXCLUSION MAY NOT APPLY TO YOU. THIS WARRANTY GIVES YOU SPECIFIC LEGAL RIGHTS, AND YOU MAY ALSO HAVE OTHER RIGHTS, WHICH VARY UNDERSTAND THAT THE PURCHASER MAY USE THIRD-PARTY SOFTWARE OR EQUIPMENT IN CONJUNCTION WITH THE PRODUCT. SAMSUNG MAKES NO WARRANTIES OR REPRESENTATIONS AND THERE ARE - Samsung P207 | User Manual (user Manual) (ver.f5) (English) - Page 205
AND THE DIRECT VENDOR, OWNER OR SUPPLIER OF SUCH THIRD-PARTY SOFTWARE OR EQUIPMENT, AS THE CASE MAY BE. This Limited Warranty allocates risk of Product failure between Purchaser and SAMSUNG, and SAMSUNG's Product pricing reflects this allocation of risk and the limitations of liability contained in - Samsung P207 | User Manual (user Manual) (ver.f5) (English) - Page 206
Samsung or its respective suppliers relating to the SAMSUNG Phone, including but not limited to, accessories, parts, or software relating thereto (the "Phone System"), is proprietary to Samsung disassemble, or otherwise attempt to create source code from the software. No title to or ownership in the - Samsung P207 | User Manual (user Manual) (ver.f5) (English) - Page 207
Telecommunications America (STA), L.P. Samsung Telecommunications America (STA), L.P. Internet Address: http://www.samsungusa.com Printed in South Korea Care Center 1601 E. Plano Parkway, Suite 150 Plano, TX 75074 Toll Free Tel: 1.888.987.HELP (4357) Section 13 Section 13: Warranty Information 203 - Samsung P207 | User Manual (user Manual) (ver.f5) (English) - Page 208
Phone 6 Address Book 67 Finding Entry 73 Memory Status 79 New Entry 68 Alarms 148 B Battery Group 76 Currency Convertor 156 D Dialing a Number 70 Phone 71 SIM Card 71 Display Screen 18 Display Settings 111 Mode 62 G Getting Started 5 Activating Your Phone 6 Voicemail 11 H Health and Safety Information - Samsung P207 | User Manual (user Manual) (ver.f5) (English) - Page 209
Limited Warranty 196 Storing a Number 68 Idle Mode 68 New Entry Option 69 Symbol Mode 65 T To Do List 153 U Understanding Your Phone 13 Command Keys 16 Features of Your Phone 14 Front View of Your Phone 15, 16 V VoiceMode 45 Adapt 46 Reset Adaptation 47 W WAP 159 Warranty Information 195 Index 205
-
 1
1 -
 2
2 -
 3
3 -
 4
4 -
 5
5 -
 6
6 -
 7
7 -
8
-
9
-
10
-
11
-
12
-
13
-
14
-
15
-
16
-
17
-
18
-
19
-
20
-
21
-
22
-
23
-
24
-
25
-
26
-
27
-
28
-
29
-
30
-
31
-
32
-
33
-
34
-
35
-
36
-
37
-
38
-
39
-
40
-
41
-
42
-
43
-
44
-
45
-
46
-
47
-
48
-
49
-
50
-
51
-
52
-
53
-
54
-
55
-
56
-
57
-
58
-
59
-
60
-
61
-
62
-
63
-
64
-
65
-
66
-
67
-
68
-
69
-
70
-
71
-
72
-
73
-
74
-
75
-
76
-
77
-
78
-
79
-
80
-
81
-
82
-
83
-
84
-
85
-
86
-
87
-
88
-
89
-
90
-
91
-
92
-
93
-
94
-
95
-
96
-
97
-
98
-
99
-
100
-
101
-
102
-
103
-
104
-
105
-
106
-
107
-
108
-
109
-
110
-
111
-
112
-
113
-
114
-
115
-
116
-
117
-
118
-
119
-
120
-
121
-
122
-
123
-
124
-
125
-
126
-
127
-
128
-
129
-
130
-
131
-
132
-
133
-
134
-
135
-
136
-
137
-
138
-
139
-
140
-
141
-
142
-
143
-
144
-
145
-
146
-
147
-
148
-
149
-
150
-
151
-
152
-
153
-
154
-
155
-
156
-
157
-
158
-
159
-
160
-
161
-
162
-
163
-
164
-
165
-
166
-
167
-
168
-
169
-
170
-
171
-
172
-
173
-
174
-
175
-
176
-
177
-
178
-
179
-
180
-
181
-
182
-
183
-
184
-
185
-
186
-
187
-
188
-
189
-
190
-
191
-
192
-
193
-
194
-
195
-
196
-
197
-
198
-
199
-
200
-
201
-
202
-
203
-
204
-
205
-
206
-
207
-
208
-
209
 |
 |

UCEC5.02_WBp207_033005_F5
SGH-P207 Series
P
O
R
T
A
B
L
E
Tr
i
/
D
u
a
l
-
M
o
d
e
T
E
L
E
P
H
O
N
E
User Guide
Please read this manual before operating your
phone, and keep it for future reference.