Samsung PPM42S3 Owners Instructions
Samsung PPM42S3 - PPM - 42S3 Manual
 |
UPC - 770332800141
View all Samsung PPM42S3 manuals
Add to My Manuals
Save this manual to your list of manuals |
Samsung PPM42S3 manual content summary:
- Samsung PPM42S3 | Owners Instructions - Page 1
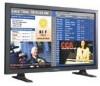
BN68-00457B-01_ENG 2003.10.23 3:20 PM Page 1 PDP-MONITOR (PLASMA DISPLAY PANEL) PPM42S3 PPM50H3 PPM63H3 Owner's Instructions Before operating the unit, please read this manual thoroughly, and retain it for future reference. Intended for Commercial Use and Operation ON-SCREEN MENUS PICTURE IN PICTURE - Samsung PPM42S3 | Owners Instructions - Page 2
for years to come. Warning! Important Safety Instructions CAUTION RISK OF ELECTRIC SHOCK DO NOT OPEN CAUTION: TO PREVENT ELECTRICAL SHOCK, DO NOT REMOVE REAR COVER, NO USER SERVICEABLE PARTS INSIDE. REFER SERVICING TO QUALIFIED SERVICE PERSONNEL. The lightning flash and arrow head within - Samsung PPM42S3 | Owners Instructions - Page 3
place the PDP on an unstable cart, stand, tripod, bracket, table, or floor instructions for mounting. ◆ Operate your PDP only from the type of power source indicated on the marking label. If you are not sure of the type of power supplied replace your outlet. ◆ Protect the power cord. Power supply - Samsung PPM42S3 | Owners Instructions - Page 4
by the operating instructions. Adjusting other controls may result in damage and will often require extensive work by a qualified technician to restore the PDP to normal. ◆ When replacement parts are required, be sure the service technician uses replacement parts specified by the manufacturer - Samsung PPM42S3 | Owners Instructions - Page 5
Install in accordance with the manufacturer's instructions. ◆ Do not install near any trician for replacement of the obsolete outlet. ◆ Protect the power cord from servicing to qualified service personnel. Servicing is required when the apparatus has been damaged in any way, such as power-supply - Samsung PPM42S3 | Owners Instructions - Page 6
User must use shielded signal interface cables to maintain FCC compliance for the product. Provided with this monitor is a detachable power supply cord with IEC320 style terminations. It may be suitable for connection Problems SAMSUNG ELECTRONICS CO., LTD America QA Lab of Samsung instruction manual. - Samsung PPM42S3 | Owners Instructions - Page 7
the wide screen 16:9 ratio format, or expanded to fill the screen if your model offers this feature and constantly moving. Displaying stationary graphics and images on screen, such as the dark side-bars on non- and use, as well as burned-in images, are not covered by your Samsung limited warranty. 7 - Samsung PPM42S3 | Owners Instructions - Page 8
Page 8 User Instructions ENG ◆ Screen Image retention Do not display a still image (such as on a video game or when hooking up a PC to this PDP) on the plasma display panel for ■ EN55024:1998 Electromagnetic Immunity ■ EN61000-3-2:2000 Power Line Harmonics ■ EN61000-3-3:1995 Voltage Fluctuations ■ - Samsung PPM42S3 | Owners Instructions - Page 9
COLOURED GREEN OR GREEN AND YELLOW. Checking Parts PPM42S3 & PPM50H3 Owner's Instructions Remote Control/ AAA Batteries Power Cord Speaker Wires (2EA) Stand-Base (2EA) 2 Install CD - MDC Software (RS232C) Ferrite Cores for - Pivot software Speaker Wire (2EA) PC Cable MDC Cable (RS232C - Samsung PPM42S3 | Owners Instructions - Page 10
Viewing 7 ■ User Instructions 8 ■ Wiring the Mains Power Supply Plug (UK Only 9 ◆ CONNECTING AND PREPARING YOUR DISPLAY ■ Your New Plasma Display Panel 12 ■ Becoming Familiar with the Remote Control 14 ■ Inserting the Batteries in the Remote Control 15 ■ Assembling the Stand-Base 15 - Samsung PPM42S3 | Owners Instructions - Page 11
Input 42 ■ Connecting to the DVI Input 43 ■ Connecting to the RGB(PC) Input 43 ■ Setting up Your PC Software (Windows only 44 ■ Pin Configurations 45 ■ Input Mode (PC/DVI 46 ■ Power Saver (PC1 mode only 47 ◆ RECOMMENDATIONS FOR USE ■ Troubleshooting: Before Contacting Service Personnel - Samsung PPM42S3 | Owners Instructions - Page 12
Plasma Display Panel ➢ The actual configuration on your PDP may be different, ENG depending on your model. Front Panel PPM42S3/PPM50H3 a bc Speaker PPM63H3 Speaker b Power Indicator - Power Off; Red - Power On; Off - Timer On; Green c Remote Control Signal Receiver Aim the remote control - Samsung PPM42S3 | Owners Instructions - Page 13
IN Video (Y/Pb/Pr) and audio (L/R) inputs for component. h) VIDEO OUT (VIDEO / L-AUDIO-R) Used to output screen of Video or S-Video in PDP when connecting video and/or audio input of external devices. i) EXT SPEAKER (8Ω) Connect external speakers. j) POWER IN Connect the supplied power cord. 13 - Samsung PPM42S3 | Owners Instructions - Page 14
(ONLY PC MODE) NEXT CHANNEL (NOT AVAILABLE FOR THIS MONITOR) EXTERNAL INPUT SELECTION PREVIOUS CHANNEL (NOT AVAILABLE FOR THIS MONITOR) INFORMATION DISPLAY EXIT FROM ANY DISPLAY CHANGE CONFIRMATION MULTIPLE DISPLAY CONTROL PICTURE SIZE SELECTION PIP FUNCTIONS; - PIP ON/OFF - SIZE SELECTION (SIZE - Samsung PPM42S3 | Owners Instructions - Page 15
control ◆ + on the battery against + on the remote control 3 Replace the cover by aligning it with the base of the remote control and pressing it back into place. Assembling the Stand-Base Fit the Stand-Base into the guide hole on the bottom of the monitor and tighten the left and right sides using - Samsung PPM42S3 | Owners Instructions - Page 16
-01_ENG 2003.10.23 3:20 PM Page 16 Installing the Display on the Wall Attachment Panel ENG ☛ This wall mount bracket installation guide is for the following models: WMN4230/WMN5030/WMN6330. This installation guide may be different from the PDP User's manual. Please refer to the proper installation - Samsung PPM42S3 | Owners Instructions - Page 17
.23 3:20 PM Page 17 Installing the Display on the Wall Attachment Panel ➢ The exterior of the PDP may be different than the picture. (Assembly and installation of the plastic hanger is the same.) ENG 1 Remove the screws from the back of the PDP. PPM42S3 PPM50H3 PPM63H3 2 Use the screws and - Samsung PPM42S3 | Owners Instructions - Page 18
Display Vertically ENG You can install the PDP vertically. (PPM42S3/50H3/63H3 models can operate the remote control only for the Display Control, refer to "Setting the MDC (Multiple Display Control)" on page 31 and the Help section in MDC program CD. Example for Multiple Display Control connections - Samsung PPM42S3 | Owners Instructions - Page 19
the square holes on the rear of the PDP. PPM50H3 PPM42S3 PPM50H3 PPM63H3 PPM63H3 3 Tighten the PDP and the speaker bracket using the screws removed from the PDP. PPM42S3 PPM50H3 PPM63H3 ➢ When moving your PDP, do NOT hold the speaker connected to your PDP. It may damage the bracket clamping - Samsung PPM42S3 | Owners Instructions - Page 20
of the cable with the diagram on the PDP. PPM42S3/PPM50H3 PPM63H3 ➢ ◆ The speakers MUST have to a power handling capability of 10 watts minimum (impedance 8Ω). ◆ When you connect the speaker wire to the external speaker out connector, first bind the speaker wire round the ferrite core to secure it - Samsung PPM42S3 | Owners Instructions - Page 21
PDP in the United Kingdom, refer to page 9 for further instructions on plug wiring. 1 Plug the mains lead into an appropriate remote control). ENG Front of the PDP Choosing Your Language When you start using your PDP for the first time, you must select the language which will be used for displaying - Samsung PPM42S3 | Owners Instructions - Page 22
type of picture which best corresponds to your viewing requirements. 1 Press the MENU button. Result: The options available in the Picture group are displayed. 2 Press the √ button. 3 Press the ▲ or ▼ button to select Mode. Select the option by pressing the œ or √ button. Result: The following modes - Samsung PPM42S3 | Owners Instructions - Page 23
to select the option (Contrast, Brightness, Sharpness, Color, Tint-NTSC only) to be adjusted. Press the œ or √ button. Result: The horizontal bar is displayed. Move the horizontal bar's cursor left or right by pressing the œ or √ button. 5 When you are satisfied with the settings, press the store - Samsung PPM42S3 | Owners Instructions - Page 24
mode. 9 Press the ▲ or ▼ button to select the option (Red, Green, Blue) to be adjusted. Press the œ or √ button. Result: The horizontal bar is displayed. Move the horizontal bar's cursor left or right by pressing the œ or √ button. 10 When you are satisfied with the settings, press the store them - Samsung PPM42S3 | Owners Instructions - Page 25
to reduce any static and ghosting that may appear on the screen. 1 Press the MENU button. Result: The options available in the Picture group are displayed. 2 Press the √ button. 3 Press the ▲ or ▼ button to select Digital NR. 4 Press the œ or √ button to change the setting (On or Off). Mode Adjust - Samsung PPM42S3 | Owners Instructions - Page 26
to be used when watching a given broadcast. 1 Press the MENU button. Result: The main menu is displayed. 2 Press the ▲ or ▼ button to select Sound. Result: The options available in the Sound group are displayed. 3 Press the √ button. Result: The Mode is selected. 4 Select the option by pressing the - Samsung PPM42S3 | Owners Instructions - Page 27
. 3 Press the √ button. 4 Press the ▲ or ▼ button to select Equalizer. Press the √ button. Result: The Equalizer menu is displayed with the current option. 5 Select the option (volume, balance, equalizer) to be adjusted by pressing the œ or √ button. Press the ▲ or ▼ button to reach the - Samsung PPM42S3 | Owners Instructions - Page 28
low. ◆ Melody You can hear clear melody sound when the PDP is powered on or off. ◆ Pseudo Stereo / Virtual Surround Pseudo stereo feature converts Move Sel. Return 1 Press the MENU button. Result: The main menu is displayed. 2 Press the ▲ or ▼ button to select Sound. Result: The options available in - Samsung PPM42S3 | Owners Instructions - Page 29
store. button to 7 Press the MENU button. Result: The Screen Adjust menu is displayed again. 8 Press the ▲ or ▼ button to select Scale. Press the √ The position and scale settings are replaced with the factory default values. Setup Screen Adjust Key Lock Multi Control Burning Protection Video - Samsung PPM42S3 | Owners Instructions - Page 30
are satisfied with the settings, press the MENU button. Result: The Image Lock menu is displayed again. 8 Press the ▲ or ▼ button to select Position. Press the . Press the √ button. The zoom and panning settings are replaced with the factory default values. ➢ The Panning and Reset menus can be used - Samsung PPM42S3 | Owners Instructions - Page 31
to the Menu screen and you can operate the remote control. At this time, PDP2 doesn't operate with the remote control and displays the standby mode of ID Input. ➢ For further details, refer to the MDC program guide. Setup Screen Adjust Key Lock Multi Control Burning Protection Video Wall √ œ Off - Samsung PPM42S3 | Owners Instructions - Page 32
Key Lock Multi Control Burning Protection Video Wall √ œ Off 1 Press the MENU button. Result: The main menu is displayed. 2 required setting. ➣ Optimum condition for pixel shift; Horizontal Dot Vertical Line Time PPM42S3 2 4 4MIN PPM50/63H3 4 4 4MIN Burning Protection Pixel Shift Signal - Samsung PPM42S3 | Owners Instructions - Page 33
to select Video Wall. 5 Press the √ button. Result: The Video Wall menu is displayed with the Set selected. 6 Set to On by pressing the œ or √ button. 7 does not operate during Video Wall operation. Setup Screen Adjust Key Lock Multi Control Burning Protection Video Wall √ œ Off Move Enter - Samsung PPM42S3 | Owners Instructions - Page 34
Displaying the PC Information ENG Setup Image Lock Key Lock Multi Control Burning Protection Video Wall Information √ œ Off Move Enter Return PC Information Resolution . Result: The resolution, vertical frequency and horizontal frequency are displayed. Displaying the Setting Information - Samsung PPM42S3 | Owners Instructions - Page 35
the settings, press the store them. button to Function Language Time Selectable Fan Film Mode English √ œ Off √ œ Off √ ENG Move Enter Return Time Clock Clock Display Timer On Time Volume On Time Off Time 11:35 œ Off √ œ Off √ 10 --:---:-- Move œ √ Sel. Store Time Clock Clock - Samsung PPM42S3 | Owners Instructions - Page 36
√ œ Off √ 10 06:00 --:-- Move œ √ Sel. Store Time Clock Clock Display Timer On Time Volume On Time Off Time 11:35 œ Off √ œ Off √ you are satisfied with the settings, press the store them. button to ➣ Absent Power Off Your PDP will automatically be turned off, if you do not operate any - Samsung PPM42S3 | Owners Instructions - Page 37
Press the œ or √ button to change the setting (On or Off). ➣ ◆ If your PDP is displayed vertically, the fan automatically works. ◆ The message Check Fan is displayed if there is a fan problem. ◆ Please use the fan when the temperature is over 35 degrees. Function Language Time Selectable Fan Film - Samsung PPM42S3 | Owners Instructions - Page 38
Sound Sel. Move PIP œ On √ œ Video √ √ œ Large √ œ √ œ Main √ Sel. Return You can display a sub picture within the main picture. In this way you can monitor the video input from any connected devices while monitoring other video input. 1 Press the MENU button. Result: The main menu is - Samsung PPM42S3 | Owners Instructions - Page 39
BN68-00457B-01_ENG 2003.10.23 3:21 PM Page 39 Viewing the Picture In Picture (PIP) (continued) ENG Easy functions of remote control. Buttons PIP ON SIZE LOCATE SOURCE SWAP S.SEL Feature Used to activate or deactivate the PIP feature directly. Used to select a size of sub - Samsung PPM42S3 | Owners Instructions - Page 40
can view different sources by selecting the appropriate input. 1 Check that all the necessary connections have been made. 2 Switch your PDP on, then press the SOURCE button. Result: The input sources available are displayed. 3 Press the ▲ or ▼ button to select the required input source. 4 Press the - Samsung PPM42S3 | Owners Instructions - Page 41
that you can redirect the signal from "VIDEO IN" to "VIDEO OUT". ☛ Whenever you connect an audio or video system to your PDP, ensure that all elements are switched off. Refer to the documentation supplied with your equipment for detailed connection instructions and associated safety precautions. 41 - Samsung PPM42S3 | Owners Instructions - Page 42
BN68-00457B-01_ENG 2003.10.23 3:21 PM Page 42 Connecting to the S-Video Input ENG The S-VIDEO and RCA ① and VCR ① To play picture and sound, both the S-VIDEO and RCA connectors must be used. Connecting to the DVD/DTV RECEIVER Input The "COMPONENT1 IN" (or "R(Pr)/G(Y)/B(Pb)" (video) and "AUDIO") - Samsung PPM42S3 | Owners Instructions - Page 43
the DVI Input ENG The "DVI IN" (video) and "AUDIO" connectors are used for equipment with a DVI output. Rear of the PDP Personal Computer and Connecting to the RGB(PC) Input The "RGB1(PC1) IN" (or "R(Pr)/G(Y)/B(Pb)/H/V") and "AUDIO" connectors are used for interfacing with your PC. Rear of the - Samsung PPM42S3 | Owners Instructions - Page 44
Software (Windows only) ENG The Windows display or Samsung Dealer.) display dialog-box. The two key variables that apply the PDP-PC interface are "Resolution" and "Colours". The correct settings for these two variables are: ◆ Size (sometimes called "Resolution") - 640 x 480 pixels (PPM42S3 - Samsung PPM42S3 | Owners Instructions - Page 45
Data2/4 Shield 4 T.M.D.S. Data4- 5 T.M.D.S. Data4+ 6 Clock (DDC) 7 Data (DDC) 8 Not Connected 9 T.M.D.S. Data1- 10 T.M.D.S. Data1+ 11 T.M.D.S. Data1/3 Shield 12 T.M.D.S. Data3- 13 T.M.D.S. Data3+ 14 +5V Power 15 5V Grounding 16 Hot Plug Detect 17 T.M.D.S. Data0- 18 - Samsung PPM42S3 | Owners Instructions - Page 46
screen position and size will vary depending on the type of PC monitor and its resolution. The table below shows all of the display modes that are supported: Resolution VGA 640 x 350 640 x 400 720 x 400 640 x 35.1 36.0 37.0 31.8 67.5 64.0 80.0 47.7 60.1 47.8 48.2 75.0 PPM42S3 PPM50H3 PPM63H3 - Samsung PPM42S3 | Owners Instructions - Page 47
management system saves energy by switching your monitor into a low-power mode when it has not been used for a certain amount of time. This power management system operates with a VESA DPMS compliant video card installed in your computer. You use a software utility installed on your computer to set - Samsung PPM42S3 | Owners Instructions - Page 48
-01_ENG 2003.10.23 3:21 PM Page 48 Troubleshooting: Before Contacting Service Personnel ENG Before contacting Samsung after-sales service, perform the following simple checks. If you cannot solve the problem using the instructions below, note the model and serial number of the PDP and contact - Samsung PPM42S3 | Owners Instructions - Page 49
(Without stand) Screen aspect ratio Screen size Native pixel resolution (H x V) Color systems Sound Audio output power Power supply Power consumption Video inputs Monitor outputs Audio inputs Audio outputs External control PPM42S3 - 1027 x 79 x 630.5 mm ; 40.43 x 3.11 x 24.82 inches PPM50H3 - 1204 - Samsung PPM42S3 | Owners Instructions - Page 50
BN68-00457B-01_ENG 2003.10.23 3:21 PM Page 50 Memo ENG 50 - Samsung PPM42S3 | Owners Instructions - Page 51
BN68-00457B-01_ENG 2003.10.23 3:21 PM Page 51 Memo ENG 51 - Samsung PPM42S3 | Owners Instructions - Page 52
BN68-00457B-01_ENG 2003.10.23 3:21 PM Page 52 - AFTER SALES SERVICE - Do not hesitate to contact your retailer or service agent if a change in the performance of your product indicates that a faulty condition may be present. ELECTRONICS BN68-00457B-01
-
 1
1 -
 2
2 -
 3
3 -
 4
4 -
 5
5 -
 6
6 -
 7
7 -
8
-
9
-
10
-
11
-
12
-
13
-
14
-
15
-
16
-
17
-
18
-
19
-
20
-
21
-
22
-
23
-
24
-
25
-
26
-
27
-
28
-
29
-
30
-
31
-
32
-
33
-
34
-
35
-
36
-
37
-
38
-
39
-
40
-
41
-
42
-
43
-
44
-
45
-
46
-
47
-
48
-
49
-
50
-
51
-
52
 |
 |
PDP-MONITOR
(P
LASMA
D
ISPLAY
P
ANEL
)
PPM42S3
PPM50H3
PPM63H3
Owner’s Instructions
Before operating the unit,
please read this manual thoroughly,
and retain it for future reference.
ON-SCREEN MENUS
P
ICTURE
I
N
P
ICTURE
(PIP)
VIDEO WALL
MDC
(M
ULTIPLE
D
ISPLAY
C
ONTROL
)
Intended for Commercial Use and Operation
BN68-00457B-01_ENG
2003.10.23
3:20 PM
Page 1