Samsung RS267LASH Quick Guide (easy Manual) (ver.1.0) (English)
Samsung RS267LASH Manual
 |
View all Samsung RS267LASH manuals
Add to My Manuals
Save this manual to your list of manuals |
Samsung RS267LASH manual content summary:
- Samsung RS267LASH | Quick Guide (easy Manual) (ver.1.0) (English) - Page 1
and COLD WATER DISPENSER 7 SHELVES and BINS 8 FOOD STORAGE GUIDE 9 CoolSelect ZoneTM Drawer GUIDE 11 REMOVING THE FREEZER ACCESSORIES 13 REMOVING THE REFRIGERATOR ACCESSORIES 13 CLEANING THE ACCESSORIES 14 CHANGING THE INTERIOR LIGHT 15 WATER FILTER 16 DOORS ...16 INSTALLATION INSTRUCTIONS - Samsung RS267LASH | Quick Guide (easy Manual) (ver.1.0) (English) - Page 2
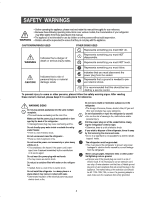
operating the appliance, please read and retain this manual thoroughly for your reference. • Because these following operating instructions cover various models, the characteristics of your refrigerator may differ slightly from those described in this manual. • The appliance is not intended for use - Samsung RS267LASH | Quick Guide (easy Manual) (ver.1.0) (English) - Page 3
personal injury. Never put fingers or other objects into the dispenser hole and ice chute. It may cause personal injury or material damage DANGER Risk of child entrapment. Before you throw away your old refrigerator or freezer • Take off the doors • Leave the shelves in places so that children may - Samsung RS267LASH | Quick Guide (easy Manual) (ver.1.0) (English) - Page 4
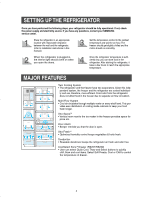
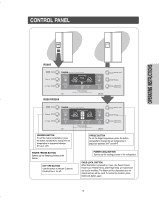
contact your SAMSUNG service center. Place the refigerator in an appropriate location with reasonable clearance between the wall and the refrigerator. (refer to installation instructions in this manual) Set the temperature control to the coldest temperature and wait for an hour. The freezer should - Samsung RS267LASH | Quick Guide (easy Manual) (ver.1.0) (English) - Page 5
between 34°F and 46°F. POWER COOL BUTTON Speeds up the cooling process in the refrigerator CHILD LOCK BUTTON When this button is pressed for 3 sec., the Power Freeze, Power Cool, Freezer Temp. and Fridge Temp. are locked and can not be modified. The Water and Ice dispensers are not locked and can - Samsung RS267LASH | Quick Guide (easy Manual) (ver.1.0) (English) - Page 6
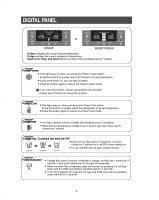
DIGITAL PANEL or RS265 RS267/RS269 Freezer indicates the current freezer temperature. Fridge indicates the current refrigerator temperature. Quick Cool, Thaw, and Select show the status of the CoolSelect ZoneTM Drawer Power Freeze • This light goes on when you press the Power Freeze button. - Samsung RS267LASH | Quick Guide (easy Manual) (ver.1.0) (English) - Page 7
to blink . The digital display will stop blinking when the freezer and refrigerator return to normal temperature. If the temperature control does not reset temp, unplug the refrigerator, wait 9 min, then plug it back in. ICE and COLD WATER DISPENSER Press the Ice Type button to select the type - Samsung RS267LASH | Quick Guide (easy Manual) (ver.1.0) (English) - Page 8
AND BINS Freezer RS265 Model Refrigerator Water Filter Light (upper) Spill-proof glass Shelf Light Switch Foldable Shelf (RS267/RS269) Deodorizer Egg Container CoolSelect ZoneTM Drawer for RS267/RS269 ( Chilled Bin for RS265) Vegetable & Fruit Drawers Xtra SpaceTM Door Bin Ice Maker Light Ice - Samsung RS267LASH | Quick Guide (easy Manual) (ver.1.0) (English) - Page 9
OPERATING INSTRUCTIONS FOOD STORAGE GUIDE FROZEN FOOD STORAGE IN FREEZER Ice chute Do not put your fingers, hands or any other unsuitable objects in the chute or ice-maker bucket, as this may result in personal injury or material damage. WARNING Door Bin (Tilt Pocket) • Can be used for small - Samsung RS267LASH | Quick Guide (easy Manual) (ver.1.0) (English) - Page 10
FOOD STORAGE GUIDE CHILLED FOOD STORAGE IN REFRIGERATOR Wine Shelf (RS267/RS269) • Place your wine bottles butter or margarine. Gallon Door Bins • Can be used to store foods in small packages, such as milk and yogurt. • If you have a long vacation planned, empty the refrigerator and turn it off. - Samsung RS267LASH | Quick Guide (easy Manual) (ver.1.0) (English) - Page 11
INSTRUCTIONS CoolSelect ZoneTM Drawer GUIDE "Quick Cool" Button (RS267/RS269) • You can use the Quick Cool feature with the CoolSelect ZoneTM. • "Quick Cool" allows 1~3 canned beverages to cool within 60 min. • To cancel this option, press the "Quick Cool" button the size and chicken will be - Samsung RS267LASH | Quick Guide (easy Manual) (ver.1.0) (English) - Page 12
kept at 30°F(-1oC), regardless of the set refrigerator temperature. • "Chill" temperature helps keep meat or fish fresh for longer. Cool • When "Cool" is selected, the temperature will be the same as the set temperature of the refrigerator. The digital panel shows the same temperature as that of the - Samsung RS267LASH | Quick Guide (easy Manual) (ver.1.0) (English) - Page 13
and remove it. Door Bin • Hold the door bin with both hands and then lift it up. Plastic Drawer (Wire Drawer) • Remove the drawer by pulling it out and slightly lifting it up. Ice Maker Bucket • Remove the bucket by lifting up and pulling out. Front Leg Cover • Open the freezer and refriger- ator - Samsung RS267LASH | Quick Guide (easy Manual) (ver.1.0) (English) - Page 14
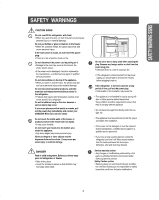
Ice and water dispenser • Use a damp cloth to clean the ice and water dispenser. Then wipe it out with a dry cloth. • To keep drainage grid dry, do not touch ice and water dispenser. Rubber door seals • If the rubber door seals are dirty, the door will not close properly, The refrigerator will - Samsung RS267LASH | Quick Guide (easy Manual) (ver.1.0) (English) - Page 15
your service center. WARNING INTERIOR LIGHT IN THE REFRIGERATOR . Upper Pull out the screw cap ➀ and remove the screw. Pull the lamp cover in the direction of the arrows. After changing the bulb, reattach the light cover and screw it in again. Replacement bulbs for both freezer and fridge are - Samsung RS267LASH | Quick Guide (easy Manual) (ver.1.0) (English) - Page 16
water and ice dispenser without a water filter cartridge because the water line blocks at water supply. Ordering replacement filters • To order more water filter cartridges, call 1-800-SAMSUNG and ask for accessory Part # DA29- 00003A or contact your authorized Samsung dealer. DOORS The refrigerator - Samsung RS267LASH | Quick Guide (easy Manual) (ver.1.0) (English) - Page 17
the refrigerator can pass through it. Dimension (inch) Model Capacity (Cu. Ft) Width Case Height Depth without Hinge with Hinge with door without door RS265/RS267/RS269 26.1 36" 69" 70" 35" 30" Selecting the Location for the Refrigerator • Select a location with easy access to the water supply - Samsung RS267LASH | Quick Guide (easy Manual) (ver.1.0) (English) - Page 18
REMOVING THE REFRIGERATOR DOORS Removing the Front Leg Cover Open the freezer and refrigerator doors, and then take off the front leg cover by turning the three screws counter-clockwise. a FRONT LEG COVER SCREW Separating the Water Supply Line from the Refrigerator 1) Remove the screw from clamp ( - Samsung RS267LASH | Quick Guide (easy Manual) (ver.1.0) (English) - Page 19
REMOVING THE REFRIGERATOR DOORS NOTE • Lift the door straight up. • Be careful not to pinch the water tubing and wire harness on the door. • Place doors on a protected surface. Removing the Freezer Door 1) With the door closed, remove the upper hinge cover (➀) using a screwdriver, and then - Samsung RS267LASH | Quick Guide (easy Manual) (ver.1.0) (English) - Page 20
REFRIGERATOR DOORS Removing the Refrigerator Door 1) With the door closed, remove the upper hinge cover (➀) using a screwdriver 2) Remove hinge screws ( ) and ground screw ( ) counter-clockwise, and take off the upper hinge ( ) in the direction of the arrow ( ). Be careful when removing the door - Samsung RS267LASH | Quick Guide (easy Manual) (ver.1.0) (English) - Page 21
REATTACHING THE REFRIGERATOR DOORS Reattaching the Freezer Door 1) Insert the lower hinge (➀) in the bracket lower hinge (➁). 2) Reattach the freezer door by inserting the hose (➂) in the lower side of the door into the hole in the lower hinge (➃) and pulling the hose down. 3) Insert the upper - Samsung RS267LASH | Quick Guide (easy Manual) (ver.1.0) (English) - Page 22
door (➂) over the lower hinge (➃). 3) Insert the upper hinge shaft (➄) into the hole (➅). After levelling between the upper hinge hole (➆) and the hole of the cabinet (➇). reattach hinge screws (➈) and ground screw (➉) in the clockwise direction. 4) Connect the wires. 5) Put the front part - Samsung RS267LASH | Quick Guide (easy Manual) (ver.1.0) (English) - Page 23
REATTACHING THE REFRIGERATOR DOORS Reattaching the Water Supply Line 1) While pressing the front face of coupler (➁), insert the water line (➀) in the coupler. 2) Tighten in the figure. Before attaching check water connector, be sure to check for leakage. NOTE FRONT LEG COVER SCREW 23 INSTALLATION - Samsung RS267LASH | Quick Guide (easy Manual) (ver.1.0) (English) - Page 24
LEVELING REFRIGERATOR Make sure the refrigerator is level before adjusting its doors. The doors will be uneven if the refrigerator is not level. The front of refrigerator is adjustable. NOTE Case 1) Freezer door is lower than that of the refrigerator Insert a flat-blade screwdriver (-) (➀) into - Samsung RS267LASH | Quick Guide (easy Manual) (ver.1.0) (English) - Page 25
BETWEEN THE DOORS Adjust Leveling first. NOTE Making small adjustments between doors. If the door of the freezer is lower than that of the refrigerator. If the door of freezer is higher than that of the refrigerator. INSTALLATION INSTRUCTIONS Adjustment part Please open the doors and adjust - Samsung RS267LASH | Quick Guide (easy Manual) (ver.1.0) (English) - Page 26
Ice maker to the off position. - Locate the nearest cold drinking water line. - Follow the instructions in the ice maker installation kit. - After connecting the water supply with water filter, turn on water supply and flush 4 or more gallons into a bucket to clear the water filter 1. Cold Water - Samsung RS267LASH | Quick Guide (easy Manual) (ver.1.0) (English) - Page 27
only. NOTE Cut off 1/4 inch of the provided plastic tubing squarely to prevent leaks when reconnect. Install the water filter. 1) As shown, the fixed cap separates from the refrigerator by rotating it counterclockwise. Remove the water filter from the box and put a month indicator stick on the - Samsung RS267LASH | Quick Guide (easy Manual) (ver.1.0) (English) - Page 28
. ICE 2) Run water through the dispenser until the water runs clear (6~7 minutes). This will clean the water supply system and clear air from the lines. 3) Additional flushing may be required in some households. 4) Open the refrigerator door and check if water leaks around the water filter. WATER - Samsung RS267LASH | Quick Guide (easy Manual) (ver.1.0) (English) - Page 29
TROUBLESHOOTING The refrigerator does not work at all or it does not Ice is not dispensed chill sufficiently • Did you stop the ice making function? • Check that the power plug is properly connected. • Is the temperature control on the display panel set to the correct temperature? Try setting it - Samsung RS267LASH | Quick Guide (easy Manual) (ver.1.0) (English) - Page 30
problem determination and service procedures. Warranty service can only be performed by a SAMSUNG authorized service center. The original dated bill of sale must be presented upon request as proof of purchase to SAMSUNG or SAMSUNG's authorized service center. SAMSUNG will repair or replace any part - Samsung RS267LASH | Quick Guide (easy Manual) (ver.1.0) (English) - Page 31
MEMO - Samsung RS267LASH | Quick Guide (easy Manual) (ver.1.0) (English) - Page 32
If you have any questions or comments relating to Samsung products, please contact the SAMSUNG customer care centre. Samsung Electronics America, Inc. 105 Challenger Road Ridgefield Park, NJ 07660-0511 1-800-SAMSUNG (1-800-726-7864) www.samsung.com
-
 1
1 -
 2
2 -
 3
3 -
 4
4 -
 5
5 -
 6
6 -
 7
7 -
8
-
9
-
10
-
11
-
12
-
13
-
14
-
15
-
16
-
17
-
18
-
19
-
20
-
21
-
22
-
23
-
24
-
25
-
26
-
27
-
28
-
29
-
30
-
31
-
32
 |
 |
OWNER’S
MANUAL AND INSTALLATION
DA68-01506B
REV(0.4)
CONTENTS
SAFETY WARNING SIGNS
...............................................................
2
OPERATING INSTRUCTIONS
........................................................
4
SETTING UP THE
REFRIGERATOR
.........................................................
4
MAJOR FEATURES
.....................................................................................
4
CONTROL PANEL
........................................................................................
5
DIGITAL
PANEL
...........................................................................................
6
TEMPERATURE CONTROL
.......................................................................
7
ICE and COLD WATER DISPENSER
.........................................................
7
SHELVES and BINS
.....................................................................................
8
FOOD STORAGE GUIDE
...........................................................................
9
CoolSelect Zone
TM
Drawer GUIDE
.............................................................
11
REMOVING THE FREEZER ACCESSORIES
..........................................
13
REMOVING THE REFRIGERATOR ACCESSORIES
..............................
13
CLEANING THE ACCESSORIES
.............................................................
14
CHANGING THE INTERIOR LIGHT
.........................................................
15
WATER FILTER
..........................................................................................
16
DOORS
.......................................................................................................
16
INSTALLATION INSTRUCTIONS
................................................
17
INSTALLATION OF THE REFRIGERATOR
.............................................
17
REMOVING THE REFRIGERATOR DOORS
...........................................
18
REATTACHING THE REFRIGERATOR DOORS
......................................
21
LEVELING REFRIGERATOR
....................................................................
24
ADJUSTING THE CLEARANCE BETWEEN THE DOORS
....................
25
CHECKING THE WATER DISPENSER LINE
...........................................
26
INSTALLING THE WATER DISPENSER LINE
.........................................
27
TROUBLESHOOTING
...............................................................................
29
CONSUMER SUPPORT
....................................................................
30
WARRANTY
...............................................................................................
30
In the U.S. for questions about features,
operation/performance, parts, accesories or service, call:
1-800-726-7864 (1-800-SAMSUNG)
www.samsung.com
Write the model and serial number here:
Model #
Serial #
Find these numbers on a label of the
refrigerator’s cabinet on the left hand-side wall.
Register your product at www.samsung.com/global/register
SIDE BY SIDE
REFRIGERATOR
RS265LA
**
RS267LA
**
RS269LA
**