Samsung SCH-R390 User Manual Ver.fd04_f2 (English(north America)) - Page 47
Menu Method, Finding a Contacts Entry, New Contact, Erase, New Text Msg, New Picture Msg
 |
View all Samsung SCH-R390 manuals
Add to My Manuals
Save this manual to your list of manuals |
Page 47 highlights
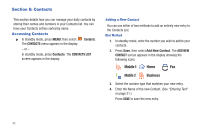
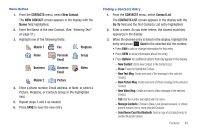
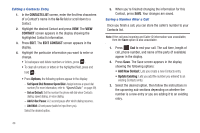
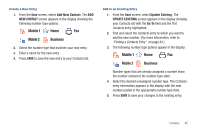
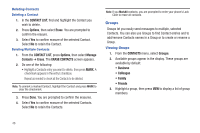
Menu Method 1. From the CONTACTS menu, select New Contact. The NEW CONTACT screen appears in the display with the Name field highlighted. 2. Enter the Name of the new Contact. (See "Entering Text" on page 21.) 3. Highlight one of the following fields: Mobile 1 Fax Ringtone Home Personal Email Group Business Business Email Notes Mobile 2 Picture 4. Enter a phone number, Email address, or Note; or select a Picture, Ringtone, or Contacts Group in the highlighted field. 5. Repeat steps 3 and 4 as needed. 6. Press SAVE to save the new entry. Finding a Contacts Entry 1. From the CONTACTS menu, select Contact List. The CONTACTS LIST screen appears in the display with the Go To field and the first Contacts List entry highlighted. 2. Enter a name. As you enter letters, the closest match(es) appear(s) in the display. 3. When the desired entry is listed in the display, highlight the entry and press Send to the selected dial the number. • Press Edit to add or change information for this entry. • Press VIEW to show information about this entry. • Press Options for additional options that may appear in the display. - New Contact: Add a new Contact to the Contacts List. - Erase: Erase the highlighted Contact. - New Text Msg: Create and send a Text message to the selected Contact. - New Picture Msg: Create and send a Picture message to the selected Contact. - New Video Msg: Create and send a Video message to the selected Contact. - Call: Dial the number associated with the name. - Manage Contacts: Choose to Erase, Lock (prevent erasure), or Unlock (permit erasure) one or more selected Contacts. - Send Name Card Via Bluetooth: Send a copy of a Contacts entry to another Bluetooth device. Contacts 43
-
 1
1 -
2
-
3
-
4
-
5
-
6
-
7
-
8
-
9
-
10
-
11
-
12
-
13
-
14
-
15
-
16
-
17
-
18
-
19
-
20
-
21
-
22
-
23
-
24
-
25
-
26
-
27
-
28
-
29
-
30
-
31
-
32
-
33
-
34
-
35
-
36
-
37
-
38
-
39
-
40
-
41
-
 42
42 -
 43
43 -
 44
44 -
 45
45 -
 46
46 -
 47
47 -
 48
48 -
 49
49 -
 50
50 -
 51
51 -
 52
52 -
53
-
54
-
55
-
56
-
57
-
58
-
59
-
60
-
61
-
62
-
63
-
64
-
65
-
66
-
67
-
68
-
69
-
70
-
71
-
72
-
73
-
74
-
75
-
76
-
77
-
78
-
79
-
80
-
81
-
82
-
83
-
84
-
85
-
86
-
87
-
88
-
89
-
90
-
91
-
92
-
93
-
94
-
95
-
96
-
97
-
98
-
99
-
100
-
101
-
102
-
103
-
104
-
105
-
106
-
107
-
108
-
109
-
110
-
111
-
112
-
113
-
114
-
115
-
116
-
117
 |
 |