Samsung SCH-R720 User Manual (user Manual) (ver.f4) (English(north America)) - Page 36
Contacts, Creating Contacts, Sync Contacts
 |
View all Samsung SCH-R720 manuals
Add to My Manuals
Save this manual to your list of manuals |
Page 36 highlights
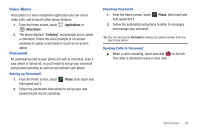
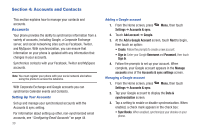
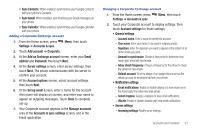
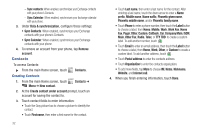
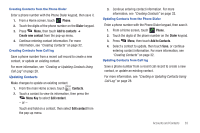
- Sync contacts: When enabled, synchronizes your Exchange contacts with your phone's Contacts. - Sync Calendar: When enabled, synchronizes your Exchange calendar with your phone. 3. Under Data & synchronization, configure these settings: • Sync Contacts: When enabled, synchronizes your Exchange contacts with your phone's Contacts. • Sync Calendar: When enabled, synchronizes your Exchange contacts with your phone. 4. To remove an account from your phone, tap Remove account. Contacts To access Contacts: ᮣ From the main Home screen, touch Creating Contacts Contacts. 1. From the main Home screen, touch Menu ➔ New contact. Contacts ➔ 2. At the Create contact under account prompt, touch an account for saving the contact to. 3. Touch contact fields to enter information: • Touch the Gray picture box to choose a picture to identify the contact. • Touch First name, then enter a first name for the contact. 32 • Touch Last name, then enter a last name for the contact. After entering a last name, touch the down arrow to enter a Name prefix, Middle name, Name suffix, Phonetic given name, Phonetic middle name, and/or Phonetic family name. • Touch Phone to enter a phone number, then touch the Label button to choose a label, from Home, Mobile, Work, Work Fax, Home Fax, Pager, Other, Custom, Callback, Car, Company Main, ISDN, Main, Other Fax, Radio, Telex, or TTY TDD to create a custom label. To add another number, touch . • Touch Email to enter an email address, then touch the Label button to choose a label, from Home, Work, Other, or Custom to create a custom label. To add another address, touch . • Touch Postal address to enter the contacts address. • Touch Organization to enter the contacts organization. • To add more fields, tap More to choose IM, Notes, Nickname, Website, and Internet call. 4. When you finish entering information, touch Done.
-
 1
1 -
2
-
3
-
4
-
5
-
6
-
7
-
8
-
9
-
10
-
11
-
12
-
13
-
14
-
15
-
16
-
17
-
18
-
19
-
20
-
21
-
22
-
23
-
24
-
25
-
26
-
27
-
28
-
29
-
30
-
 31
31 -
 32
32 -
 33
33 -
 34
34 -
 35
35 -
 36
36 -
 37
37 -
 38
38 -
 39
39 -
 40
40 -
 41
41 -
42
-
43
-
44
-
45
-
46
-
47
-
48
-
49
-
50
-
51
-
52
-
53
-
54
-
55
-
56
-
57
-
58
-
59
-
60
-
61
-
62
-
63
-
64
-
65
-
66
-
67
-
68
-
69
-
70
-
71
-
72
-
73
-
74
-
75
-
76
-
77
-
78
-
79
-
80
-
81
-
82
-
83
-
84
-
85
-
86
-
87
-
88
-
89
-
90
-
91
-
92
-
93
-
94
-
95
-
96
-
97
-
98
-
99
-
100
-
101
-
102
-
103
-
104
-
105
-
106
-
107
-
108
-
109
-
110
-
111
-
112
-
113
-
114
-
115
-
116
-
117
-
118
-
119
-
120
-
121
-
122
-
123
-
124
-
125
-
126
-
127
-
128
-
129
-
130
-
131
-
132
-
133
-
134
-
135
-
136
 |
 |