Samsung SCH-U360 User Manual (user Manual) (ver.f3) (English) - Page 49
Creating and Sending Picture Messages, Save As Draft
 |
View all Samsung SCH-U360 manuals
Add to My Manuals
Save this manual to your list of manuals |
Page 49 highlights
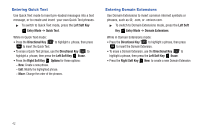
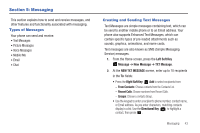
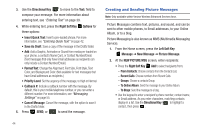
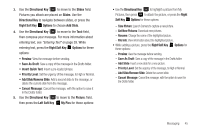
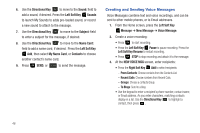
3. Use the Directional Key to move to the Text: field to compose your message. For more information about entering text, see "Entering Text" on page 39. 4. While entering text, press the Right Soft Key Options for these options: • Insert Quick Text: Insert a pre-loaded phrase. For more information, see "Entering Quick Text" on page 42. • Save As Draft: Save a copy of the message in the Drafts folder. • Add: Add a Graphic, Animation or Sound from media pre-loaded on your phone, a contact's Name Card, or Contact Number/Email. (Text messages that only have Email addresses as recipients can only include a Contact Number/Email.) • Format Text: Change the Alignment, Font Size, Font Style, Text Color, and Background Color. (Not available for text messages that have Email addresses as recipients.) • Priority Level: Set the urgency of the message, to High or Normal. • Callback #: Include a callback number with the message. By default, this is your mobile telephone number, or you can enter a different number. For more information, see "Messaging Settings" on page 55. • Cancel Message: Cancel the message, with the option to save it in the Drafts folder. 5. Press SEND, or SEND to send the message. Creating and Sending Picture Messages Note: Only available within Verizon Wireless Enhanced Services Area. Picture Messages combine text, pictures, and sound, and can be sent to other mobile phones, to Email addresses, to your Online Album, or to a blog. Picture Messaging is also known as MMS (Multimedia Messaging Service). 1. From the Home screen, press the Left Soft Key Message ➔ New Message ➔ Picture Message. 2. At the NEW PICTURE MSG screen, enter recipients: • Press the Right Soft Key Add to select recipients from: - From Contacts: Choose contacts from the Contacts List. - Recent Calls: Choose numbers from Recent Calls. - Groups: Choose a contacts Group. - To Online Album: Send the message to your Online Album. - To Blogs: Send the message to a blog. • Use the keypad to enter a recipient's phone number, contact name, or Email address. As you enter characters, matching contacts display in a list. Use the Directional Key to highlight a contact, then press . 44
-
 1
1 -
2
-
3
-
4
-
5
-
6
-
7
-
8
-
9
-
10
-
11
-
12
-
13
-
14
-
15
-
16
-
17
-
18
-
19
-
20
-
21
-
22
-
23
-
24
-
25
-
26
-
27
-
28
-
29
-
30
-
31
-
32
-
33
-
34
-
35
-
36
-
37
-
38
-
39
-
40
-
41
-
42
-
43
-
 44
44 -
 45
45 -
 46
46 -
 47
47 -
 48
48 -
 49
49 -
 50
50 -
 51
51 -
 52
52 -
 53
53 -
 54
54 -
55
-
56
-
57
-
58
-
59
-
60
-
61
-
62
-
63
-
64
-
65
-
66
-
67
-
68
-
69
-
70
-
71
-
72
-
73
-
74
-
75
-
76
-
77
-
78
-
79
-
80
-
81
-
82
-
83
-
84
-
85
-
86
-
87
-
88
-
89
-
90
-
91
-
92
-
93
-
94
-
95
-
96
-
97
-
98
-
99
-
100
-
101
-
102
-
103
-
104
-
105
-
106
-
107
-
108
-
109
-
110
-
111
-
112
-
113
-
114
-
115
-
116
-
117
-
118
-
119
-
120
-
121
-
122
-
123
-
124
-
125
-
126
-
127
-
128
-
129
-
130
-
131
-
132
-
133
-
134
-
135
-
136
-
137
-
138
-
139
-
140
-
141
-
142
-
143
-
144
-
145
-
146
-
147
-
148
-
149
-
150
-
151
-
152
 |
 |