Samsung SCH-U365 User Manual Ver.fb03_f6 (English(north America)) - Page 52
Managing Contacts, Adding Pauses or Waits, Right Soft Key, Contacts, Options, Manage, Directional Key - how to unlock
 |
View all Samsung SCH-U365 manuals
Add to My Manuals
Save this manual to your list of manuals |
Page 52 highlights
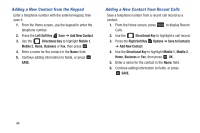
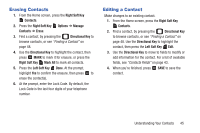
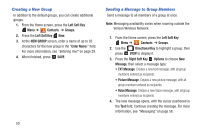
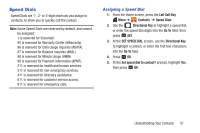
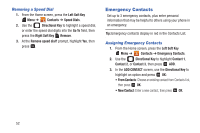
Managing Contacts Use Manage Contacts to perform actions such as erasing, locking, or unlocking, on multiple contacts at one time. 1. From the Home screen, press the Right Soft Key Contacts. 2. Press the Right Soft Key Options ➔ Manage Contacts. 3. Choose an option: • Erase: Mark multiple contact(s) for deletion. • Lock: Mark multiple contact(s) to lock. Locked contacts cannot be deleted. • Unlock: Mark multiple contact(s) to unlock. 4. Find contact(s), by pressing the Directional Key to browse contacts, or see "Finding a Contact" on page 48. Use the Directional Key to highlight contacts, then press to MARK each contact, or press the Right Soft Key Mark All to mark all contacts. 5. Press the Left Soft Key Done to perform the selected option on all marked contacts. Adding Pauses or Waits Calls to automated systems can require you to press keys to navigate menus, or to enter a password or account number. You can store those phone numbers, with special pause or wait characters, in a contact record to make dialing easier. 1. From the Home screen, press the Right Soft Key Contacts. 2. Create a new contact entry, or edit an existing contact. For more information, see "Adding a New Contact" on page 42, or "Editing a Contact" on page 45. 3. Enter the phone number up to the pause or wait, then press the Right Soft Key Options to select an option: • Add 2-Sec Pause: Stops the dialing sequence for two seconds, then automatically dials the remaining digits. A "P" appears in the field to indicate the pause. • Add Wait: Stops the dialing sequence, to wait for further input from you. A "W" appears in the field to indicate the wait. 4. When you're finished, press SAVE to save. Note: You can enter multiple pauses to extend the length of a pause. Each pause counts as a digit. Understanding Your Contacts 47
-
 1
1 -
2
-
3
-
4
-
5
-
6
-
7
-
8
-
9
-
10
-
11
-
12
-
13
-
14
-
15
-
16
-
17
-
18
-
19
-
20
-
21
-
22
-
23
-
24
-
25
-
26
-
27
-
28
-
29
-
30
-
31
-
32
-
33
-
34
-
35
-
36
-
37
-
38
-
39
-
40
-
41
-
42
-
43
-
44
-
45
-
46
-
 47
47 -
 48
48 -
 49
49 -
 50
50 -
 51
51 -
 52
52 -
 53
53 -
 54
54 -
 55
55 -
 56
56 -
 57
57 -
58
-
59
-
60
-
61
-
62
-
63
-
64
-
65
-
66
-
67
-
68
-
69
-
70
-
71
-
72
-
73
-
74
-
75
-
76
-
77
-
78
-
79
-
80
-
81
-
82
-
83
-
84
-
85
-
86
-
87
-
88
-
89
-
90
-
91
-
92
-
93
-
94
-
95
-
96
-
97
-
98
-
99
-
100
-
101
-
102
-
103
-
104
-
105
-
106
-
107
-
108
-
109
-
110
-
111
-
112
-
113
-
114
-
115
-
116
-
117
-
118
-
119
-
120
-
121
-
122
-
123
-
124
-
125
-
126
-
127
-
128
-
129
-
130
-
131
-
132
-
133
-
134
-
135
-
136
-
137
-
138
-
139
-
140
-
141
-
142
-
143
-
144
-
145
-
146
-
147
-
148
-
149
-
150
-
151
-
152
-
153
-
154
-
155
-
156
-
157
-
158
-
159
-
160
-
161
-
162
-
163
-
164
-
165
-
166
-
167
-
168
-
169
-
170
-
171
-
172
-
173
-
174
-
175
 |
 |