Samsung SCX 4725FN User Manual (ENGLISH) - Page 49
Setting up Phone Book, Speed dial numbers
 |
UPC - 635753613117
View all Samsung SCX 4725FN manuals
Add to My Manuals
Save this manual to your list of manuals |
Page 49 highlights
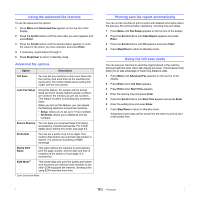
Setting up Phone Book You can set up Phone Book with the fax numbers you use most frequently. Your machine provides you with the following features for setting up Phone Book: • Speed dial numbers • Group dial numbers Speed dial numbers You can store up to 200 frequently-used fax numbers in speed dial numbers. Registering a speed dial number 1 Press Phone Book until Store/Edit appears on the bottom line of the display and press Enter. 2 Press Enter when Speed Dials appears. 3 Enter a speed dial number between 0 and 199 and press Enter. If an entry is already stored in the number you choose, you can edit the entry. To start over with another speed dial number, press Upper Level. 4 Enter the fax number you want and press Enter. 5 Enter the name you want and press Enter. For details on how to enter alphanumeric characters, see page 2.3. 6 Press Stop/Clear to return to Standby mode. Editing speed dial numbers 1 Press Phone Book until Store/Edit appears on the bottom line of the display and press Enter. 2 Press Enter when Speed Dials appears. 3 Enter the speed dial number you want to edit and press Enter. 4 Change the fax number and press Enter. 5 Change the name and press Enter. 6 Press Stop/Clear to return to Standby mode. Using speed dial numbers When you are prompted to enter a destination number while sending a fax, enter the speed dial number at which you stored the number you want. • For a one-digit (0-9) speed dial number, press and hold the corresponding digit button on the number keypad. • For a two- or three-digit speed dial number, press the first digit button(s) and then hold down the last digit button. Group dial numbers If you frequently send the same document to several destinations, you can group these destinations and set them under a group dial number. You can then use a group dial number to send a document to all of the destinations within the group. You can set up to 199 group dial numbers using the destination's existing speed dial numbers. Registering a group dial number 1 Press Phone Book until Store/Edit appears on the bottom line of the display and press Enter. 2 Press the Scroll buttons until Group Dials appears and press Enter. 3 Press Enter when New appears. 4 Enter a group dial number between 0 and 199 and press Enter. 5 Enter a speed dial number and press Enter. 6 Press Enter. 7 Repeat steps 5 and 6 to include other speed dial numbers into the group. 8 When you have finished, press Upper Level. 9 Enter the group name you want and press Enter. 10 Press Stop/Clear to return to Standby mode. Editing a group dial number You can delete a specific entry from a group or add a new number to the selected group. 1 Press Phone Book until Store/Edit appears on the bottom line of the display and press Enter. 2 Press the Scroll buttons until Group Dials appears and press Enter. 3 Press the Scroll buttons until Edit appears and press Enter. 4 Enter the group dial number you want to edit and press Enter. 5 Enter the speed dial number you want to add or delete and press Enter. If you enter a new speed dial number, Add? appears. If you enter a speed dial number stored in the group, Delete? appears. 6 Press Enter to add or delete the number. 7 Repeat from step 5 to add or delete more numbers. 8 When you have finished, press Upper Level. 9 Edit the group name and press Enter. 10 Press Stop/Clear to return to Standby mode. 10.3
-
 1
1 -
2
-
3
-
4
-
5
-
6
-
7
-
8
-
9
-
10
-
11
-
12
-
13
-
14
-
15
-
16
-
17
-
18
-
19
-
20
-
21
-
22
-
23
-
24
-
25
-
26
-
27
-
28
-
29
-
30
-
31
-
32
-
33
-
34
-
35
-
36
-
37
-
38
-
39
-
40
-
41
-
42
-
43
-
 44
44 -
 45
45 -
 46
46 -
 47
47 -
 48
48 -
 49
49 -
 50
50 -
 51
51 -
 52
52 -
 53
53 -
 54
54 -
55
-
56
-
57
-
58
-
59
-
60
-
61
-
62
-
63
-
64
-
65
-
66
-
67
-
68
-
69
-
70
-
71
-
72
-
73
-
74
-
75
-
76
-
77
-
78
-
79
-
80
-
81
-
82
-
83
-
84
-
85
-
86
-
87
-
88
-
89
-
90
-
91
-
92
-
93
-
94
-
95
-
96
-
97
-
98
-
99
-
100
-
101
-
102
-
103
-
104
-
105
-
106
-
107
-
108
-
109
-
110
-
111
-
112
-
113
-
114
-
115
-
116
-
117
-
118
-
119
-
120
-
121
 |
 |