Samsung SCX 4725FN User Manual (ENGLISH) - Page 56
Cleaning the drum, Cleaning the drum automatically, Sending new toner notification, Toner Empty
 |
UPC - 635753613117
View all Samsung SCX 4725FN manuals
Add to My Manuals
Save this manual to your list of manuals |
Page 56 highlights
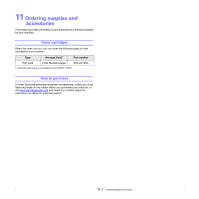
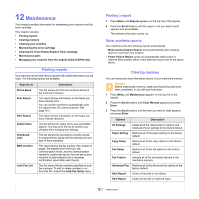
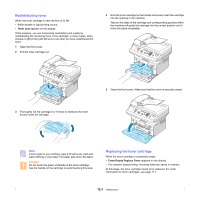
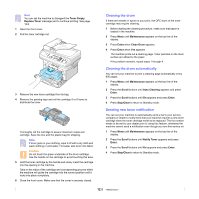
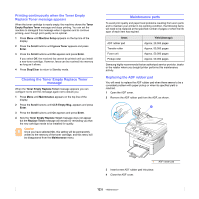
Note You can set the machine to disregard the Toner Empty Replace Toner message and to continue printing. See page 12.6. 1 Open the front cover. 2 Pull the toner cartridge out. 3 Remove the new toner cartridge from its bag. 4 Remove the packing tape and roll the cartridge 5 or 6 items to distribute the toner. Thoroughly roll the cartridge to assure maximum copies per cartridge. Save the box and the plastic bag for shipping. Note If toner gets on your clothing, wipe it off with a dry cloth and wash clothing in cold water. Hot water sets toner into fabric. Caution Do not touch the green underside of the toner cartridge. Use the handle on the cartridge to avoid touching this area. 5 Hold the toner cartridge by the handle and slowly insert the cartridge into the opening in the machine. Tabs on the sides of the cartridge and corresponding grooves within the machine will guide the cartridge into the correct position until it locks into place completely. 6 Close the front cover. Make sure that the cover is securely closed. Cleaning the drum If there are streaks or spots on your print, the OPC drum of the toner cartridge may require cleaning. 1 Before starting the cleaning procedure, make sure that paper is loaded in the machine. 2 Press Menu until Maintenance appears on the top line of the display. 3 Press Enter when Clean Drum appears. 4 Press Enter when Yes appears. The machine prints out a cleaning page. Toner particles on the drum surface are affixed to the paper. If the problem remains, repeat steps 1 through 4. Cleaning the drum automatically You can set your machine to print a cleaning page automatically every 600 pages. 1 Press Menu until Maintenance appears on the top line of the display. 2 Press the Scroll buttons until Auto Cleaning appears and press Enter. 3 Press the Scroll buttons until On appears and press Enter. 4 Press Stop/Clear to return to Standby mode. Sending new toner notification You can set your machine to automatically send a fax to your service company or dealer to notify them that your machine requires a new toner cartridge when the toner cartridge needs to be replaced. The fax number needs to be set by your dealer prior to using this feature, otherwise the machine cannot send a notification even though you turn this service on. 1 Press Menu until Maintenance appears on the top line of the display. 2 Press the Scroll buttons until Notify Toner appears and press Enter. 3 Press the Scroll buttons until On appears and press Enter. 4 Press Stop/Clear to return to Standby mode. 12.5
-
 1
1 -
2
-
3
-
4
-
5
-
6
-
7
-
8
-
9
-
10
-
11
-
12
-
13
-
14
-
15
-
16
-
17
-
18
-
19
-
20
-
21
-
22
-
23
-
24
-
25
-
26
-
27
-
28
-
29
-
30
-
31
-
32
-
33
-
34
-
35
-
36
-
37
-
38
-
39
-
40
-
41
-
42
-
43
-
44
-
45
-
46
-
47
-
48
-
49
-
50
-
 51
51 -
 52
52 -
 53
53 -
 54
54 -
 55
55 -
 56
56 -
 57
57 -
 58
58 -
 59
59 -
 60
60 -
 61
61 -
62
-
63
-
64
-
65
-
66
-
67
-
68
-
69
-
70
-
71
-
72
-
73
-
74
-
75
-
76
-
77
-
78
-
79
-
80
-
81
-
82
-
83
-
84
-
85
-
86
-
87
-
88
-
89
-
90
-
91
-
92
-
93
-
94
-
95
-
96
-
97
-
98
-
99
-
100
-
101
-
102
-
103
-
104
-
105
-
106
-
107
-
108
-
109
-
110
-
111
-
112
-
113
-
114
-
115
-
116
-
117
-
118
-
119
-
120
-
121
 |
 |