Samsung SCX 4725FN User Manual (ENGLISH) - Page 69
Scanning problems, Fax problems, Condition, Suggested solutions, SmarThru, Configuration, Phone Book - smarthru 4
 |
UPC - 635753613117
View all Samsung SCX 4725FN manuals
Add to My Manuals
Save this manual to your list of manuals |
Page 69 highlights
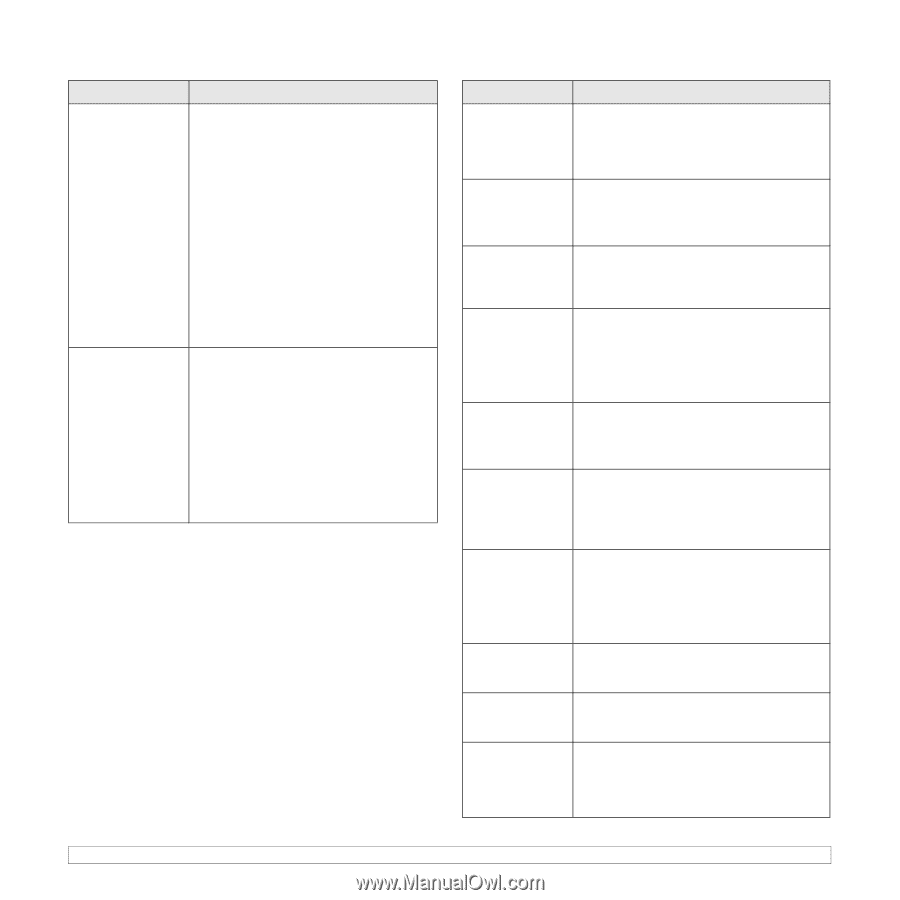
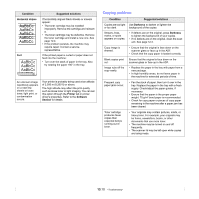
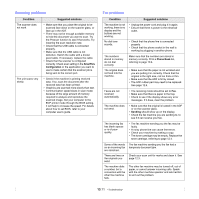
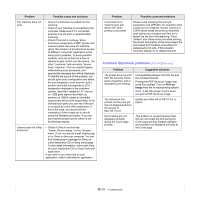
Scanning problems Condition The scanner does not work. The unit scans very slowly. Suggested solutions • Make sure that you place the original to be scanned face down on the scanner glass, or face up in the ADF. • There may not be enough available memory to hold the document you want to scan. Try the Prescan function to see if that works. Try lowering the scan resolution rate. • Check that the USB cable is connected properly. • Make sure that the USB cable is not defective. Switch the cable with a known good cable. If necessary, replace the cable. • Check that the scanner is configured correctly. Check scan setting in the SmarThru Configuration or the application you want to use to make certain that the scanner job is being sent to the correct port. • Check if the machine is printing received data. If so, scan the document after the received data has been printed. • Graphics are scanned more slowly than text. • Communication speed slows in scan mode because of the large amount of memory required to analyze and reproduce the scanned image. Set your computer to the ECP printer mode through the BIOS setting. It will help to increase the speed. For details about how to set BIOS, refer to your computer user's guide. Fax problems Condition Suggested solutions The machine is not working, there is no display and the buttons are not working. No dial tone sounds. • Unplug the power cord and plug it in again. • Ensure that there is power to the electrical outlet. • Check that the phone line is connected properly. • Check that the phone socket in the wall is working by plugging in another phone. The numbers stored in memory do not dial correctly. The original does not feed into the machine. Make sure that the numbers are stored in memory correctly. Print a Phone Book list, referring to page 10.4. • Make sure that the paper is not wrinkled and you are putting it in correctly. Check that the original is the right size, not too thick or thin. • Make sure that the ADF is firmly closed. • The ADF rubber pad may need to be replaced. See page 12.6. Faxes are not received automatically. • The receiving mode should be set to Fax. • Make sure that there is paper in the tray. • Check to see if the display shows any error messages. If it does, clear the problem. The machine does not send. • Make sure that the original is loaded in the ADF or on the scanner glass. • Sending should show up on the display. • Check the fax machine you are sending to, to see if it can receive your fax. The incoming fax has blank spaces or is of poorquality. • The fax machine sending you the fax may be faulty. • A noisy phone line can cause line errors. • Check your machine by making a copy. • The toner cartridge may be empty. Replace the toner cartridge, referring to page 12.4. Some of the words on an incoming fax are stretched. There are lines on the originals you send. The machine dials a number, but a connection with the other fax machine fails. The fax machine sending you the fax had a temporary document jam. Check your scan unit for marks and clean it. See page 12.3. The other fax machine may be turned off, out of paper, or cannot answer incoming calls. Speak with the other machine operator and ask her/him to sort out the problem. 13.11
-
 1
1 -
2
-
3
-
4
-
5
-
6
-
7
-
8
-
9
-
10
-
11
-
12
-
13
-
14
-
15
-
16
-
17
-
18
-
19
-
20
-
21
-
22
-
23
-
24
-
25
-
26
-
27
-
28
-
29
-
30
-
31
-
32
-
33
-
34
-
35
-
36
-
37
-
38
-
39
-
40
-
41
-
42
-
43
-
44
-
45
-
46
-
47
-
48
-
49
-
50
-
51
-
52
-
53
-
54
-
55
-
56
-
57
-
58
-
59
-
60
-
61
-
62
-
63
-
 64
64 -
 65
65 -
 66
66 -
 67
67 -
 68
68 -
 69
69 -
 70
70 -
 71
71 -
 72
72 -
 73
73 -
 74
74 -
75
-
76
-
77
-
78
-
79
-
80
-
81
-
82
-
83
-
84
-
85
-
86
-
87
-
88
-
89
-
90
-
91
-
92
-
93
-
94
-
95
-
96
-
97
-
98
-
99
-
100
-
101
-
102
-
103
-
104
-
105
-
106
-
107
-
108
-
109
-
110
-
111
-
112
-
113
-
114
-
115
-
116
-
117
-
118
-
119
-
120
-
121
 |
 |