Samsung SCX 4826FN User Manual (ENGLISH) - Page 65
In the manual tray, In the toner cartridge area, In the paper exit area, Guide rear - has paper jam after replacing toner
 |
UPC - 635753614824
View all Samsung SCX 4826FN manuals
Add to My Manuals
Save this manual to your list of manuals |
Page 65 highlights
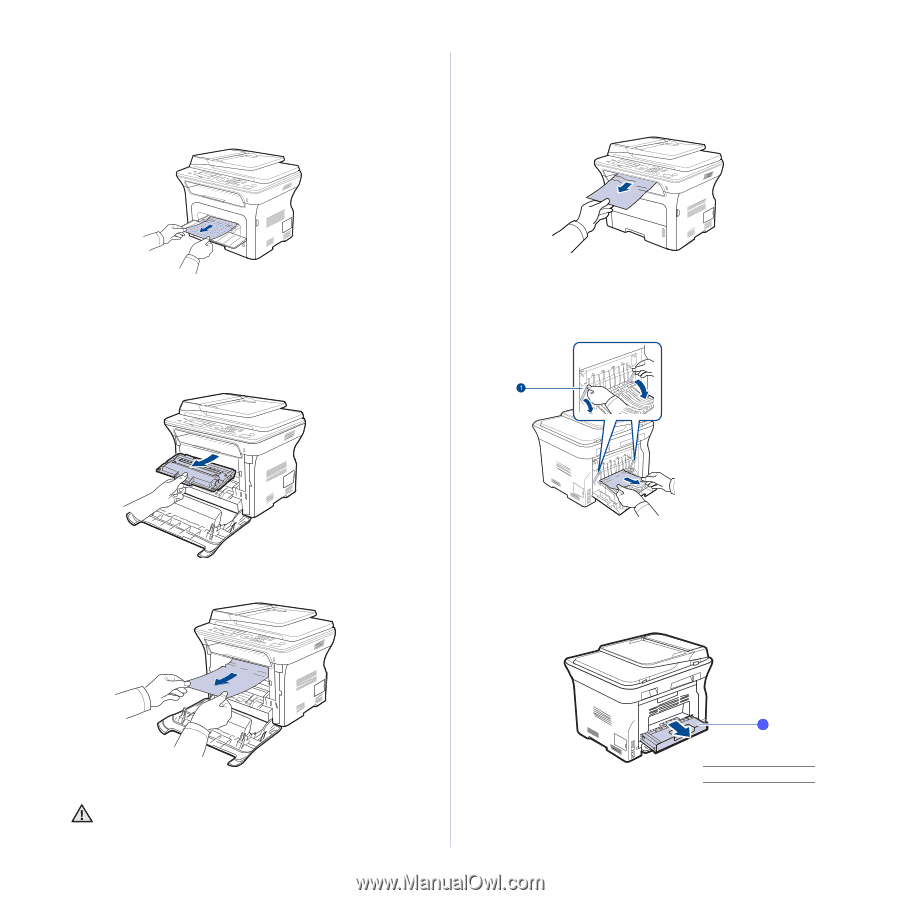
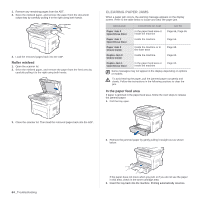
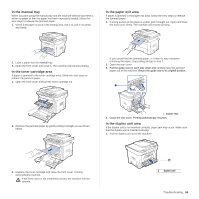
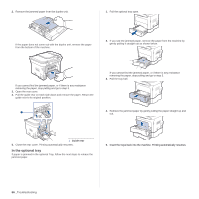
In the manual tray When you print using the manual tray and the machine detects that there is either no paper or that the paper has been improperly loaded, follow the next steps to release the jammed paper. 1. Check if the paper is stuck in the feeding area, and if so, pull it out gently and slowly. In the paper exit area If paper is jammed in the paper exit area, follow the next steps to release the jammed paper. 1. If a long portion of the paper is visible, pull it straight out. Open and close the front cover firmly. The machine will resume printing. 2. Load a paper into the manual tray. 3. Open the front cover and close it. The machine will resume printing. In the toner cartridge area If paper is jammed in the toner cartridge area, follow the next steps to release the jammed paper. 1. Open the front cover and pull the toner cartridge out If you cannot find the jammed paper, or if there is any resistance removing the paper, stop pulling and go to step 2. 2. Open the rear cover. 3. Pull the guide rear on each side down and carefully take the jammed paper out of the machine. Return the guide rear to its original position. 2. Remove the jammed paper by gently pulling it straight out as shown below. 1 Guide rear 4. Close the rear cover. Printing automatically resumes. In the duplex unit area If the duplex unit is not inserted correctly, paper jam may occur. Make sure that the duplex unit is inserted correctly. 1. Pull the duplex unit out of the machine. 3. Replace the toner cartridge and close the front cover. Printing automatically resumes. If the front cover is not completely closed, the machine will not operate. 1 1 duplex unit Troubleshooting_ 65
-
 1
1 -
2
-
3
-
4
-
5
-
6
-
7
-
8
-
9
-
10
-
11
-
12
-
13
-
14
-
15
-
16
-
17
-
18
-
19
-
20
-
21
-
22
-
23
-
24
-
25
-
26
-
27
-
28
-
29
-
30
-
31
-
32
-
33
-
34
-
35
-
36
-
37
-
38
-
39
-
40
-
41
-
42
-
43
-
44
-
45
-
46
-
47
-
48
-
49
-
50
-
51
-
52
-
53
-
54
-
55
-
56
-
57
-
58
-
59
-
 60
60 -
 61
61 -
 62
62 -
 63
63 -
 64
64 -
 65
65 -
 66
66 -
 67
67 -
 68
68 -
 69
69 -
 70
70 -
71
-
72
-
73
-
74
-
75
-
76
-
77
-
78
-
79
-
80
-
81
-
82
-
83
-
84
-
85
-
86
-
87
-
88
-
89
-
90
-
91
-
92
-
93
-
94
-
95
-
96
-
97
-
98
-
99
-
100
-
101
-
102
-
103
-
104
-
105
-
106
-
107
-
108
-
109
-
110
-
111
-
112
-
113
-
114
-
115
-
116
-
117
-
118
-
119
-
120
-
121
-
122
-
123
-
124
-
125
-
126
-
127
-
128
-
129
-
130
-
131
-
132
-
133
-
134
-
135
-
136
-
137
-
138
 |
 |