Samsung SCX 4826FN User Manual (ENGLISH) - Page 69
Solving other problems, Paper feeding - toner exhausted
 |
UPC - 635753614824
View all Samsung SCX 4826FN manuals
Add to My Manuals
Save this manual to your list of manuals |
Page 69 highlights
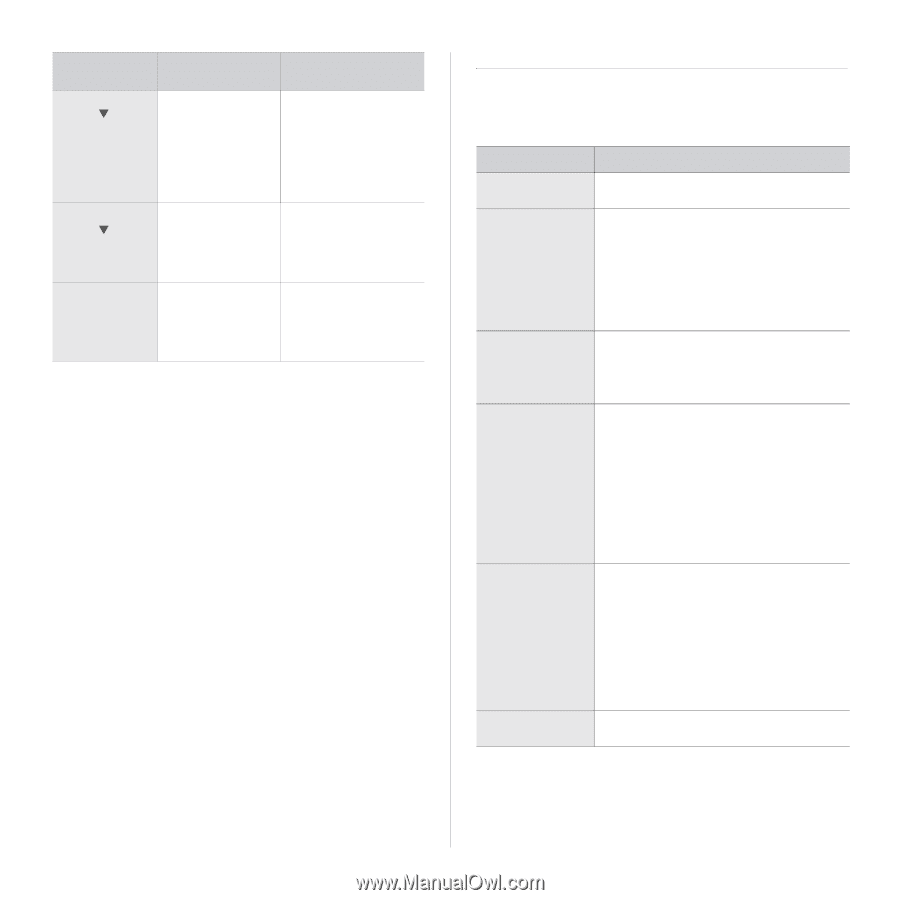
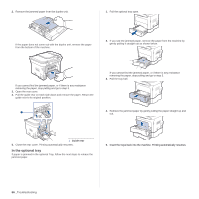
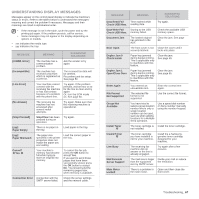
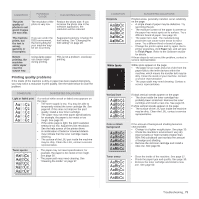
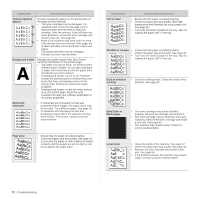
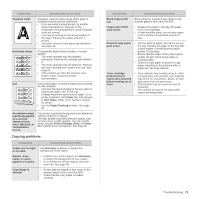
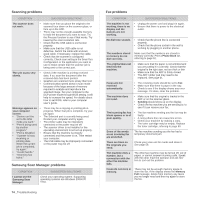
MESSAGE MEANING SUGGESTED SOLUTIONS Toner Exhausted T The lifespan of the toner cartridge which the arrow indicates is reached. This message appears when the toner is completely empty, and your machine stops printing. Replace the corresponding toner cartridge with a Samsunggenuine cartridge. See page 60. Toner Low T The corresponding toner cartridge is almost empty. Take out the toner cartridge and thoroughly shake it. By doing this, you can temporarily reestablish printing operations. Updating Data Please Wait... This message appears when there is a change in the system setting or when you back up a data. Do not turn the power off when this message is showing. Changes may not be saved and datas can be lost. SOLVING OTHER PROBLEMS The following chart lists some conditions that may occur and the recommended solutions. Follow the suggested solutions until the problem is corrected. If the problem persists, call for service. Paper feeding CONDITION SUGGESTED SOLUTIONS Paper is jammed during printing. Clear the paper jam. See page 63. Paper sticks together. • Ensure there is not too much paper in the tray. The tray can hold up to 250 sheets of paper, depending on the thickness of your paper. • Make sure that you are using the correct type of paper. See page 35. • Remove paper from the tray and flex or fan the paper. • Humid conditions may cause some paper to stick together. Multiple sheets of paper do not feed. • Different types of paper may be stacked in the tray. Load paper of only one type, size, and weight. • If multiple sheets have caused a paper jam, clear the paper jam. See page 63. Paper does not feed • Remove any obstructions from inside the into the machine. machine. • Paper has not been loaded correctly. Remove paper from the tray and reload it correctly. • There is too much paper in the tray. Remove excess paper from the tray. • The paper is too thick. Use only paper that meets the specifications required by the machine. See page 30. • If an original does not feed into the machine, the ADF rubber pad may require to be replaced. See page 61. The paper keeps jamming. • There is too much paper in the tray. Remove excess paper from the tray. If you are printing on special materials, use the manual tray. • An incorrect type of paper is being used. Use only paper that meets the specifications required by the machine. See page 30. • There may be debris inside the machine. Open the front cover and remove the debris. • If an original does not feed into the machine, the ADF rubber pad may require to be replaced. See page 61. Envelopes skew or Ensure the paper guides are against both sides of fail to feed correctly. the envelopes. Troubleshooting_ 69
-
 1
1 -
2
-
3
-
4
-
5
-
6
-
7
-
8
-
9
-
10
-
11
-
12
-
13
-
14
-
15
-
16
-
17
-
18
-
19
-
20
-
21
-
22
-
23
-
24
-
25
-
26
-
27
-
28
-
29
-
30
-
31
-
32
-
33
-
34
-
35
-
36
-
37
-
38
-
39
-
40
-
41
-
42
-
43
-
44
-
45
-
46
-
47
-
48
-
49
-
50
-
51
-
52
-
53
-
54
-
55
-
56
-
57
-
58
-
59
-
60
-
61
-
62
-
63
-
 64
64 -
 65
65 -
 66
66 -
 67
67 -
 68
68 -
 69
69 -
 70
70 -
 71
71 -
 72
72 -
 73
73 -
 74
74 -
75
-
76
-
77
-
78
-
79
-
80
-
81
-
82
-
83
-
84
-
85
-
86
-
87
-
88
-
89
-
90
-
91
-
92
-
93
-
94
-
95
-
96
-
97
-
98
-
99
-
100
-
101
-
102
-
103
-
104
-
105
-
106
-
107
-
108
-
109
-
110
-
111
-
112
-
113
-
114
-
115
-
116
-
117
-
118
-
119
-
120
-
121
-
122
-
123
-
124
-
125
-
126
-
127
-
128
-
129
-
130
-
131
-
132
-
133
-
134
-
135
-
136
-
137
-
138
 |
 |