Samsung SGH-A687 User Manual (user Manual) (ver.f9) (English) - Page 113
Missed Alarm Events, Used Space
 |
View all Samsung SGH-A687 manuals
Add to My Manuals
Save this manual to your list of manuals |
Page 113 highlights
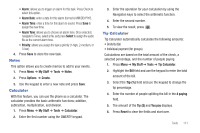
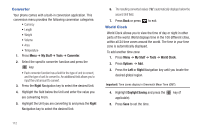
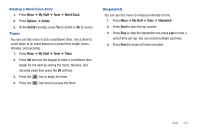
• Appointment • Anniversary • Holiday • Important • Private Other options for the Calendar include: • View: allows you to view a specified date. • View by: allows you to choose between day view or week view. • Create: allows you to select an event category: Appointment, Anniversary, Holiday, Important or Private event. • Go to: allows you to go to your today's calendar or that of a specified date. • Event List: allows you to refer to your scheduled events stored on your calendar according to the type of event: Appointment, Anniversary, Holiday, Important or Private event. • Delete: allows you to delete a calendar event. • Calendar Settings: this option allows you to configure the Calendar's Starting Day and Default View Mode. • Missed Alarm Events: this option displays any missed events. • Used Space: this option displays a list of the different Calendar event categories along with the memory allocation for each. 4. Highlight the Title field and use the QWERTY keypad to enter a name for this specific event (up to 15 characters). 5. Select the Details field and enter a description for this event (up to 100 characters). 6. Highlight the Start Date field and enter a date for this event to begin. 7. Select the Start Time field and enter a time for this event to begin. Use the Right Navigation key to set am or pm. 8. Highlight the End Date field and enter a date for this event to end. 9. Select the End Time field and enter a time for this event to end. 10. Highlight the Location field and enter a location description for this event (up to 15 characters). 11. Highlight the Alarm check box and press Check. Once selected, all remaining alarm settings are enabled. 12. Highlight the Repeat check box and press Check then scroll to the next field and use the Left or Right Navigation key to select the number of repetitions for this alarm (Daily, Weekly, or Monthly). 13. Select the Every field and enter the number of times you want this alarm to repeat. Tools 109
-
 1
1 -
2
-
3
-
4
-
5
-
6
-
7
-
8
-
9
-
10
-
11
-
12
-
13
-
14
-
15
-
16
-
17
-
18
-
19
-
20
-
21
-
22
-
23
-
24
-
25
-
26
-
27
-
28
-
29
-
30
-
31
-
32
-
33
-
34
-
35
-
36
-
37
-
38
-
39
-
40
-
41
-
42
-
43
-
44
-
45
-
46
-
47
-
48
-
49
-
50
-
51
-
52
-
53
-
54
-
55
-
56
-
57
-
58
-
59
-
60
-
61
-
62
-
63
-
64
-
65
-
66
-
67
-
68
-
69
-
70
-
71
-
72
-
73
-
74
-
75
-
76
-
77
-
78
-
79
-
80
-
81
-
82
-
83
-
84
-
85
-
86
-
87
-
88
-
89
-
90
-
91
-
92
-
93
-
94
-
95
-
96
-
97
-
98
-
99
-
100
-
101
-
102
-
103
-
104
-
105
-
106
-
107
-
 108
108 -
 109
109 -
 110
110 -
 111
111 -
 112
112 -
 113
113 -
 114
114 -
 115
115 -
 116
116 -
 117
117 -
 118
118 -
119
-
120
-
121
-
122
-
123
-
124
-
125
-
126
-
127
-
128
-
129
-
130
-
131
-
132
-
133
-
134
-
135
-
136
-
137
-
138
-
139
-
140
-
141
-
142
-
143
-
144
-
145
-
146
-
147
-
148
-
149
-
150
-
151
-
152
-
153
 |
 |