Samsung SGH-A697 User Manual (user Manual) (ver.f8.4) (English) - Page 120
AT&T Music, Music Player, Playlists, Remove Tracks, Select All, Settings, Connectivity
 |
View all Samsung SGH-A697 manuals
Add to My Manuals
Save this manual to your list of manuals |
Page 120 highlights
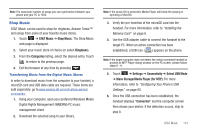
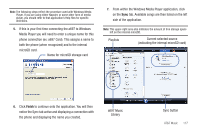
4. Touch and hold one of the songs. The color bar changes color. 5. Drag the song to the new location. Removing songs from a Playlist 1. Touch ➔ AT&T Music ➔ Music Player ➔ Playlists. 2. Touch a previously created playlist from the list and touch Remove Tracks. 3. Touch any available music files to place a checkmark alongside their entry (indicating their selection). - or - Touch Select All to select all available songs from the list for removal. 4. Touch Remove Tracks and wait for the songs to be deleted from the current playlist. Transferring Music using a Media Application A USB cable, microSD card, and a current version of a media application (such as Napster® or Windows Media Player®) are required for this procedure. 1. Open the media player on your personal computer (if you are using Windows Media Player, use version 10.0 or higher). Note: The Napster application can be downloaded at www.napster.com. Subscription fees may apply. 2. Touch ➔ Settings ➔ Connectivity ➔ Select USB Mode ➔ Mass Storage/Media Player (for MTP). For more information, refer to "Configuring Your Phone's USB Settings" on page 60. 3. Use the USB adapter cable to connect the handset to the target PC. When an active connection has been established, a USB icon ( ) appears on the phone. 4. Once the USB connection has been established, the handset displays "Connected" and the computer screen then shows your phone. 116
-
 1
1 -
2
-
3
-
4
-
5
-
6
-
7
-
8
-
9
-
10
-
11
-
12
-
13
-
14
-
15
-
16
-
17
-
18
-
19
-
20
-
21
-
22
-
23
-
24
-
25
-
26
-
27
-
28
-
29
-
30
-
31
-
32
-
33
-
34
-
35
-
36
-
37
-
38
-
39
-
40
-
41
-
42
-
43
-
44
-
45
-
46
-
47
-
48
-
49
-
50
-
51
-
52
-
53
-
54
-
55
-
56
-
57
-
58
-
59
-
60
-
61
-
62
-
63
-
64
-
65
-
66
-
67
-
68
-
69
-
70
-
71
-
72
-
73
-
74
-
75
-
76
-
77
-
78
-
79
-
80
-
81
-
82
-
83
-
84
-
85
-
86
-
87
-
88
-
89
-
90
-
91
-
92
-
93
-
94
-
95
-
96
-
97
-
98
-
99
-
100
-
101
-
102
-
103
-
104
-
105
-
106
-
107
-
108
-
109
-
110
-
111
-
112
-
113
-
114
-
 115
115 -
 116
116 -
 117
117 -
 118
118 -
 119
119 -
 120
120 -
 121
121 -
 122
122 -
 123
123 -
 124
124 -
 125
125 -
126
-
127
-
128
-
129
-
130
-
131
-
132
-
133
-
134
-
135
-
136
-
137
-
138
-
139
-
140
-
141
-
142
-
143
-
144
-
145
-
146
-
147
-
148
-
149
-
150
-
151
-
152
-
153
-
154
-
155
-
156
-
157
-
158
-
159
-
160
-
161
-
162
-
163
-
164
-
165
-
166
-
167
-
168
-
169
-
170
-
171
-
172
-
173
-
174
-
175
-
176
-
177
-
178
-
179
-
180
-
181
-
182
-
183
-
184
-
185
 |
 |