Samsung SGH-A797 User Manual (user Manual) (ver.f12) (English) - Page 68
Understanding Your Address Book, Address Book Settings, Adding a New Contact - model
 |
View all Samsung SGH-A797 manuals
Add to My Manuals
Save this manual to your list of manuals |
Page 68 highlights
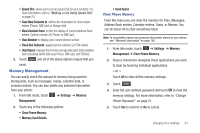
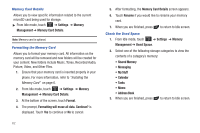
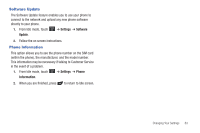
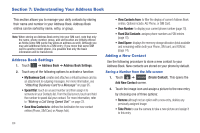
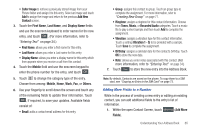
Section 7: Understanding Your Address Book This section allows you to manage your daily contacts by storing their name and number in your Address Book. Address Book entries can be sorted by name, entry, or group. Note: When storing an Address Book entry into your SIM card, note that only the name, phone number, group, and slot location are initially offered as fields (some SIM cards may allow an address as well). Although you may add additional fields to a SIM entry; if you move that same SIM card to another model phone, it is possible that only the basic information will be transferred. Address Book Settings 1. Touch ➔ Address Book ➔ Address Book Settings. 2. Touch any of the following options to activate a function: • My Business Card: creates and attaches a virtual business card as an attachment to outgoing messages. For more information, see "Attaching Business Card to a Message" on page 95. • Speed Dial: touch an unused number and then assign it to someone in your Contacts list. From the Dial screen, touch and hold the number to speed dial your contact. For more information, refer to "Making a Call Using Speed Dial" on page 23. • Save New Contacts to: defines the destination for new contact entries (Phone, SIM Card, or Always Ask). • View Contacts from: to filter the display of current Address Book entries. Options include: All, Phone, or SIM Card. • Own Number: to display your current phone number (page 70). • Fixed Dial Contacts: assigns phone numbers as FDN entries (page 70). • Used Space: displays the memory storage allocation (total available and remaining) within both your Phone, SIM card, and FDN list (page 74). Adding a New Contact Use the following procedure to store a new contact to your Address Book. New contacts are stored on your phone by default. Saving a Number from the Idle screen 1. Touch ➔ Create Contact (Create Contact). This opens the Add New Contact screen. 2. Touch the image icon and assign a picture to the new entry by choosing one of three options: • Remove although not an option with a new entry, deletes any previously assigned image. • Take Photo to use the camera to take a new picture and assign it to this entry. 64
-
 1
1 -
2
-
3
-
4
-
5
-
6
-
7
-
8
-
9
-
10
-
11
-
12
-
13
-
14
-
15
-
16
-
17
-
18
-
19
-
20
-
21
-
22
-
23
-
24
-
25
-
26
-
27
-
28
-
29
-
30
-
31
-
32
-
33
-
34
-
35
-
36
-
37
-
38
-
39
-
40
-
41
-
42
-
43
-
44
-
45
-
46
-
47
-
48
-
49
-
50
-
51
-
52
-
53
-
54
-
55
-
56
-
57
-
58
-
59
-
60
-
61
-
62
-
 63
63 -
 64
64 -
 65
65 -
 66
66 -
 67
67 -
 68
68 -
 69
69 -
 70
70 -
 71
71 -
 72
72 -
 73
73 -
74
-
75
-
76
-
77
-
78
-
79
-
80
-
81
-
82
-
83
-
84
-
85
-
86
-
87
-
88
-
89
-
90
-
91
-
92
-
93
-
94
-
95
-
96
-
97
-
98
-
99
-
100
-
101
-
102
-
103
-
104
-
105
-
106
-
107
-
108
-
109
-
110
-
111
-
112
-
113
-
114
-
115
-
116
-
117
-
118
-
119
-
120
-
121
-
122
-
123
-
124
-
125
-
126
-
127
-
128
-
129
-
130
-
131
-
132
-
133
-
134
-
135
-
136
-
137
-
138
-
139
-
140
-
141
-
142
-
143
-
144
-
145
-
146
-
147
-
148
-
149
-
150
-
151
-
152
-
153
-
154
-
155
-
156
-
157
-
158
-
159
-
160
-
161
-
162
-
163
-
164
-
165
-
166
-
167
-
168
-
169
-
170
-
171
-
172
-
173
-
174
-
175
-
176
-
177
 |
 |