Samsung SGH-A817 User Manual (user Manual) (ver.f7) (English) - Page 63
Address Book Options, Entry Options
 |
View all Samsung SGH-A817 manuals
Add to My Manuals
Save this manual to your list of manuals |
Page 63 highlights
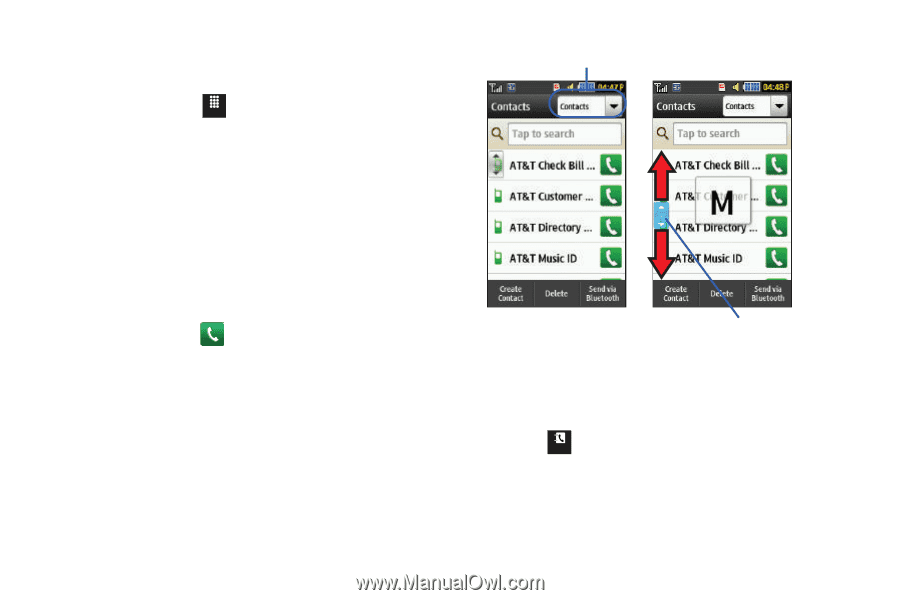
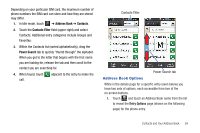
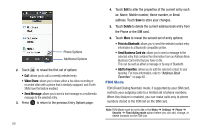
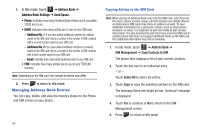
Depending on your particular SIM card, the maximum number of phone numbers the SIM card can store and how they are stored may differ. 1. In Idle mode, touch Menu ➔ Address Book ➔ Contacts. 2. Touch the Contacts Filter field (upper-right) and select Contacts. Additional entry categories include Groups and Favorites. 3. Within the Contacts list (sorted alphabetically), drag the Power Search tab to quickly "thumb through" the alphabet. When you get to the letter that begins with the first name you are looking for, release the tab and then scroll to the contact you are searching for. 4. When found, touch call. adjacent to the entry to make the Contacts Filter Power Search tab Address Book Options While in the details page for a specific entry (seen below) you have two sets of options, each accessible from two of the on-screen buttons. 1. Touch Contacts and touch an Address Book name from the list to reveal the Entry Options page (shown on the following page) for the phone entry. Contacts and Your Address Book 59
-
 1
1 -
2
-
3
-
4
-
5
-
6
-
7
-
8
-
9
-
10
-
11
-
12
-
13
-
14
-
15
-
16
-
17
-
18
-
19
-
20
-
21
-
22
-
23
-
24
-
25
-
26
-
27
-
28
-
29
-
30
-
31
-
32
-
33
-
34
-
35
-
36
-
37
-
38
-
39
-
40
-
41
-
42
-
43
-
44
-
45
-
46
-
47
-
48
-
49
-
50
-
51
-
52
-
53
-
54
-
55
-
56
-
57
-
 58
58 -
 59
59 -
 60
60 -
 61
61 -
 62
62 -
 63
63 -
 64
64 -
 65
65 -
 66
66 -
 67
67 -
 68
68 -
69
-
70
-
71
-
72
-
73
-
74
-
75
-
76
-
77
-
78
-
79
-
80
-
81
-
82
-
83
-
84
-
85
-
86
-
87
-
88
-
89
-
90
-
91
-
92
-
93
-
94
-
95
-
96
-
97
-
98
-
99
-
100
-
101
-
102
-
103
-
104
-
105
-
106
-
107
-
108
-
109
-
110
-
111
-
112
-
113
-
114
-
115
-
116
-
117
-
118
-
119
-
120
-
121
-
122
-
123
-
124
-
125
-
126
-
127
-
128
-
129
-
130
-
131
-
132
-
133
-
134
-
135
-
136
-
137
-
138
-
139
-
140
-
141
-
142
-
143
-
144
-
145
-
146
-
147
-
148
-
149
-
150
-
151
-
152
-
153
-
154
-
155
-
156
-
157
-
158
-
159
-
160
-
161
-
162
-
163
-
164
-
165
-
166
-
167
-
168
-
169
-
170
-
171
-
172
-
173
-
174
-
175
-
176
-
177
-
178
-
179
-
180
-
181
-
182
-
183
-
184
-
185
-
186
-
187
-
188
-
189
-
190
-
191
-
192
-
193
-
194
-
195
-
196
-
197
-
198
-
199
 |
 |