Samsung SGH-A927 User Manual (user Manual) (ver.f7) (English) - Page 12
Switching the Phone On or Off, Low Battery Indicator - charging cable
 |
View all Samsung SGH-A927 manuals
Add to My Manuals
Save this manual to your list of manuals |
Page 12 highlights
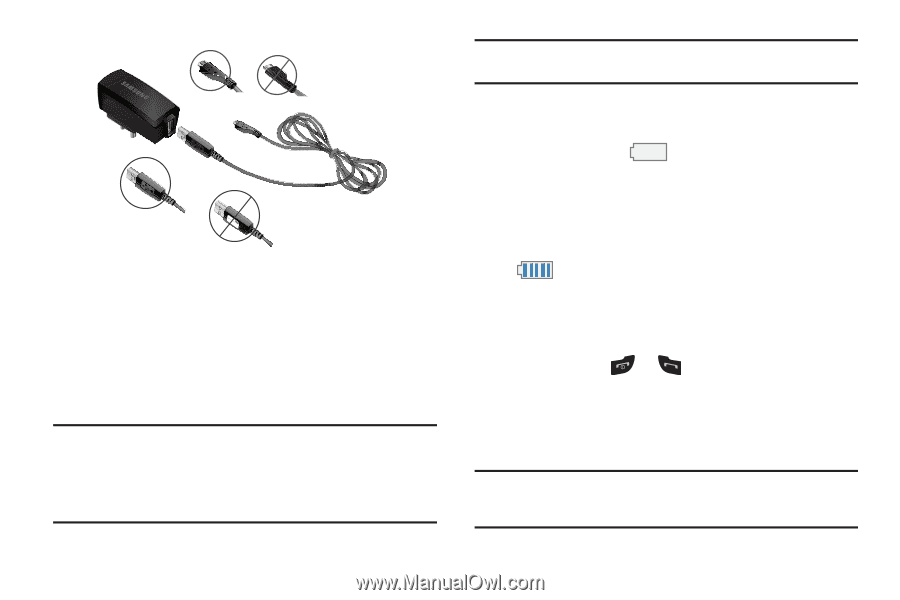
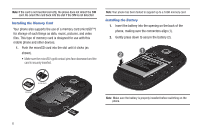
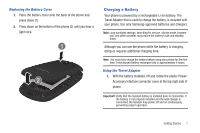
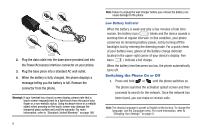
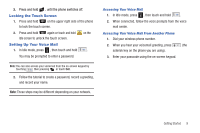
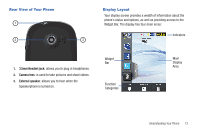
Correct Incorrect DATA LINK CABLE Correct Incorrect 2. Plug the data cable into the base piece provided and into the Power/Accessory Interface connector on your phone. 3. Plug the base piece into a standard AC wall outlet. 4. When the battery is fully charged, the phone displays a message telling you the battery is full. Remove the connector from the phone. Warning!: If your handset has a touch screen display, please note that a touch screen responds best to a light touch from the pad of your finger or a non-metallic stylus. Using excessive force or a metallic object when pressing on the touch screen may damage the tempered glass surface and void the warranty. For more information, refer to "Standard Limited Warranty" on page 180. 8 Note: Failure to unplug the wall charger before you remove the battery can cause damage to the phone. Low Battery Indicator When the battery is weak and only a few minutes of talk time remain, the battery icon ( ) blinks and the device sounds a warning tone at regular intervals. In this condition, your phone conserves its remaining battery power, not by turning off the backlight, but by entering the dimming mode. For a quick check of your battery level, glance at the battery charge indicator located in the upper-right corner of your device's display. Five bars ( ) indicate a full charge. When the battery level becomes too low, the phone automatically turns off. Switching the Phone On or Off 1. Press and hold or until the phone switches on. The phone launches the activation splash screen and then proceeds to search for the network. Once the network has been found, you can make or receive calls. Note: The display language is preset to English at the factory. To change the language, use the Language menu. For more information, refer to "Changing Your Settings" on page 51.
-
 1
1 -
2
-
3
-
4
-
5
-
6
-
 7
7 -
 8
8 -
 9
9 -
 10
10 -
 11
11 -
 12
12 -
 13
13 -
 14
14 -
 15
15 -
 16
16 -
 17
17 -
18
-
19
-
20
-
21
-
22
-
23
-
24
-
25
-
26
-
27
-
28
-
29
-
30
-
31
-
32
-
33
-
34
-
35
-
36
-
37
-
38
-
39
-
40
-
41
-
42
-
43
-
44
-
45
-
46
-
47
-
48
-
49
-
50
-
51
-
52
-
53
-
54
-
55
-
56
-
57
-
58
-
59
-
60
-
61
-
62
-
63
-
64
-
65
-
66
-
67
-
68
-
69
-
70
-
71
-
72
-
73
-
74
-
75
-
76
-
77
-
78
-
79
-
80
-
81
-
82
-
83
-
84
-
85
-
86
-
87
-
88
-
89
-
90
-
91
-
92
-
93
-
94
-
95
-
96
-
97
-
98
-
99
-
100
-
101
-
102
-
103
-
104
-
105
-
106
-
107
-
108
-
109
-
110
-
111
-
112
-
113
-
114
-
115
-
116
-
117
-
118
-
119
-
120
-
121
-
122
-
123
-
124
-
125
-
126
-
127
-
128
-
129
-
130
-
131
-
132
-
133
-
134
-
135
-
136
-
137
-
138
-
139
-
140
-
141
-
142
-
143
-
144
-
145
-
146
-
147
-
148
-
149
-
150
-
151
-
152
-
153
-
154
-
155
-
156
-
157
-
158
-
159
-
160
-
161
-
162
-
163
-
164
-
165
-
166
-
167
-
168
-
169
-
170
-
171
-
172
-
173
-
174
-
175
-
176
-
177
-
178
-
179
-
180
-
181
-
182
-
183
-
184
-
185
-
186
-
187
-
188
-
189
-
190
-
191
-
192
-
193
-
194
-
195
-
196
-
197
 |
 |