Samsung SGH-A927 User Manual (user Manual) (ver.f7) (English) - Page 25
Moving an Icon Within a Menu Screen, Moving an Icon to a New Menu Screen, Opening an Application, - icons
 |
View all Samsung SGH-A927 manuals
Add to My Manuals
Save this manual to your list of manuals |
Page 25 highlights
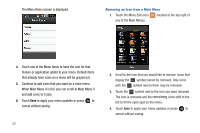
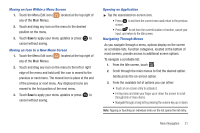
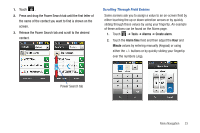
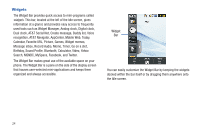
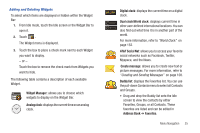
Moving an Icon Within a Menu Screen 1. Touch the Menu Edit icon ( ) located at the top right of any of the Main Menus. 2. Touch and drag any icon on the menu to the desired position on the menu. 3. Touch Save to apply your menu updates or press to cancel without saving. Moving an Icon to a New Menu Screen 1. Touch the Menu Edit icon ( ) located at the top right of any of the Main Menus. 2. Touch and drag any icon on the menu to the left or right edge of the menu and hold until the icon is moved to the previous or next menu. The moved icon is place at the end of the previous or next menu. Any displaced icons are moved to the first position of the next menu. 3. Touch Save to apply your menu updates or press to cancel without saving. Opening an Application ᮣ Tap the associated on-screen icon. • Press to exit from the current menu and return to the previous screen. • Press to exit from the current location or function, cancel your input, and return to the Idle screen. Navigating Through Menus As you navigate through a menu, options display on the screen as scrollable lists. Function categories, located at the bottom of most screens, provide access to additional screen options. To navigate a scrollable list: 1. From the Idle screen, touch . 2. Scroll through the main menus to find the desired option. Gently press the on-screen option. 3. From the available list of options you can either: • Touch an on-screen entry to activate it. • Firmly press and slide your finger up or down the screen to scroll through lists of menu items. • Navigate through a long list by pressing the volume key up or down. Note: Tapping or touching an individual entry on the list opens the list entry. Menu Navigation 21
-
 1
1 -
2
-
3
-
4
-
5
-
6
-
7
-
8
-
9
-
10
-
11
-
12
-
13
-
14
-
15
-
16
-
17
-
18
-
19
-
 20
20 -
 21
21 -
 22
22 -
 23
23 -
 24
24 -
 25
25 -
 26
26 -
 27
27 -
 28
28 -
 29
29 -
 30
30 -
31
-
32
-
33
-
34
-
35
-
36
-
37
-
38
-
39
-
40
-
41
-
42
-
43
-
44
-
45
-
46
-
47
-
48
-
49
-
50
-
51
-
52
-
53
-
54
-
55
-
56
-
57
-
58
-
59
-
60
-
61
-
62
-
63
-
64
-
65
-
66
-
67
-
68
-
69
-
70
-
71
-
72
-
73
-
74
-
75
-
76
-
77
-
78
-
79
-
80
-
81
-
82
-
83
-
84
-
85
-
86
-
87
-
88
-
89
-
90
-
91
-
92
-
93
-
94
-
95
-
96
-
97
-
98
-
99
-
100
-
101
-
102
-
103
-
104
-
105
-
106
-
107
-
108
-
109
-
110
-
111
-
112
-
113
-
114
-
115
-
116
-
117
-
118
-
119
-
120
-
121
-
122
-
123
-
124
-
125
-
126
-
127
-
128
-
129
-
130
-
131
-
132
-
133
-
134
-
135
-
136
-
137
-
138
-
139
-
140
-
141
-
142
-
143
-
144
-
145
-
146
-
147
-
148
-
149
-
150
-
151
-
152
-
153
-
154
-
155
-
156
-
157
-
158
-
159
-
160
-
161
-
162
-
163
-
164
-
165
-
166
-
167
-
168
-
169
-
170
-
171
-
172
-
173
-
174
-
175
-
176
-
177
-
178
-
179
-
180
-
181
-
182
-
183
-
184
-
185
-
186
-
187
-
188
-
189
-
190
-
191
-
192
-
193
-
194
-
195
-
196
-
197
 |
 |