Samsung SGH-S390G User Manual - Page 12
Press down firmly along the edges to ensure that the cover is flush with the, by the arrow 1.
 |
View all Samsung SGH-S390G manuals
Add to My Manuals
Save this manual to your list of manuals |
Page 12 highlights
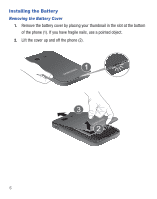
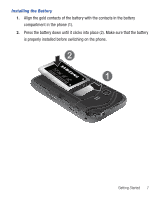
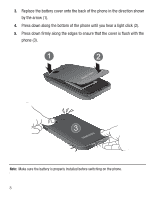
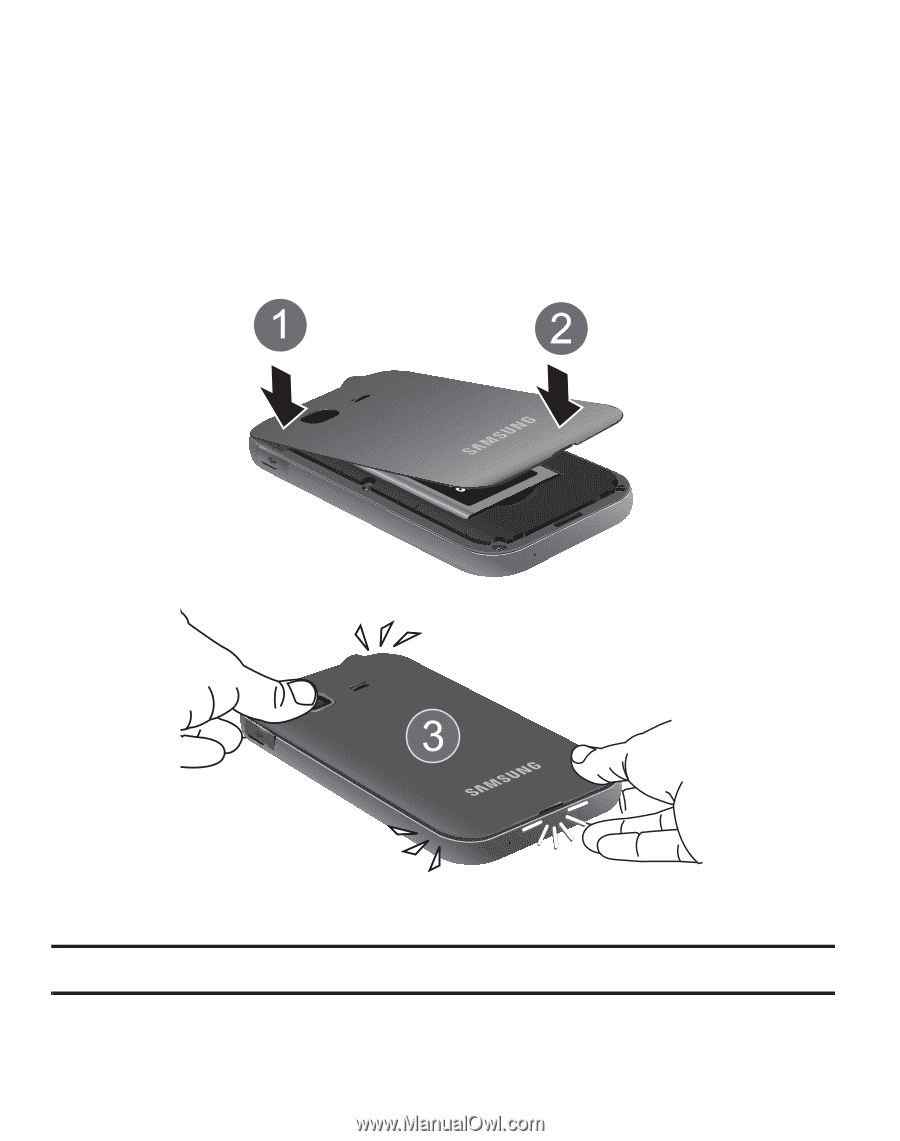
3. Replace the battery cover onto the back of the phone in the direction shown by the arrow (1). 4. Press down along the bottom of the phone until you hear a light click (2). 5. Press down firmly along the edges to ensure that the cover is flush with the phone (3). Note: Make sure the battery is properly installed before switching on the phone. 8
-
 1
1 -
2
-
3
-
4
-
5
-
6
-
 7
7 -
 8
8 -
 9
9 -
 10
10 -
 11
11 -
 12
12 -
 13
13 -
 14
14 -
 15
15 -
 16
16 -
 17
17 -
18
-
19
-
20
-
21
-
22
-
23
-
24
-
25
-
26
-
27
-
28
-
29
-
30
-
31
-
32
-
33
-
34
-
35
-
36
-
37
-
38
-
39
-
40
-
41
-
42
-
43
-
44
-
45
-
46
-
47
-
48
-
49
-
50
-
51
-
52
-
53
-
54
-
55
-
56
-
57
-
58
-
59
-
60
-
61
-
62
-
63
-
64
-
65
-
66
-
67
-
68
-
69
-
70
-
71
-
72
-
73
-
74
-
75
-
76
-
77
-
78
-
79
-
80
-
81
-
82
-
83
-
84
-
85
-
86
-
87
-
88
-
89
-
90
-
91
-
92
-
93
-
94
-
95
-
96
-
97
-
98
-
99
-
100
-
101
-
102
-
103
-
104
-
105
-
106
-
107
-
108
-
109
-
110
-
111
-
112
-
113
-
114
-
115
-
116
-
117
-
118
-
119
-
120
-
121
-
122
-
123
-
124
-
125
-
126
-
127
-
128
-
129
-
130
-
131
-
132
-
133
-
134
-
135
-
136
-
137
-
138
-
139
-
140
-
141
-
142
-
143
-
144
-
145
-
146
-
147
-
148
-
149
-
150
-
151
 |
 |
8
3.
Replace the battery cover onto the back of the phone in the direction shown
by the arrow (1).
4.
Press down along the bottom of the phone until you hear a light click (2).
5.
Press down firmly along the edges to ensure that the cover is flush with the
phone (3).
Note:
Make sure the battery is properly installed before switching on the phone.