Samsung SGH-T959 This Document Is For The T-mobile Sgh-t959 (vibrant) Only. ( - Page 100
Default Dest., White balance
 |
UPC - 610214622631
View all Samsung SGH-T959 manuals
Add to My Manuals
Save this manual to your list of manuals |
Page 100 highlights
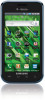
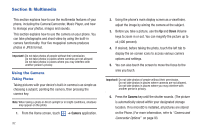
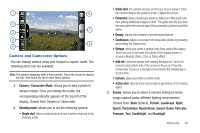
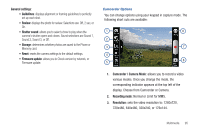
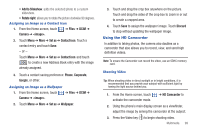
4. Default Dest.: sets the default destination for sending or saving videos. Selections are: Recent recipient, Phone Book, Online Album, New Email, or New Number. 5. Exposure: sets the total amount of light allowed to fall on the subject through the lens sensor while recording a video. Touch and drag the slider to the left to decrease the value, or to the right to increase the value. Or touch the Minus icon to decrease the value, or the Plus icon to increase the value. 6. Quick view: displays the video for quick viewing. 7. Camera button: records a video when pressed in Camcorder mode. 8. Settings: displays two types of settings, Camcorder (first tab) and General settings (second tab). Camcorder settings: • Outdoor visibility: enhances LCD visibility outdoors. • Timer: allows you to set a time delay before the camcorder records the video. Select the length of delay you want and touch the Off, 2 sec, 5 sec, and 10 sec. When you press the Camera key, the camcorder records the video after the specified time elapses. • White balance: allows you to set this option from the following choices: Auto, Cloudy, Fluorescent, Daylight, or Incandescent. • Effects: allows you to change the color tone or apply special effects to the photo. Options include: Normal, Black and White, Negative, or Sepia. • Video quality: allows you to set the video quality to: Superfine, Fine, or Normal. • Adjust: allows you to adjust the Contrast, Saturation and Sharpness for this video. General settings: • Guidelines: displays alignment or framing guidelines to perfectly set up each recording. • Audio recording: activates audio recording feature so you can record audio while recording the video. • Review: set to On to review the recorded video. • Storage: determines whether videos are saved to the Phone or Memory card. • Reset: resets the camcorder settings to the default settings. 96
-
 1
1 -
2
-
3
-
4
-
5
-
6
-
7
-
8
-
9
-
10
-
11
-
12
-
13
-
14
-
15
-
16
-
17
-
18
-
19
-
20
-
21
-
22
-
23
-
24
-
25
-
26
-
27
-
28
-
29
-
30
-
31
-
32
-
33
-
34
-
35
-
36
-
37
-
38
-
39
-
40
-
41
-
42
-
43
-
44
-
45
-
46
-
47
-
48
-
49
-
50
-
51
-
52
-
53
-
54
-
55
-
56
-
57
-
58
-
59
-
60
-
61
-
62
-
63
-
64
-
65
-
66
-
67
-
68
-
69
-
70
-
71
-
72
-
73
-
74
-
75
-
76
-
77
-
78
-
79
-
80
-
81
-
82
-
83
-
84
-
85
-
86
-
87
-
88
-
89
-
90
-
91
-
92
-
93
-
94
-
 95
95 -
 96
96 -
 97
97 -
 98
98 -
 99
99 -
 100
100 -
 101
101 -
 102
102 -
 103
103 -
 104
104 -
 105
105 -
106
-
107
-
108
-
109
-
110
-
111
-
112
-
113
-
114
-
115
-
116
-
117
-
118
-
119
-
120
-
121
-
122
-
123
-
124
-
125
-
126
-
127
-
128
-
129
-
130
-
131
-
132
-
133
-
134
-
135
-
136
-
137
-
138
-
139
-
140
-
141
-
142
-
143
-
144
-
145
-
146
-
147
-
148
-
149
-
150
-
151
-
152
-
153
-
154
-
155
-
156
-
157
-
158
-
159
-
160
-
161
-
162
-
163
-
164
-
165
-
166
-
167
-
168
-
169
-
170
-
171
-
172
-
173
-
174
-
175
-
176
-
177
-
178
-
179
-
180
-
181
-
182
-
183
-
184
-
185
-
186
-
187
-
188
-
189
-
190
-
191
-
192
-
193
-
194
-
195
-
196
-
197
-
198
-
199
-
200
-
201
-
202
-
203
-
204
-
205
-
206
-
207
-
208
-
209
-
210
-
211
-
212
-
213
-
214
-
215
-
216
-
217
-
218
 |
 |