Samsung SGH-T959 This Document Is For The T-mobile Sgh-t959 (vibrant) Only. ( - Page 13
Power Control, Active applications, Wi-Fi, Bluetooth, GPS, Synchronization - battery
 |
UPC - 610214622631
View all Samsung SGH-T959 manuals
Add to My Manuals
Save this manual to your list of manuals |
Page 13 highlights
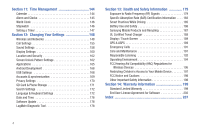
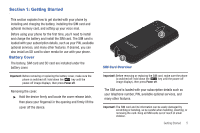
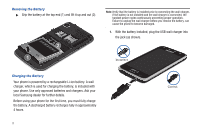
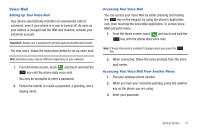
Note: This illustration displays both the correct and incorrect orientation for connecting the charger. If the charger is incorrectly connected, damage to the accessory port will occur therefore voiding the phone's warranty. 2. Plug the charger's power plug into a standard AC wall outlet. 3. When charging is finished, first unplug the charger's power plug from the AC wall outlet, then disconnect the charger's connector from the phone. Important!: If your handset has a touch screen display, please note that a touch screen responds best to a light touch from the pad of your finger or a non-metallic stylus. Using excessive force or a metallic object when pressing on the touch screen may damage the tempered glass surface and void the warranty. For more information, refer to "Standard Limited Warranty" on page 199. Low Battery Indicator When the battery level is low and only a few minutes of talk time remain, a warning tone sounds and the "Low battery" message repeats at regular intervals on the display. In this condition, your phone conserves its remaining battery power, by dimming the backlight. When the battery level becomes too low, the phone automatically turns off. Power Control Active applications, Wi-Fi, Bluetooth, GPS, Synchronization, Location consent, or the LCD Brightness functionality all act to drain your battery. The Power Control shortcut bar was designed to quickly activate (turn on), or deactivate (turn off) those functions or applications that use the most battery power. The following is a list of helpful tips that can help conserve your battery power: • Reduce your backlight time. • Turn off Bluetooth, Wi-Fi and Synchronization when not in use. • Deactivate the GPS when it is not needed. Most applications that use this function periodically query the GPS satellites for the current location; each query drains your battery. • Turn off Automatic application synchronization. Getting Started 9
-
 1
1 -
2
-
3
-
4
-
5
-
6
-
7
-
 8
8 -
 9
9 -
 10
10 -
 11
11 -
 12
12 -
 13
13 -
 14
14 -
 15
15 -
 16
16 -
 17
17 -
 18
18 -
19
-
20
-
21
-
22
-
23
-
24
-
25
-
26
-
27
-
28
-
29
-
30
-
31
-
32
-
33
-
34
-
35
-
36
-
37
-
38
-
39
-
40
-
41
-
42
-
43
-
44
-
45
-
46
-
47
-
48
-
49
-
50
-
51
-
52
-
53
-
54
-
55
-
56
-
57
-
58
-
59
-
60
-
61
-
62
-
63
-
64
-
65
-
66
-
67
-
68
-
69
-
70
-
71
-
72
-
73
-
74
-
75
-
76
-
77
-
78
-
79
-
80
-
81
-
82
-
83
-
84
-
85
-
86
-
87
-
88
-
89
-
90
-
91
-
92
-
93
-
94
-
95
-
96
-
97
-
98
-
99
-
100
-
101
-
102
-
103
-
104
-
105
-
106
-
107
-
108
-
109
-
110
-
111
-
112
-
113
-
114
-
115
-
116
-
117
-
118
-
119
-
120
-
121
-
122
-
123
-
124
-
125
-
126
-
127
-
128
-
129
-
130
-
131
-
132
-
133
-
134
-
135
-
136
-
137
-
138
-
139
-
140
-
141
-
142
-
143
-
144
-
145
-
146
-
147
-
148
-
149
-
150
-
151
-
152
-
153
-
154
-
155
-
156
-
157
-
158
-
159
-
160
-
161
-
162
-
163
-
164
-
165
-
166
-
167
-
168
-
169
-
170
-
171
-
172
-
173
-
174
-
175
-
176
-
177
-
178
-
179
-
180
-
181
-
182
-
183
-
184
-
185
-
186
-
187
-
188
-
189
-
190
-
191
-
192
-
193
-
194
-
195
-
196
-
197
-
198
-
199
-
200
-
201
-
202
-
203
-
204
-
205
-
206
-
207
-
208
-
209
-
210
-
211
-
212
-
213
-
214
-
215
-
216
-
217
-
218
 |
 |