Samsung SGH-T959 This Document Is For The T-mobile Sgh-t959 (vibrant) Only. ( - Page 92
Using Email, Your accounts
 |
UPC - 610214622631
View all Samsung SGH-T959 manuals
Add to My Manuals
Save this manual to your list of manuals |
Page 92 highlights
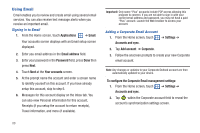
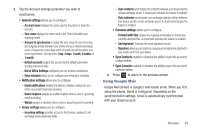
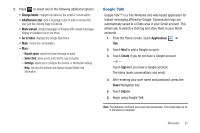
Using Email Email enables you to review and create email using several email services. You can also receive text message alerts when you receive an important email. Signing in to Email 1. From the Home screen, touch Applications ➔ Email. Your accounts screen displays with an Email setup screen displayed. 2. Enter you email address in the Email address field. 3. Enter your password in the Password field, press Done then press Next. 4. Touch Next at the Your accounts screen. 5. At the prompt name the account and enter a screen name to identify yourself on this account. If you have already setup this account, skip to step 6. 6. Messages for this account display on the Inbox tab. You can also view Personal information for this account, Receipts (if you setup the account to return receipts), Travel information, and more (if available). Important!: Only some "Plus" accounts include POP access allowing this program to connect. If you are not able to sign in with your correct email address and password, you may not have a paid "Plus" account. Launch the Web browser to access your account. Adding a Corporate Email Account 1. From the Home screen, touch Accounts and sync. ➔ Settings ➔ 2. Tap Add account ➔ Corporate. 3. Follow the onscreen prompts to create your new Corporate email account. Note: Any changes or updates to your Corporate/Outlook account are then automatically updated to your device. To configure the Corporate Email management settings: 1. From the Home screen, touch ➔ Settings ➔ Accounts and sync. 2. Tap within the Corporate account field to reveal the account's synchronization settings screen. 88
-
 1
1 -
2
-
3
-
4
-
5
-
6
-
7
-
8
-
9
-
10
-
11
-
12
-
13
-
14
-
15
-
16
-
17
-
18
-
19
-
20
-
21
-
22
-
23
-
24
-
25
-
26
-
27
-
28
-
29
-
30
-
31
-
32
-
33
-
34
-
35
-
36
-
37
-
38
-
39
-
40
-
41
-
42
-
43
-
44
-
45
-
46
-
47
-
48
-
49
-
50
-
51
-
52
-
53
-
54
-
55
-
56
-
57
-
58
-
59
-
60
-
61
-
62
-
63
-
64
-
65
-
66
-
67
-
68
-
69
-
70
-
71
-
72
-
73
-
74
-
75
-
76
-
77
-
78
-
79
-
80
-
81
-
82
-
83
-
84
-
85
-
86
-
 87
87 -
 88
88 -
 89
89 -
 90
90 -
 91
91 -
 92
92 -
 93
93 -
 94
94 -
 95
95 -
 96
96 -
 97
97 -
98
-
99
-
100
-
101
-
102
-
103
-
104
-
105
-
106
-
107
-
108
-
109
-
110
-
111
-
112
-
113
-
114
-
115
-
116
-
117
-
118
-
119
-
120
-
121
-
122
-
123
-
124
-
125
-
126
-
127
-
128
-
129
-
130
-
131
-
132
-
133
-
134
-
135
-
136
-
137
-
138
-
139
-
140
-
141
-
142
-
143
-
144
-
145
-
146
-
147
-
148
-
149
-
150
-
151
-
152
-
153
-
154
-
155
-
156
-
157
-
158
-
159
-
160
-
161
-
162
-
163
-
164
-
165
-
166
-
167
-
168
-
169
-
170
-
171
-
172
-
173
-
174
-
175
-
176
-
177
-
178
-
179
-
180
-
181
-
182
-
183
-
184
-
185
-
186
-
187
-
188
-
189
-
190
-
191
-
192
-
193
-
194
-
195
-
196
-
197
-
198
-
199
-
200
-
201
-
202
-
203
-
204
-
205
-
206
-
207
-
208
-
209
-
210
-
211
-
212
-
213
-
214
-
215
-
216
-
217
-
218
 |
 |