Samsung SPH-M350 User Manual (user Manual) (ver.f7) (English) - Page 69
Contacts Entry Options
 |
View all Samsung SPH-M350 manuals
Add to My Manuals
Save this manual to your list of manuals |
Page 69 highlights
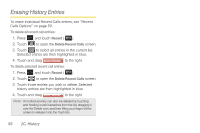
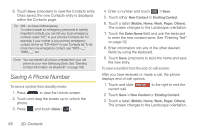
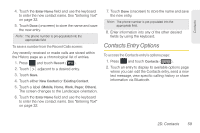
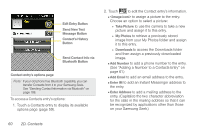
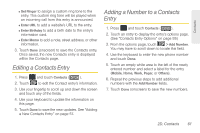
Contacts 4. Touch the Enter Name field and use the keyboard to enter the new contact name. See "Entering Text" on page 32. 5. Touch Done (onscreen) to store the name and save the new entry. Note: The phone number is pre-populated into the appropriate field. To save a number from the Recent Calls screen: Any recently received or made calls are stored within the History page as a chronological list of entries. 1. Press and touch Recent ( Recent ). 2. Touch adjacent to a desired entry. 3. Touch Save. 4. Touch either New Contact or Existing Contact. 5. Touch a label (Mobile, Home, Work, Pager, Others). The screen changes to the Landscape orientation. 6. Touch the Enter Name field and use the keyboard to enter the new contact name. See "Entering Text" on page 32. 7. Touch Done (onscreen) to store the name and save the new entry. Note: The phone number is pre-populated into the appropriate field. 8. Enter information into any of the other desired fields by using the keyboard. Contacts Entry Options To access the Contacts entry's options page: 1. Press and touch Contacts ( Contacts ). 2. Touch an entry to display its available options page where you can edit the Contacts entry, send a new text message, view specific calling history or share information via Bluetooth. 2D. Contacts 59
-
 1
1 -
2
-
3
-
4
-
5
-
6
-
7
-
8
-
9
-
10
-
11
-
12
-
13
-
14
-
15
-
16
-
17
-
18
-
19
-
20
-
21
-
22
-
23
-
24
-
25
-
26
-
27
-
28
-
29
-
30
-
31
-
32
-
33
-
34
-
35
-
36
-
37
-
38
-
39
-
40
-
41
-
42
-
43
-
44
-
45
-
46
-
47
-
48
-
49
-
50
-
51
-
52
-
53
-
54
-
55
-
56
-
57
-
58
-
59
-
60
-
61
-
62
-
63
-
 64
64 -
 65
65 -
 66
66 -
 67
67 -
 68
68 -
 69
69 -
 70
70 -
 71
71 -
 72
72 -
 73
73 -
 74
74 -
75
-
76
-
77
-
78
-
79
-
80
-
81
-
82
-
83
-
84
-
85
-
86
-
87
-
88
-
89
-
90
-
91
-
92
-
93
-
94
-
95
-
96
-
97
-
98
-
99
-
100
-
101
-
102
-
103
-
104
-
105
-
106
-
107
-
108
-
109
-
110
-
111
-
112
-
113
-
114
-
115
-
116
-
117
-
118
-
119
-
120
-
121
-
122
-
123
-
124
-
125
-
126
-
127
-
128
-
129
-
130
-
131
-
132
-
133
-
134
-
135
-
136
-
137
-
138
-
139
-
140
-
141
-
142
-
143
-
144
-
145
-
146
-
147
-
148
-
149
-
150
-
151
-
152
-
153
-
154
-
155
-
156
-
157
-
158
-
159
-
160
-
161
-
162
-
163
-
164
-
165
-
166
-
167
-
168
-
169
-
170
-
171
-
172
-
173
-
174
-
175
-
176
-
177
-
178
-
179
-
180
-
181
-
182
-
183
-
184
-
185
-
186
-
187
-
188
-
189
-
190
-
191
-
192
 |
 |