Samsung SPH-M350 User Manual (user Manual) (ver.f7) (English) - Page 71
Editing a Contacts Entry, Adding a Number to a Contacts Entry
 |
View all Samsung SPH-M350 manuals
Add to My Manuals
Save this manual to your list of manuals |
Page 71 highlights
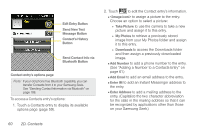
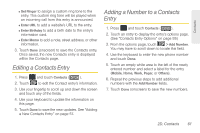
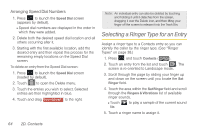
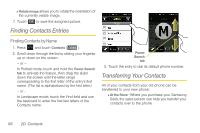
Contacts Ⅲ Set Ringer to assign a custom ring tone to the entry. This custom ring tone will be played when an incoming call from this entry is announced. Ⅲ Enter URL to add a website's URL to the entry. Ⅲ Enter Birthday to add a birth date to the entry's information card. Ⅲ Enter Memo to add a note, street address, or other information. 3. Touch Done (onscreen) to save the Contacts entry. Once saved, the new Contacts entry is displayed within the Contacts page. Editing a Contacts Entry 1. Press and touch Contacts ( Contacts ). 2. Touch to edit the Contact entry's information. 3. Use your fingertip to scroll up and down the screen and touch any of the fields. 4. Use your keyboard to update the information on this page. 5. Touch Done to save the new updates. See "Adding a New Contacts Entry" on page 57. Adding a Number to a Contacts Entry 1. Press and touch Contacts ( Contacts ). 2. Touch an entry to display the entry's options page. (See "Contacts Entry Options" on page 59.) 3. From the options page, touch > Add Number. You may have to scroll down to locate this field. 4. Use the keyboard to enter the new phone number and touch Done. 5. Touch an empty white area to the left of the newly entered number and select a label for the entry (Mobile, Home, Work, Pager, or Others). 6. Repeat the previous steps to add additional numbers with the Add Number fields. 7. Touch Done (onscreen) to save the new numbers. 2D. Contacts 61
-
 1
1 -
2
-
3
-
4
-
5
-
6
-
7
-
8
-
9
-
10
-
11
-
12
-
13
-
14
-
15
-
16
-
17
-
18
-
19
-
20
-
21
-
22
-
23
-
24
-
25
-
26
-
27
-
28
-
29
-
30
-
31
-
32
-
33
-
34
-
35
-
36
-
37
-
38
-
39
-
40
-
41
-
42
-
43
-
44
-
45
-
46
-
47
-
48
-
49
-
50
-
51
-
52
-
53
-
54
-
55
-
56
-
57
-
58
-
59
-
60
-
61
-
62
-
63
-
64
-
65
-
 66
66 -
 67
67 -
 68
68 -
 69
69 -
 70
70 -
 71
71 -
 72
72 -
 73
73 -
 74
74 -
 75
75 -
 76
76 -
77
-
78
-
79
-
80
-
81
-
82
-
83
-
84
-
85
-
86
-
87
-
88
-
89
-
90
-
91
-
92
-
93
-
94
-
95
-
96
-
97
-
98
-
99
-
100
-
101
-
102
-
103
-
104
-
105
-
106
-
107
-
108
-
109
-
110
-
111
-
112
-
113
-
114
-
115
-
116
-
117
-
118
-
119
-
120
-
121
-
122
-
123
-
124
-
125
-
126
-
127
-
128
-
129
-
130
-
131
-
132
-
133
-
134
-
135
-
136
-
137
-
138
-
139
-
140
-
141
-
142
-
143
-
144
-
145
-
146
-
147
-
148
-
149
-
150
-
151
-
152
-
153
-
154
-
155
-
156
-
157
-
158
-
159
-
160
-
161
-
162
-
163
-
164
-
165
-
166
-
167
-
168
-
169
-
170
-
171
-
172
-
173
-
174
-
175
-
176
-
177
-
178
-
179
-
180
-
181
-
182
-
183
-
184
-
185
-
186
-
187
-
188
-
189
-
190
-
191
-
192
 |
 |