Samsung SPH-M350 User Manual (user Manual) (ver.f7) (English) - Page 74
Selecting a Ringer Type for an Entry, Arranging Speed Dial Numbers
 |
View all Samsung SPH-M350 manuals
Add to My Manuals
Save this manual to your list of manuals |
Page 74 highlights
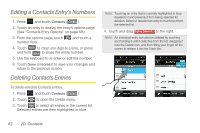
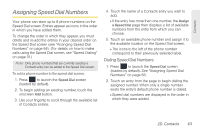
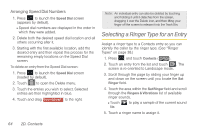
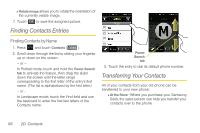
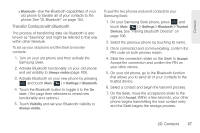
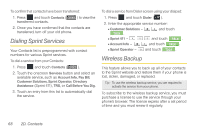
Arranging Speed Dial Numbers 1. Press to launch the Speed Dial screen (appears by default). Ⅲ Speed dial numbers are displayed in the order in which they were added. 2. Delete both the desired speed dial location and all others occurring after it. 3. Starting with the first available location, add the desired entry and then repeat this process for the remaining empty locations on the Speed Dial screen. To delete an entry from the Speed Dial screen: 1. Press to launch the Speed Dial screen (loaded by default). 2. Touch to open the Delete menu. 3. Touch the entries you wish to select. Selected entries are then highlighted in blue. 4. Touch and drag Delete Selected to the right. Note: An individual entry can also be deleted by touching and holding it until it detaches from the screen, dragging it over the Delete icon, and then lifting your finger off the screen to release it into the Trash Bin. Selecting a Ringer Type for an Entry Assign a ringer type to a Contacts entry so you can identify the caller by the ringer type. (See "Ringer Types" on page 38.) 1. Press and touch Contacts ( Contacts ). 2. Touch an entry from the list and touch . The screen is re-oriented to Landscape mode. 3. Scroll through the page by sliding your finger up and down on the screen until you locate the Set Ringer field. 4. Touch the area within the Set Ringer field and scroll through the Ringers & Vibrations list of available ringer sounds. Ⅲ Touch file. to play a sample of the current sound 5. Touch a ringer name to assign it. 64 2D. Contacts
-
 1
1 -
2
-
3
-
4
-
5
-
6
-
7
-
8
-
9
-
10
-
11
-
12
-
13
-
14
-
15
-
16
-
17
-
18
-
19
-
20
-
21
-
22
-
23
-
24
-
25
-
26
-
27
-
28
-
29
-
30
-
31
-
32
-
33
-
34
-
35
-
36
-
37
-
38
-
39
-
40
-
41
-
42
-
43
-
44
-
45
-
46
-
47
-
48
-
49
-
50
-
51
-
52
-
53
-
54
-
55
-
56
-
57
-
58
-
59
-
60
-
61
-
62
-
63
-
64
-
65
-
66
-
67
-
68
-
 69
69 -
 70
70 -
 71
71 -
 72
72 -
 73
73 -
 74
74 -
 75
75 -
 76
76 -
 77
77 -
 78
78 -
 79
79 -
80
-
81
-
82
-
83
-
84
-
85
-
86
-
87
-
88
-
89
-
90
-
91
-
92
-
93
-
94
-
95
-
96
-
97
-
98
-
99
-
100
-
101
-
102
-
103
-
104
-
105
-
106
-
107
-
108
-
109
-
110
-
111
-
112
-
113
-
114
-
115
-
116
-
117
-
118
-
119
-
120
-
121
-
122
-
123
-
124
-
125
-
126
-
127
-
128
-
129
-
130
-
131
-
132
-
133
-
134
-
135
-
136
-
137
-
138
-
139
-
140
-
141
-
142
-
143
-
144
-
145
-
146
-
147
-
148
-
149
-
150
-
151
-
152
-
153
-
154
-
155
-
156
-
157
-
158
-
159
-
160
-
161
-
162
-
163
-
164
-
165
-
166
-
167
-
168
-
169
-
170
-
171
-
172
-
173
-
174
-
175
-
176
-
177
-
178
-
179
-
180
-
181
-
182
-
183
-
184
-
185
-
186
-
187
-
188
-
189
-
190
-
191
-
192
 |
 |