Samsung SPH-M580 User Manual (user Manual) (ver.f12) (English) - Page 101
Saving a Phone Number, Tap a phone number field and enter a phone - phone cases
 |
View all Samsung SPH-M580 manuals
Add to My Manuals
Save this manual to your list of manuals |
Page 101 highlights
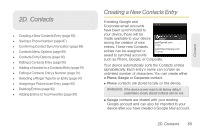
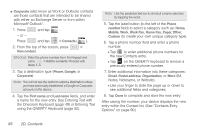
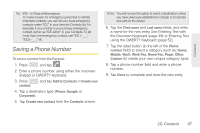
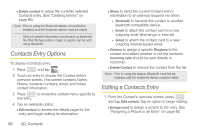
Contacts Tip: ICE - In Case of Emergency To make it easier for emergency personnel to identify important contacts, you can list your local emergency contacts under "ICE" in your device's Contacts list. For example, if your mother is your primary emergency contact, list her as "ICE-Mom" in your Contacts. To list more than one emergency contact, use "ICE1-___," "ICE2-___," etc. Saving a Phone Number To save a number from the Keypad: 1. Press and tap . 2. Enter a phone number using either the onscreen dialpad or QWERTY keyboard. 3. Press contact. and tap Add to Contacts > Create new 4. Tap a destination type (Phone, Google, or Corporate). 5. Tap Create new contact from the Contacts screen. Note: You will not see the option to select a destination unless you have previously established a Google or Corporate account on the device. 6. Tap the First name and Last name fields, and enter a name for the new entry. See Entering Text with the Onscreen Keyboard (page 49) or Entering Text using the QWERTY Keyboard (page 52). 7. Tap the label button (to the left of the Phone number field) to select a category such as: Home, Mobile, Work, Work Fax, Home Fax, Pager, Other, Custom (to create your own unique category type). 8. Tap a phone number field and enter a phone number. 9. Tap Done to complete and store the new entry. 2D. Contacts 87
-
 1
1 -
2
-
3
-
4
-
5
-
6
-
7
-
8
-
9
-
10
-
11
-
12
-
13
-
14
-
15
-
16
-
17
-
18
-
19
-
20
-
21
-
22
-
23
-
24
-
25
-
26
-
27
-
28
-
29
-
30
-
31
-
32
-
33
-
34
-
35
-
36
-
37
-
38
-
39
-
40
-
41
-
42
-
43
-
44
-
45
-
46
-
47
-
48
-
49
-
50
-
51
-
52
-
53
-
54
-
55
-
56
-
57
-
58
-
59
-
60
-
61
-
62
-
63
-
64
-
65
-
66
-
67
-
68
-
69
-
70
-
71
-
72
-
73
-
74
-
75
-
76
-
77
-
78
-
79
-
80
-
81
-
82
-
83
-
84
-
85
-
86
-
87
-
88
-
89
-
90
-
91
-
92
-
93
-
94
-
95
-
 96
96 -
 97
97 -
 98
98 -
 99
99 -
 100
100 -
 101
101 -
 102
102 -
 103
103 -
 104
104 -
 105
105 -
 106
106 -
107
-
108
-
109
-
110
-
111
-
112
-
113
-
114
-
115
-
116
-
117
-
118
-
119
-
120
-
121
-
122
-
123
-
124
-
125
-
126
-
127
-
128
-
129
-
130
-
131
-
132
-
133
-
134
-
135
-
136
-
137
-
138
-
139
-
140
-
141
-
142
-
143
-
144
-
145
-
146
-
147
-
148
-
149
-
150
-
151
-
152
-
153
-
154
-
155
-
156
-
157
-
158
-
159
-
160
-
161
-
162
-
163
-
164
-
165
-
166
-
167
-
168
-
169
-
170
-
171
-
172
-
173
-
174
-
175
-
176
-
177
-
178
-
179
-
180
-
181
-
182
-
183
-
184
-
185
-
186
-
187
-
188
-
189
-
190
-
191
-
192
-
193
-
194
-
195
-
196
-
197
-
198
-
199
-
200
-
201
-
202
-
203
-
204
-
205
-
206
-
207
-
208
-
209
-
210
-
211
-
212
-
213
-
214
-
215
-
216
-
217
-
218
-
219
-
220
-
221
-
222
-
223
-
224
-
225
-
226
-
227
-
228
-
229
-
230
 |
 |