Samsung SPH-M580 User Manual (user Manual) (ver.f12) (English) - Page 170
Adding Additional Internet Email Accounts, Opening Email
 |
View all Samsung SPH-M580 manuals
Add to My Manuals
Save this manual to your list of manuals |
Page 170 highlights
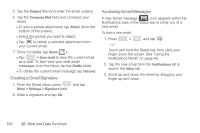
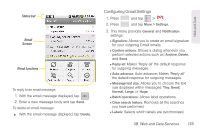
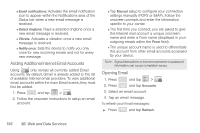
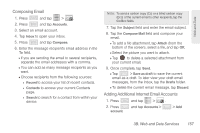
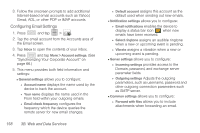
Ⅲ Email notifications: Activates the email notification icon to appear within the Notifications area of the Status bar when a new email message is received. Ⅲ Select ringtone: Plays a selected ringtone once a new email message is received. Ⅲ Vibrate: Activates a vibration once a new email message is received. Ⅲ Notify once: Sets the device to notify you only once for new incoming emails and not for every new message. Adding Additional Internet Email Accounts Using only reveals all currently added Email accounts. By default, Gmail is already added to this list of available Internet email providers. To view additional email accounts within the main Email screen, they must first be added. 1. Press and tap > . 2. Follow the onscreen instructions to setup an email account. Ⅲ Tap Manual setup to configure your connection settings manually (POP3 or IMAP). Follow the onscreen prompts and enter the information specific to your carrier. Ⅲ The first time you connect, you are asked to give this Internet mail account a unique onscreen name and enter a From name (displayed in your outgoing emails within the From field). Ⅲ The unique account name is used to differentiate this account from other email accounts accessed by your device. Note: Signal interruptions or incorrect username or password information can cause completion issues.. Opening Email 1. Press and tap > . 2. Press and tap Accounts. 3. Select an email account. 4. Tap an email message. To refresh your Email messages: ᮣ Press and tap Refresh. 156 3B. Web and Data Services
-
 1
1 -
2
-
3
-
4
-
5
-
6
-
7
-
8
-
9
-
10
-
11
-
12
-
13
-
14
-
15
-
16
-
17
-
18
-
19
-
20
-
21
-
22
-
23
-
24
-
25
-
26
-
27
-
28
-
29
-
30
-
31
-
32
-
33
-
34
-
35
-
36
-
37
-
38
-
39
-
40
-
41
-
42
-
43
-
44
-
45
-
46
-
47
-
48
-
49
-
50
-
51
-
52
-
53
-
54
-
55
-
56
-
57
-
58
-
59
-
60
-
61
-
62
-
63
-
64
-
65
-
66
-
67
-
68
-
69
-
70
-
71
-
72
-
73
-
74
-
75
-
76
-
77
-
78
-
79
-
80
-
81
-
82
-
83
-
84
-
85
-
86
-
87
-
88
-
89
-
90
-
91
-
92
-
93
-
94
-
95
-
96
-
97
-
98
-
99
-
100
-
101
-
102
-
103
-
104
-
105
-
106
-
107
-
108
-
109
-
110
-
111
-
112
-
113
-
114
-
115
-
116
-
117
-
118
-
119
-
120
-
121
-
122
-
123
-
124
-
125
-
126
-
127
-
128
-
129
-
130
-
131
-
132
-
133
-
134
-
135
-
136
-
137
-
138
-
139
-
140
-
141
-
142
-
143
-
144
-
145
-
146
-
147
-
148
-
149
-
150
-
151
-
152
-
153
-
154
-
155
-
156
-
157
-
158
-
159
-
160
-
161
-
162
-
163
-
164
-
 165
165 -
 166
166 -
 167
167 -
 168
168 -
 169
169 -
 170
170 -
 171
171 -
 172
172 -
 173
173 -
 174
174 -
 175
175 -
176
-
177
-
178
-
179
-
180
-
181
-
182
-
183
-
184
-
185
-
186
-
187
-
188
-
189
-
190
-
191
-
192
-
193
-
194
-
195
-
196
-
197
-
198
-
199
-
200
-
201
-
202
-
203
-
204
-
205
-
206
-
207
-
208
-
209
-
210
-
211
-
212
-
213
-
214
-
215
-
216
-
217
-
218
-
219
-
220
-
221
-
222
-
223
-
224
-
225
-
226
-
227
-
228
-
229
-
230
 |
 |