Samsung T260HD Quick Guide (ENGLISH)
Samsung T260HD - SyncMaster - 25.5" LCD Monitor Manual
 |
UPC - 729507803807
View all Samsung T260HD manuals
Add to My Manuals
Save this manual to your list of manuals |
Samsung T260HD manual content summary:
- Samsung T260HD | Quick Guide (ENGLISH) - Page 1
LCD MONITOR quick start guide T260HD/T240HD ii - Samsung T260HD | Quick Guide (ENGLISH) - Page 2
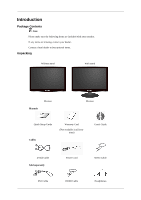
your dealer. Contact a local dealer to buy optional items. Unpacking Without stand With stand Manuals Monitor Monitor Quick Setup Guide Cables Warranty Card (Not available in all locations) User's Guide D-Sub Cable Sold separately DVI Cable Power Cord HDMI Cable Stereo Cable Headphones - Samsung T260HD | Quick Guide (ENGLISH) - Page 3
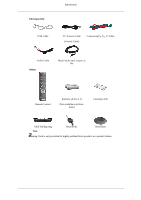
Sold separately Introduction USB Cable TV Antenna Cable (Coaxial Cable) Component(PR, PB, Y) Cable Audio Cable Others Digital audio optic output cable Remote Control Batteries (AAA X 2) (Not available in all locations) Cleaning Cloth Cable holding ring Note Stand Body Stand Base - Samsung T260HD | Quick Guide (ENGLISH) - Page 4
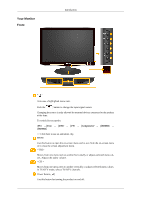
horizontally or adjusts selected menu values. Adjusts the audio volume. - CH + Moves from one menu item to another vertically or adjusts selected menu values. In TV/DTV mode, selects TV/DTV channels. Power button [ ] Use this button for turning the product on and off. - Samsung T260HD | Quick Guide (ENGLISH) - Page 5
to the right of the monitor are touch-sensitive buttons. Touch a button lightly with your finger. Power indicator This light is lit when operating normally, and blinks once when your adjustments are saved. Note See PowerSaver described in the manual for further information regarding power saving - Samsung T260HD | Quick Guide (ENGLISH) - Page 6
optical output cable. EXT(RGB) EX-LINK This is a reserved terminal used for servicing. Connect the EXT(RGB) port of the monitor to the DVD Player using a SCART jack. As for EXT(RGB) port of the monitor, it makes TV or Video signal input and output. DVI-D DVI-D Connect the DVI cable to the - Samsung T260HD | Quick Guide (ENGLISH) - Page 7
differ from the illustration depending on the manufacturer. Refer to the manual provided with the Kensington Lock for proper use. The locking be different depending on its model. Using the Anti-Theft Kensington Lock 1. Insert the locking device into the Kensington slot on the Monitor ( ) and turn it - Samsung T260HD | Quick Guide (ENGLISH) - Page 8
on the rear side of the product. Make sure to use a TV antenna cable (sold separately) as the antenna cable. COMMON INTERFACE This The Application Info inserting is about the CI CARD. You can install the CAM anytime whether the TV is ON or OFF. HDMI IN 2 / HDMI IN 2 Connect the [HDMI IN 2] - Samsung T260HD | Quick Guide (ENGLISH) - Page 9
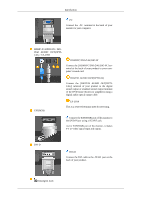
Introduction POWER Number Buttons TV/DTV CH LIST MUTE MENU Up-Down Left-Right buttons ENTER RETURN SOURCE PRE-CH GUIDE D.MENU P EXIT INFO TTX/MIX COLOR BUTTON P.MODE, M/B (MagicBright) S.MODE AUTO P.SIZE DUAL SUBTITLE SOURCE PIP Turns the product On/Off. Press to change the channel. (One/Two-Digit - Samsung T260HD | Quick Guide (ENGLISH) - Page 10
channel. Electronic Program Guide (EPG) display. DTV menu display In TV mode, selects TV channels. Exits from the menu screen. Current picture information is displayed on the upper left corner of the screen. TV channels provide written information services via teletext. - Teletext Buttons 20. COLOR - Samsung T260HD | Quick Guide (ENGLISH) - Page 11
Scan STEREO/MONO, DUAL l / DUAL ll and MONO/NICAM MONO/NICAM STEREO can be operated depending on broadcasting type by using DUAL button on the remote control while watching TV. Dgital subtitle display - Samsung T260HD | Quick Guide (ENGLISH) - Page 12
[DVI-D] Connect the [HDMI / PC / DVI-D AUDIO IN] port on the rear side of the monitor to the sound card of the PC. Note • You may enjoy clear and quality sound from the computer sound card using the monitor speakers. (You don't need to install any separate speakers for your computer.) • You may get - Samsung T260HD | Quick Guide (ENGLISH) - Page 13
and Macintosh. Connecting to Other devices Note • This monitor allows the user to connect it to such input devices as a DVD player, a VCR or cam- corder, or a DTV or TV without disconnecting the PC. • The configuration at the back of the monitor may vary from product to product. • The DVI to HDMI - Samsung T260HD | Quick Guide (ENGLISH) - Page 14
monitor. Make sure to use a TV antenna cable (sold separately) as the antenna cable. • When using an interior antenna terminal: Check the antenna terminal on the wall straight. 2. Turn on the monitor. 3. Select TV using the TV / DTV. 4. Select a desired TV channel. Note Is weak signal causing poor - Samsung T260HD | Quick Guide (ENGLISH) - Page 15
a [COMPONENT IN] connector. You can watch Component simply by hooking up the Component with the monitor as long as the power is on. Connect the port of the DVD, VCR (DVD / DTV digital output devices to your monitor. You can enjoy better screen and sound quality. 1. Connecting Using a HDMI Cable - Samsung T260HD | Quick Guide (ENGLISH) - Page 16
using the DVI to HDMI cable without connecting to the sound source, you cannot hear sound. Connecting the audio output terminal of a digital device to the [R-AUDIO-L] of [COMPONENT IN] of the monitor using an audio cable will not give you sound. Make sure to connect to the [HDMI / PC/DVI-D AUDIO - Samsung T260HD | Quick Guide (ENGLISH) - Page 17
sound is emitted from the monitor, you need to use an amplifier. • For information on how to connect a speaker and amplifier, refer to the respective user manuals provided by their manufacturers. Connecting COMMON INTERFACE Note You can install the CAM anytime whether the TV scrambled signal channel. - Samsung T260HD | Quick Guide (ENGLISH) - Page 18
Connections Connecting Headphone Note You may connect your headphones to the monitor. 1. Connect your headphones to the Headphone connection terminal. Using the Stand Monitor Assembly Tilt angle Monitor and Bottom You can adjust the tilt angle within a range of 5° forward to 25° backward for the - Samsung T260HD | Quick Guide (ENGLISH) - Page 19
and disappears after one minute. The user must adjust the frequency within that one minute. Note Refer to Specifications > Preset Timing Modes for the resolutions or frequencies that are supported by the monitor. Maintenance and Cleaning 1. Maintaining the Monitor Case. Clean with a soft cloth after - Samsung T260HD | Quick Guide (ENGLISH) - Page 20
the computer. Therefore, if there is trouble with the computer or the video card, this can cause the monitor to become blank, have poor coloring, noise, Video mode not supported, etc. In this case, first check the SOURCE of the problem, and then contact a service center or your dealer. 1. Check if - Samsung T260HD | Quick Guide (ENGLISH) - Page 21
to the external antenna.(Refer to Connecting TV) 2. Problems related to Screen Note Problems related to the monitor screen and their solutions are listed. Q: Screen is blank and power indicator is off A: Ensure that the power cord is firmly connected and the LCD monitor is on.(Refer to the Con - Samsung T260HD | Quick Guide (ENGLISH) - Page 22
Troubleshooting A: Check if the resolution and frequency set for the computer video card falls in the range supported by the monitor.If not, reset them referring to the current Information under the monitor menu and Preset Timing Modes. Q: The image is too light or too dark A: Adjust the Brightness - Samsung T260HD | Quick Guide (ENGLISH) - Page 23
surrounding the scree This is part of the product's design and is not a defect. Q & A Q: How can I change the frequency? A: The frequency can be changed by reconfiguring the video card. A: Note that video card support can vary, depending on the version of the driver used. (Refer to the computer - Samsung T260HD | Quick Guide (ENGLISH) - Page 24
Troubleshooting Q: What is the difference between HDTV and SDTV? A: There are various types of digital TVs. A: The most widely known types of digital TV are HDTV and SDTV. They are classified according to the screen quality and the video specifications. • HDTV (High Definition TV digital TV service,
-
 1
1 -
 2
2 -
 3
3 -
 4
4 -
 5
5 -
 6
6 -
 7
7 -
8
-
9
-
10
-
11
-
12
-
13
-
14
-
15
-
16
-
17
-
18
-
19
-
20
-
21
-
22
-
23
-
24
 |
 |

±±
LCD MONITOR
quick start guide
T260HD
/
T240HD