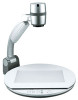
Samsung UF-80DX User Guide
Samsung UF-80DX Manual
 |
View all Samsung UF-80DX manuals
Add to My Manuals
Save this manual to your list of manuals |
Samsung UF-80DX manual content summary:
- Samsung UF-80DX | User Guide - Page 1
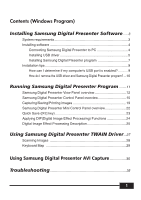
Samsung Digital Presenter Software User's Guide - Samsung UF-80DX | User Guide - Page 2
- Samsung UF-80DX | User Guide - Page 3
22 Quick Save ([F2] key 23 Applying DIP(Digital Image Effect Processing) Functions 24 Digital Image Effect Processing Description 25 Using Samsung Digital Presenter TWAIN Driver...27 Scanning Images 28 Keyboard Map 29 Using Samsung Digital Presenter AVI Capture 30 Troubleshooting 35 1 - Samsung UF-80DX | User Guide - Page 4
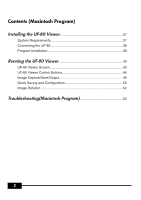
the UF-80 Viewer 37 System Requirements 37 Connecting the UF-80 38 Program Installation 39 Running the UF-80 Viewer 43 UF-80 Viewer Screen 43 UF-80 Viewer Control Buttons 46 Image Capture/Save/Output 49 Quick Saving and Configuration 52 Image Rotation 52 Troubleshooting(Macintosh - Samsung UF-80DX | User Guide - Page 5
Samsung Digital Presenter Software The supplied Samsung Digital Presenter program CD contains : • USB driver • Samsung Digital Presenter program To control your Samsung Digital Presenter on the PC, save the images into the computer HDD, or print the images, you must connect Samsung Digital Presenter - Samsung UF-80DX | User Guide - Page 6
the software 1. Connect your Samsung Digital Presenter to the PC with USB cable. See the current page. 2. Install the USB driver. See page 5. 3. Install the Samsung Digital Presenter control program. See page 7. Follow the instructions below to complete the installation: Connecting Samsung Digital - Samsung UF-80DX | User Guide - Page 7
Installing USB driver 1. The Add New Hardware Wizard dialog box appears. ( Case of Windows XP ) 2. Put a checkmark on the Install from a list or specific location (Advanced) box and click Next. ( Case of Windows XP ) ✔ Note : In the Windows 98, it may demand the Windows 98 original CD. 5 - Samsung UF-80DX | User Guide - Page 8
3. Insert the SAMSUNG program CD into your CD-ROM drive, then put a checkmark on the CD-ROM drives box and Include this location in the search box then type x:\ (where x is the drive letter for the CD-ROM drive). Click Next. 4. Click Finish. The USB driver will be inserted. 6 - Samsung UF-80DX | User Guide - Page 9
Installing Samsung Digital Presenter program 1. Insert the Samsung Digital Presenter Program CD in a CD-ROM drive and the install program will be auto-run. And then select ENGLISH.Click Next. 2. The InstallShield Wizard window opens. 3. You can select components you want to install. 7 - Samsung UF-80DX | User Guide - Page 10
setup. AVI Capture program shortcut and the software manual appears in the [Start] Menu. 6. After the Samsung Digital Presenter software is properly installed, you can see the Samsung Digital Presenter icon in the [Start] Menu and the desktop and Software manual shortcut in the [Start] Menu. 8 - Samsung UF-80DX | User Guide - Page 11
Installation tips How can I determine if my computer's USB port is enabled ? 1. We will explain by Windows XP. Please find the Device Manager in other Windows version for yourself. 2. Select Start System Device Manager 3. If you see USB host controllers and a USB root hub listed, USB interface is - Samsung UF-80DX | User Guide - Page 12
Presenter program ? USB Driver : 1. We will explain by Windows XP. Please find the Device Manager in other Windows version for yourself. 2. Select Start System Device Manager 3. Click the plus (+) icon before the Imaging Device. 4. From the Imaging devices items select Samsung Digital Presenter UF - Samsung UF-80DX | User Guide - Page 13
of the Samsung Digital Presenter View Panel does not appear, check if the graphic card on your PC supports 1024 x 768(65536 colors) or higher. ✔ Caution : • While viewing, capturing or printing images on the program or TWAIN Driver, do not turn off power of the presenter or remove the USB cable off - Samsung UF-80DX | User Guide - Page 14
Samsung Digital Presenter View Panel overview 4 1 2 3 1 View area You can see the images presented from the presenter in this view area. When you adjust the image using the Samsung Digital Presenter Control Panel or remote controller,you can see the applied result in this area. 12 - Samsung UF-80DX | User Guide - Page 15
other mode. FULL : 1024 x 768 size of image, Control Panel is closed and Mini Control Panel opens. (It is recommended to select this mode in a XGA or higher Monitor.) SCREEN FULL : 1024 x 768 size of image, Control Panel is also closed and Mini Control Panel opens. The title bar and taskbar - Samsung UF-80DX | User Guide - Page 16
to 30. When you set 0 seconds the Mini Control Panel is always visual. (For details about Mini Control Panel see page 22.) 3 Always Full Mode Making use of some Low-end PC(include DVMT type graphic card) makes trouble with displaying images in 20 frame/sec(USB2.0). The program can operate slower - Samsung UF-80DX | User Guide - Page 17
Presenter Control Panel 3 4 1. You can control capture, save and print images on the Control Panel. 5 6 2. The buttons on the Control Panel are the same as buttons on Samsung Digital Presenter or those of a remote controller. (For details, refer to Samsung Digital Presenter User's Manual - Samsung UF-80DX | User Guide - Page 18
ControlPanel Mini Control Panel switch button 1 In FULL mode you can change Control Panel to Mini Control Panel. 2 HALF button (It is invisible in usual Control Panel.) This button appears when you call Control Panel in the FULL mode. It makes program to return normal window. (Hotkey : [Esc] - Samsung UF-80DX | User Guide - Page 19
the View Panel do not change. (For the UF-80DX only) Aper. (Aperture): Turns on/off aperture mode. (TEXT MODE/IMAGE MODE) Fz. (Freeze): Turns on/off Freeze mode. The images on the View Panel do not change. Hz (Frequency): Switches frequency of the presenter between 60Hz and 75Hz. The images on the - Samsung UF-80DX | User Guide - Page 20
button inter-operates with the number button (1~8). (Refer to Samsung Digital Presenter User's Manual) I-sav(Image Save) / I-rcl(Image Recall) : from the right to left to show the hidden portion of the image. (For the UF-80DX only) Div9(3 x 3 Multi): Allow to see all the images in the memory (up - Samsung UF-80DX | User Guide - Page 21
displayed in the View Panel as a BMP or JPEG format graphic file. Do as follows: 1. Samsung Digital Presenter View Panel 10 displays image currently presented from Samsung Digital Presenter. When the desired image is displayed in the View Panel, click Capture button. 2. When capturing is - Samsung UF-80DX | User Guide - Page 22
Printing images 1. When capturing is complete, the Print button is activated. Click Print button,then the Print page Setup dialog box prompts. 2. Select Paper Size/Print Position/Print Size/Orientation etc. I Fit to page : The image is fit to the page size you selected. I Specified : You can specify - Samsung UF-80DX | User Guide - Page 23
captured image. ✔ Note : • The Save/Print size is originally set to the same one as View Panel image size. To Save/Print the Full size(XGA) image, check the 'Always Full Resolution Save/Print' item in the Option dialog box. • It may take 0.5 ~ 2 seconds to capture or release image in USB - Samsung UF-80DX | User Guide - Page 24
Samsung Digital Presenter Mini Control Panel overview Mini Control Panel : See page 24. 4 Half : See page 16. 5 Opens Control Panel on which you can control all functions of presenter. ✔ Note : • Mini Control Panel disappears within several seconds, you can set this moment in the option dialog box. - Samsung UF-80DX | User Guide - Page 25
be set in Option dialog box. (The default path is located where the Samsung Digital Presenter program is installed + QuickCap.) How to Q-SAVE 1. When the closed image captured image is saved as JPEG format. (ex> c:\program files\UF-80 USB Viewer\Quick Cap or specified directory which you have set in - Samsung UF-80DX | User Guide - Page 26
doesn't change. The DIP image is transformed just in the PC. DIP is available only in USB 2.0 mode. Using DIP for Digital Image Effect 1. While the image from presenter is displayed, if you click DIP button on (Mini) Control panel, DIP Panel opens. This button is not available while capturing - Samsung UF-80DX | User Guide - Page 27
shows the histogram on the left-up side. This effect is available on Default, Grayscale, Binarization mode. [Uses : Lets you adjust the Digital Presenter's bright value or turn the lamp On/Off efficiently.] ✔ Note : A histogram illustrates how pixels in an image are distributed by graphing the - Samsung UF-80DX | User Guide - Page 28
is 8 and you can adjust the value by mouse or [ ], [ ] keys. [Uses : Mosaics the original image from the Digital Presenter.] Digital Image Effects Default Grayscale Negative Binarization Edge Detection Image Rotation Emboss Mosaic Save O O O O O O O O Print O O O O X X X X Processing time Quick - Samsung UF-80DX | User Guide - Page 29
or Digital Camera ...] Select [UF-80 TWAIN Data Source], then select [Custom Insert]. 4) In the other TWAIN supported application software refer to application manual. 4 Scan images through UF-80 TWAIN driver Samsung Digital Presenter TWAIN driver operates almost same as Samsung Digital Presenter - Samsung UF-80DX | User Guide - Page 30
Scanning Images 1 The images from a presenter are displayed on the View Panel. Select the captured image is transferred to the application program. 4 For more information about TWAIN Driver, refer to the graphic application software manual. ✔ Note : • In FULL / SCREEN FULL mode, you can scan FULL - Samsung UF-80DX | User Guide - Page 31
Keyboard Map Keys [Alt + Enter] [ESC] [F2] [Alt + F4] Description Set the window SCREEN FULL mode. Remark [While displaying] Return to HALF size mode [While capturing] Release captured image You can specify the path your Q-SAVE images are saved. (See page 23.) For operating Q-SAVE the other - Samsung UF-80DX | User Guide - Page 32
512x384 pixels, 20 frame/sec) to AVI file (USB 2.0 only) 1. Make sure that your Samsung Digital Presenter is connected to the PC and both are turned on. 2. Select and Click [Start] [Program] [UF-80 USB Viewer] [UF-80 AVI Capture] 3. AVI Capture program is available in USB2.0 mode (Windows 2000/XP or - Samsung UF-80DX | User Guide - Page 33
format or convert your file system to capture more than 4 GB on single file. We recommend to use MPEG-4 video Codec. (Ask the technical support to use Format, Convert command) Maximum File Size No Compression MPEG-4 High Quality MPEG-4 Low Quality FAT32 4 GB Approx. 6 Min Approx. 12 Hours Approx - Samsung UF-80DX | User Guide - Page 34
4. Using UF-80 AVI Capture Program (1) Capture Time Limits You can set capture time limits to capture AVI file for a fixed period by minute. Program will show - Samsung UF-80DX | User Guide - Page 35
displays below status lamp. (4) Flip image vertical According to digital presenter lens position, preview images can be reversed. So, using Flip top-left of AVI playback file by this option. (7) Display user caption in AVI file You can display user caption (up to 50 characters) in top-left of AVI - Samsung UF-80DX | User Guide - Page 36
. (10) Exit Exits AVI capture program. ✔ Notice : 1. While capture processes, Do not turn off power of the presenter or remove the USB cable off the PC. It may cause the presenter or the PC to make trouble. 2. While capture processes, [Exit] button would not finalize AVI file. For saving AVI file - Samsung UF-80DX | User Guide - Page 37
Troubleshooting Symptom Fails to run Samsung Digital Presenter program Solution There is a communication error between Samsung Digital Presenter and the computer. Exit Samsung Digital Presenter program and do as follows: • Unplug the USB cable and then plug in it again. • Close other unnecessary - Samsung UF-80DX | User Guide - Page 38
• Make sure that the USB 2.0 function is ON in CMOS. • Download and install Microsoft USB patches.(KB822603) • On [Control Panel] Select Start root hub and select the Power Management tab. Uncheck the 'To turn off this device for saving Power' item. • Turn off the power management (S3) of computer. - Samsung UF-80DX | User Guide - Page 39
Installing the UF-80 Viewer(Macintosh Program) System Requirements • Power PC G3 400MHz or above (USB 2.0: PowerPC G4 800MHz or above Drive ✔ Notice : • USB 2.0 PCI Cards or USB 2.0 PCMCIA Cards are not formally supported. • USB 2.0 PCMCIA Cards may not demonstrate full USB 2.0 capability. 37 - Samsung UF-80DX | User Guide - Page 40
Connecting the UF-80 1. Make sure that both the Samsung Digital Presenter and a computer are turned on. 2. Plug one end of the USB cable into the USB port on the Samsung Digital Presenter. 3. Plug the with USB 2.0 works in 1.1 mode when the digital visual presenter is connected to the keyboard. 38 - Samsung UF-80DX | User Guide - Page 41
Program Installation After inserting the CD, double-click the following program icon to run it. When the above screen appears, click the "Continue" button. The installation will not proceed if the current OS version is older than 10.2. 39 - Samsung UF-80DX | User Guide - Page 42
After reviewing the information, click the "Continue" button. After reviewing the copyright information, click the "Agree" button (if you agree). 40 - Samsung UF-80DX | User Guide - Page 43
Select the hard disk where the software will be installed. When multiple hard disks are available in the system, the one where the software can be installed is displayed. Select it by clicking on it and press the "Continue" button. 41 - Samsung UF-80DX | User Guide - Page 44
When the software installation is complete, click "Close" to exit the installation program. The UF-80 Viewer software is installed in the "Applications" folder on the selected hard disk. 42 - Samsung UF-80DX | User Guide - Page 45
Running the UF-80 Viewer UF-80 Viewer Screen 1. Adjusting image size Adjusts the size of an input image. According to user selection, the size of the image is changed to 1024x768, 512x384, or 256x192. Displays 1024x768 image. Displays 512x384 image. Displays 256x192 image. 43 - Samsung UF-80DX | User Guide - Page 46
fitted to the display area. If pressed again, the image is displayed in its original size, but a part of it may be hidden. If the user enlarges the size of the window, the entire image is displayed regardless of the current display mode. 2. Function Status Display Displays the function status of - Samsung UF-80DX | User Guide - Page 47
user can click this button to display it again. 5. Control Button The control button area provides a collection of functions to control a set. For more detailed information, please refer to "UF-Viewer Control Buttons". 6. Display Area An image taken through the lens of the digital visual presenter - Samsung UF-80DX | User Guide - Page 48
UF-80 Viewer Control Buttons By using the Samsung Digital Visual Presenter program, the user can change an input image by controlling the visual presenter. 1. Image Control Slider With the control slider, the user can control zooming, focusing screen brightness & color. Press a function selection - Samsung UF-80DX | User Guide - Page 49
mode. Performs automatic focusing. When pressed, the image in the digital visual presenter is rotated by 90 , 180 , 270 or 0 . Images in the display area are not affected by this change. 3. Lamp Power Button When pressed, the visual presenter lamp toggles on or off. 4. Device Control Converts an - Samsung UF-80DX | User Guide - Page 50
in the dialogue box. (For the UF-80DX only) Displays an image saved in the memory of the digital visual presenter. After pressing the button, select a number button (1-8) in the dialogue box. (For the UF-80DX only) Saves the values changed by the user, including zoom/shrink, focus, brightness and - Samsung UF-80DX | User Guide - Page 51
and saved in JPG, TIFF or PNG format on a Macintosh hard disk and output to a printer. 1. Capturing Images When images from the digital visual presenter are transmitted to the display area, press the capture button ( ). Select a capture size in the dialogue box. The entire image is captured - Samsung UF-80DX | User Guide - Page 52
2. Saving Images To save a captured image, press the "Save image..." button. After specifying a filename and a saving format, press the "Save" button to save the image. 50 - Samsung UF-80DX | User Guide - Page 53
paper type and printing method are set according to the printer driver. Please refer to the manual of the printer currently being used. Pressing the "Preview" button converts the current image to PDF format, allowing the user to check its condition before printing. 4. Copying Images Press the "Copy - Samsung UF-80DX | User Guide - Page 54
When an image is being displayed on the digital visual presenter, the user can quickly save it by pressing the shortcut key be reduced. The filename in which an image will be saved cannot be specified by the user, but consists of the current date and time. ✔ Notice : The Quick Saving function works - Samsung UF-80DX | User Guide - Page 55
Troubleshooting(Macintosh Program) Symptom If the UF-80 Viewer does not run Solution To run the UF-80 Viewer, the digital visual presenter must be connected to a Macintosh. The digital visual presenter power must also be turned on. Check the USB connection and the digital visual presenter power. - Samsung UF-80DX | User Guide - Page 56
Memo 54 - Samsung UF-80DX | User Guide - Page 57
TECHWIN MOSCOW OFFICE LENNINGRADSKY PR-KT, 37-A. KORP.14 RUSSIA, 125167, MOSCOW TEL: +7-095-258-9296, 9298 FAX: +7-095-258-9297 I SAMSUNG OPTO-ELECTRONICS UK LTD (SOUK) Samsung House,1000 Hillswood Drive Hillswood Business Park Chertsey Surrey KT16OPS TEL :44-(0)1932-45-5308 FAX :44-(0)1932-45-5325
-
 1
1 -
 2
2 -
 3
3 -
 4
4 -
 5
5 -
 6
6 -
 7
7 -
8
-
9
-
10
-
11
-
12
-
13
-
14
-
15
-
16
-
17
-
18
-
19
-
20
-
21
-
22
-
23
-
24
-
25
-
26
-
27
-
28
-
29
-
30
-
31
-
32
-
33
-
34
-
35
-
36
-
37
-
38
-
39
-
40
-
41
-
42
-
43
-
44
-
45
-
46
-
47
-
48
-
49
-
50
-
51
-
52
-
53
-
54
-
55
-
56
-
57
 |
 |

Samsung Digital
Presenter
Software
User’s Guide