Samsung WB150F User Manual Ver.1.3 (English) - Page 91
Creating a print order (DPOF), Face Retouch, Red-eye Fix
 |
View all Samsung WB150F manuals
Add to My Manuals
Save this manual to your list of manuals |
Page 91 highlights
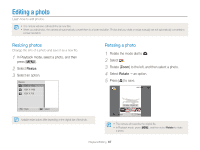
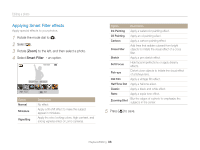
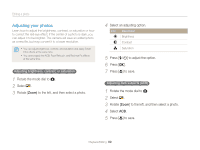
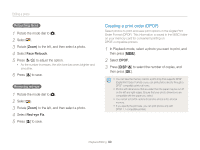
Editing a photo Retouching faces 1 Rotate the mode dial to g. 2 Select . 3 Rotate [Zoom] to the left, and then select a photo. 4 Select Face Retouch. 5 Press [F/t] to adjust the option. • As the number increases, the skin tone becomes brighter and smoother. 6 Press [c] to save. Removing red-eye 1 Rotate the mode dial to g. 2 Select . 3 Rotate [Zoom] to the left, and then select a photo. 4 Select Red-eye Fix. 5 Press [c] to save. Creating a print order (DPOF) Select photos to print and save print options in the Digital Print Order Format (DPOF). This information is saved in the MISC folder on your memory card for convenient printing on DPOF-compatible printers. 1 In Playback mode, select a photo you want to print, and then press [m]. 2 Select DPOF. 3 Press [D/c] to select the number of copies, and then press [o]. • You can take the memory card to a print shop that supports DPOF (Digital Print Order Format) or you can print photos directly through a DPOF-compatible printer at home. • Photos with dimensions that are wider than the paper may be cut off on the left and right edges. Ensure that your photo dimensions are compatible with the paper you select. • You cannot set DPOF options for photos stored in the internal memory. • If you specify the print size, you can print photos only with DPOF 1.1-compatible printers. Playback/Editing 90
-
 1
1 -
2
-
3
-
4
-
5
-
6
-
7
-
8
-
9
-
10
-
11
-
12
-
13
-
14
-
15
-
16
-
17
-
18
-
19
-
20
-
21
-
22
-
23
-
24
-
25
-
26
-
27
-
28
-
29
-
30
-
31
-
32
-
33
-
34
-
35
-
36
-
37
-
38
-
39
-
40
-
41
-
42
-
43
-
44
-
45
-
46
-
47
-
48
-
49
-
50
-
51
-
52
-
53
-
54
-
55
-
56
-
57
-
58
-
59
-
60
-
61
-
62
-
63
-
64
-
65
-
66
-
67
-
68
-
69
-
70
-
71
-
72
-
73
-
74
-
75
-
76
-
77
-
78
-
79
-
80
-
81
-
82
-
83
-
84
-
85
-
 86
86 -
 87
87 -
 88
88 -
 89
89 -
 90
90 -
 91
91 -
 92
92 -
 93
93 -
 94
94 -
 95
95 -
 96
96 -
97
-
98
-
99
-
100
-
101
-
102
-
103
-
104
-
105
-
106
-
107
-
108
-
109
-
110
-
111
-
112
-
113
-
114
-
115
-
116
-
117
-
118
-
119
-
120
-
121
-
122
-
123
-
124
-
125
-
126
-
127
-
128
-
129
-
130
-
131
-
132
-
133
-
134
-
135
-
136
-
137
-
138
-
139
-
140
-
141
-
142
-
143
-
144
-
145
-
146
-
147
-
148
-
149
-
150
-
151
-
152
-
153
-
154
-
155
-
156
-
157
-
158
-
159
-
160
 |
 |