Sanyo DP42841 Owners Manual
Sanyo DP42841 Manual
 |
View all Sanyo DP42841 manuals
Add to My Manuals
Save this manual to your list of manuals |
Sanyo DP42841 manual content summary:
- Sanyo DP42841 | Owners Manual - Page 1
- Sanyo DP42841 | Owners Manual - Page 2
RISK OF ELECTRIC SHOCK, DO NOT REMOVE COVER (OR BACK). NO USER-SERVICEABLE PARTS INSIDE. REFER SERVICING TO QUALIFIED SERVICE PERSONNEL. THIS SYMBOL INDICATES THAT THERE ARE IMPORTANT OPERATING AND MAINTENANCE INSTRUCTIONS IN THE LITERATURE ACCOMPANYING THIS UNIT. WARNING: TO REDUCE THE RISK OF - Sanyo DP42841 | Owners Manual - Page 3
: AC 120V, 60Hz AC Power Consumption: DP42841 178 watts DP46841 178 watts Weight: 33 lbs. 41 lbs. Dimensions: MODEL WIDTH HEIGHT DEPTH DP42841 40.0 26.4 9.2 w/o stand 24.4 4.0 DP46841 43.9 29.4 w/o stand 26.6 10.6 4.6 NOTE: Dimensions are in inches Need help? www.sanyoctv.com - Sanyo DP42841 | Owners Manual - Page 4
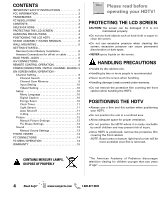
THE LCD HDTV 4 STAND ASSEMBLY /STAND REMOVAL 5 WALL MOUNTING 5 GETTING STARTED- Remote Control Battery Installation 5 Antenna Connections for off-air or cable 5 BACK PANEL JACKS 6 A/V CONNECTIONS 7 REMOTE CONTROL OPERATION 8 POWER CONNECTION / INITIAL CHANNEL SEARCH 9 ON-SCREEN MENU - Sanyo DP42841 | Owners Manual - Page 5
flat surface to protect the screen and finish. 2 Remove the four (4) screws securing the foot stand. CAUTION: Hold the stand firmly as you remove the last screw. Use the screws you would use to attach the stand base to secure the HDTV to a wall mounting kit. NOTE: Wall mounting kit is not included - Sanyo DP42841 | Owners Manual - Page 6
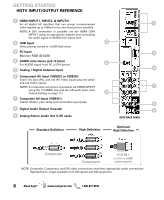
GETTING STARTED HDTV INPUT/OUTPUT REFERENCE 1 HDMI (INPUT1, INPUT2, & INPUT3) An all digital AV interface that can accept uncompressed 1 video signals up to 1080p for the very best picture possible. NOTE: A DVI connection is possible via the HDMI (DVI) INPUT1 using an appropriate adapter and - Sanyo DP42841 | Owners Manual - Page 7
adapter. Stereo Mini AUDIO jack needs to be hooked up to the DVI device as well NOTE: HDTV. MULTICHANNEL RECEIVER STEREO AMPLIFIER NOTE: Audio/Video cables are not supplied Audio Output L/R are used to hookup an external stereo Amplifier. (Do not connect external speakers directly to the HDTV - Sanyo DP42841 | Owners Manual - Page 8
(see Clock Timer on page 10 for details.) Displays the "Off" Timer. While Off Timer is on-screen, press the "0" key to Set the amount of time (in 30 minute increments) at which the HDTV will turn off. Increases or decreases the audio level. Allows for the direct selection of digital subchannels. For - Sanyo DP42841 | Owners Manual - Page 9
GETTING STARTED (CONTINUED) INITIAL CHANNEL SEARCH Before proceeding, please make sure to correctly hook up your antenna or cable connection and all AV equipment to your HDTV. 1. PLUG IN AC POWER CORD 120V AC, 60Hz 2. TURN ON TV (PRESS POWER BUTTON) Wait for on-screen instructions to set an Initial - Sanyo DP42841 | Owners Manual - Page 10
is textual information transmitted along with the picture and sound. Turning Captioning ON (by pressing the CAPTION key during normal TV viewing) causes the HDTV to open these captions (digital or analog) and superimpose them on the screen. NOTE: Local broadcasters decide which caption signals - Sanyo DP42841 | Owners Manual - Page 11
picture parameters to reduce the HDTV's power consumption. NOTE: When room lighting is dark, the panel brightness and/or the picture set to ON. TV will automatically turn off if no AV channels. When the HDTV detects compatible RRT5 data, it's downloaded & stored in memory, and the Setup V-Chip screen - Sanyo DP42841 | Owners Manual - Page 12
white line may appear near edge of screen). Pix6 and Pix7 use is recommended only for PC signal through HDMI. Pix-Auto (AFD) Active Format Description. Data carried in the video stream includes coded picture frame information of the actual image, allowing the TV to adjust the Pix-Shape automatically - Sanyo DP42841 | Owners Manual - Page 13
TV viewing. Press ENTER on Start Slideshow either from the Thumbnail View Screen or from the full view options menu to start the slideshow from the current picture. JPEG VIEWER USB MENU 1 Audyssey Dynamic Volume solves the problem of large variations in volume level between television programs - Sanyo DP42841 | Owners Manual - Page 14
Standard - Sets predetermined values to the Picture or Sound parameters. Manual - Adjust Contrast, Brightness, and Color Temperature screen settings, and the Bass and Treble audio settings. Laptop Display When using your Sanyo HDTV to display a Laptop's screen display, holding down the Fn (or FN - Sanyo DP42841 | Owners Manual - Page 15
, such as the remote control. The defective TV will be exchanged for the same model, or a replacement model of equal value, if necessary. Replacement model will be contingent on availability and at the sole discretion of Sanyo Manufacturing Corporation. THE FOREGOING WARRANTY IS EXCLUSIVE AND IN - Sanyo DP42841 | Owners Manual - Page 16
LA TAPA TRASERA). NO HAY PARTES ADENTRO QUE LAS PUEDA REPARAR EL sale del aparato. 11. Sólo use anexos o accesorios especificados por el fabricante. 12. Use únicamente con con ellos puede ser fatal. EJEMPLO DE ATERRIZAMIENTO DE ANTENA DE ACUERDO AL CÓDIGO ELÉCTRICO NACIONAL (National Electrical Code - Sanyo DP42841 | Owners Manual - Page 17
mites para un aparato digital Clase B, en acorde a la Parte 15 de las Reglas FCC. Estos límites están diseñados a un técnico de radio y tele- visión con experiencia para más ayuda. PRECAUCIÓN: Regulaciones de la FCC , 60Hz Consumo de Potencia: DP42841 178 watts DP46841 178 watts Peso: 15 kg. 18 kg. - Sanyo DP42841 | Owners Manual - Page 18
-Shape 26 Sonido 27 aaConfiguración manual de sonido 27 REPRODUCTOR DE IMÁGENES 27 CONEXIONES DE PC 28 CONFIGURACIÓN DE PC 28 GARANTÍA 29 CONTIENE LÁMPARAS DE MERCURIO, DESECHAR DE MANERA APROPIADA Favor de leer antes de operar su HDTV! PROTEGER LA PANTALLA LCD PRECAUCIÓN: La pantalla podr - Sanyo DP42841 | Owners Manual - Page 19
NOTA: Saltar estos pasos si montará su TV a la pared. 1 Coloque la HDTV con la pantalla hacia abajo sobre una superficie plana y acolchonada para proteger la pantalla y el acabado de la HDTV. 2 Inserte con cuidado la base a la parte inferior de la HDTV, y asegurela colocando los 4 tornillos como se - Sanyo DP42841 | Owners Manual - Page 20
digital que acepta señales de video sin compresión hasta de 1080p paraobtener la mejor calidad de imagen posible. NOTA: Una conexión DVI Salida de Audio Análogo (L/R) 1 3 4 7 8 9 PANEL TRASERO DE LA HDTV Definición estándar Alta definición Óptima alta definición Compuesto Componente H D M I - Sanyo DP42841 | Owners Manual - Page 21
la entrada USB para conectar una memoria USB para desplegar imágenes JPEG en la HDTV. La conexión COMPUESTA es utilizada para conectar equipo análogo tal como una videocasetera o un reproductor DVD que no cuente con salidas de Componente. NOTA:Siempre haga coincidir el color de las sali- das de su - Sanyo DP42841 | Owners Manual - Page 22
subtítulos digitales. Presione dos veces seguidas para restaurar la TV a configuraciones de fábrica. Se borrarán las modificaciones del en la parte superior e inferior, o lado izquierdo y derecho, dependiendo en la señal o programa transmitido. (Ver pág. 26) Prende o apaga su HDTV. Selecciona el - Sanyo DP42841 | Owners Manual - Page 23
INICIAL Antes de continuar, asegúrese de conectar correctamente su antena o conexión de TV por cable y todos los dispositivos a su HDTV. 1. CONECTE EL CABLE DE CORRIENTE 120V AC, 60Hz 2. ENCIENDA LA TV Siga instrucciones en pantalla para configurar el Modo de Ahorro de Energía inicial y realizar - Sanyo DP42841 | Owners Manual - Page 24
con la imagen y sonido. El activar la función (al presionar la tecla CAPTION al ver televisión), la HDTV Compuesta a la entrada de VIDEO INPUT 2 en su HDTV. Use el CURSOR LM para seleccionar el tipo de conexi ón permite establecer la Hora Actual en su HDTV y habilitar una Hora de Encendido para que - Sanyo DP42841 | Owners Manual - Page 25
de Apagado Automático se encuentra encendida, permite que la HDTV se apague automáticamente cuando no detecte señal de con señales que originen de otros países. AJUSTES A CONFIGURACIÓN V-CHIP Elija Encendido y presione ENTER. Elija Ajustar y presione ENTER. Para clasificaciones V-Chip (TV) elija TV - Sanyo DP42841 | Owners Manual - Page 26
diferentes parámetros, o puede elegir la opción de Manual para ingresar valores personalizados. NOTA: Cada entrada de AV Descripción del Formato Activo. Datos enviados junto con el video incluyen información del formato de imagen, lo cual permite a la TV ajustar el Pix-Shape automáticamente. NOTA - Sanyo DP42841 | Owners Manual - Page 27
opciones de imagen. CONFIGURACIÓN MANUAL DE SONIDO La opción de Manual incluye varios parámetros fotos en su HDTV con el uso de un dispositivo de memoria USB. MEMORIA USB NOTA: La HDTV se cambia a la diferencias marcadas en el volumen entre programas de TV, anuncios y entre las secciones de alto y - Sanyo DP42841 | Owners Manual - Page 28
sólo en la HDTV. Imagen y Audio PC Estándar - Aplica valores predeterminados a los parámetros de Imagen y Audio. Manual - Ajuste los parámetros de Contraste, Brillo y Temperatura de color de la pantalla, y los Graves y Agudos del audio. NOTA: Estos parámetros no afectan los de TV normal. Sostenga - Sanyo DP42841 | Owners Manual - Page 29
en un lugar seguro para su registro personal: No. de Modelo No. de Serie (Localizado en la parte posterior de la TV) Fecha de compra Precio de compra Lugar de compra Sanyo Manufacturing Corp. 3333 Sanyo Road, Forrest City, AR 72335 ¿Necesita ayuda? www.sanyoctv.com 1-800-877-5032 29 - Sanyo DP42841 | Owners Manual - Page 30
fente large de la prise, puis enfichez à fond. Ceci est une mesure de sécurité conçue pour ne brancher la fiche que d'une seule façon sur une prise électrique. table ou un support recommandé par le fabricant ou vendu avec l'appareil. Lors de son installation, suivez les instructions du fabricant et - Sanyo DP42841 | Owners Manual - Page 31
DE PC En tant que partenaire d'ENERGY STARMD, Sanyo Manufacturing Corporation a déterminé que ce produit DP46841 1115 746 270 sans base 676 116 REMARQUE : toutes les dimensions sont millimètres (mm). GUIDE me d'emission de Guide V canadien, donc, les instructions ne sont pas fournies pour cette fonction - Sanyo DP42841 | Owners Manual - Page 32
DES PHOTOS 42 GARANTIE 43 Veuillez lire avant d'utiliser votre HDTV! PROTECTION DE L'ÉCRAN D'AFFICHAGE ACL PRECAUTION: L'écran est • Laissez assez d'espace pour assurer une ventilation appropriée. • Placez vore HDTV hors de la portée des jeunes enfants pour éviter des accidents. CONTIENT - Sanyo DP42841 | Owners Manual - Page 33
la base (support mural non inclus). Norme d'interface VESA: 400 x 400 Dimensions des vis de montage du ACL: Diamètre M6, longueur-12mm (max.) Orifices pour assemblage VESA BRANCHEMENT D'ANTENNE AÉRIENNE OU CÂBLE Branchez votre antenne ou service de câble, à l'entrée ANT de votre HDTV en utilisant - Sanyo DP42841 | Owners Manual - Page 34
POUR COMMENCER CONNECTEURS DU PANNEAU ARRIÈRE 1 Entrée HDMI 1, 2 & 3 Interface complètement numérique qui accepte des signaux 1 vidéos sans compression pour obtenir la meilleure qualité d'image possible. REMARQUE : Un branchement de DVI est possible en utilisant l'entrée HDMI (DVI) INPUT1 avec - Sanyo DP42841 | Owners Manual - Page 35
ou des vieux reproducteurs de DVD. REMARQUE: Veuillez faire coïncider la couleur des sorties de votre appareil avec les entrées de votre HDTV. VCR (ou appareil analogique) La Sortie d'Audio Numérique est utilisée pour se brancher à un récepteur audionumérique en utilisant un câble d'audio. RÉCEPTEUR - Sanyo DP42841 | Owners Manual - Page 36
dpendant du signal ou le programme transmis. (Voir p. 40) Allumer ou éteindre la TV. Choisir la manière d'audio, Stéréo, Mono ou SAP (s'il est disponible). la touche "0" pour établir le temps de d'éteint automatique de la HDTV (intervalles de 30 minutes). Augmenter ou réduire le niveau d'audio. Il - Sanyo DP42841 | Owners Manual - Page 37
assurez-vous de brancher correctement votre antenne ou connexion de TV par câble, et tous les dispositifs à votre HDTV. 1. BRANCHEZ LE CORDON D'ALIMENTATION CA 120V CA, 60Hz 2. ALLUMER TV (APPUYER SUR LA TOUCHE POWER) Suivez les instructions dans l'écran pour configurer le mode Économiseur d'énergie - Sanyo DP42841 | Owners Manual - Page 38
activé, (appuyer sur la touche CAPTION tandis que vous voyez la télé), la TV ouvre ces sous-titres (numériques ou analogiques) et les superpose à l'écran de vidéo Composite ou Composant dans l'entrée VIDEO INPUT2 de votre HDTV. Utilisez les CURSEUR LM pour choisir le type de connexion qui sera - Sanyo DP42841 | Owners Manual - Page 39
ètres de luminosité et d'image pour réduire la consommation d'énergie de la TV. REMARQUE: Quand la chambre soit foncée, la lumi- nosité du panneau et Si la fonction d'Éteint Automatique est allumée, elle permettra que la HDTV soit automatiquement éteinte quand elle ne détecte pas signal de vidéo - Sanyo DP42841 | Owners Manual - Page 40
de l'écran). On recommande Pix6 et Pix7 seulement pour un signal de PC au moyen de HDMI. Pix-Auto Description Active de Format (AFD). Il con- siste d'une série de données incluses dans la transmission de l'information du vidéo, qui informent de la taille de l'image actuelle, en permettant que - Sanyo DP42841 | Owners Manual - Page 41
LA TVN SORTIE RGB SORTIE DVI Câble RGB Câble audio stéreo mini PC OU LAPTOP REMARQUE: Sanyo recommande d'utiliser un câble RGB avec de ferrite. Écran PC portable Si vous utilisez votre TV HD Sanyo pour voir l'image d'un PC portable, il faut d'appuyer sur la touche Fn (ou FN) plus la - Sanyo DP42841 | Owners Manual - Page 42
présentation. Ajustement Image - Ajustement Couleur, Teinte, Contraste, Luminosité, Netteté et Contraste dynamique. REMARQUE: Les ajustements d'image sont indépendants des ajustements des entrées TV et AV. 42 Besoin d'aide? www.sanyoctv.com 1-800-877-5032 - Sanyo DP42841 | Owners Manual - Page 43
MARCHANDE OU ADAPTÉE À UN BUT PARTICULIER. OBLIGATIONS Pendant un an à compter de la date d'achat, Sanyo Manufacturing Corporation (SMC) garantit que ce téléviseur est exempt de tout défaut de pièce et main-d'œuvre dans des conditions d'utilisation normale. Au titre de cette garantie et au cours des - Sanyo DP42841 | Owners Manual - Page 44
-
 1
1 -
 2
2 -
 3
3 -
 4
4 -
 5
5 -
 6
6 -
 7
7 -
8
-
9
-
10
-
11
-
12
-
13
-
14
-
15
-
16
-
17
-
18
-
19
-
20
-
21
-
22
-
23
-
24
-
25
-
26
-
27
-
28
-
29
-
30
-
31
-
32
-
33
-
34
-
35
-
36
-
37
-
38
-
39
-
40
-
41
-
42
-
43
-
44
 |
 |