Sanyo DP46840 Owners Manual (w/ GXEA remote)
Sanyo DP46840 - 46" Diagonal LCD FULL HDTV 1080p Manual
 |
View all Sanyo DP46840 manuals
Add to My Manuals
Save this manual to your list of manuals |
Sanyo DP46840 manual content summary:
- Sanyo DP46840 | Owners Manual (w/ GXEA remote) - Page 1
- Sanyo DP46840 | Owners Manual (w/ GXEA remote) - Page 2
REDUCE THE RISK OF ELECTRIC SHOCK, DO NOT REMOVE COVER (OR BACK). NO USER-SERVICEABLE PARTS INSIDE. REFER SERVICING TO QUALIFIED SERVICE PERSONNEL. THIS SYMBOL INDICATES THAT THERE ARE IMPORTANT OPERATING AND MAINTENANCE INSTRUCTIONS IN THE LITERATURE ACCOMPANYING THIS UNIT. WARNING: TO REDUCE THE - Sanyo DP46840 | Owners Manual (w/ GXEA remote) - Page 3
, pursuant to Part 15 of the FCC Rules. These limits are designed to provide reasonable protection against harmful interference in a residential installation. This equipment generates, uses and can radiate radio frequency energy and, if not installed and used in accordance with the instructions, may - Sanyo DP46840 | Owners Manual (w/ GXEA remote) - Page 4
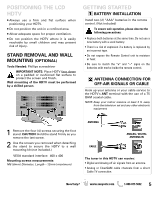
CONTENTS 4 SPECIFICATIONS 4 PROTECTING THE LCD SCREEN 4 HANDLING PRECAUTIONS 4 POSITIONING THE LCD HDTV 5 STAND REMOVAL / WALL MOUNTING 5 GETTING STARTED- Remote Control Battery Installation 5 Antenna Connections for off-air or cable 5 BACK PANEL JACKS 6 A/V CONNECTIONS 7 POWER CONNECTION - Sanyo DP46840 | Owners Manual (w/ GXEA remote) - Page 5
. Wall mounting of the HDTV must be performed by a skilled person. GETTING STARTED BATTERY INSTALLATION Install two (2) "AAA" batteries in the remote control. (Not included) To ensure safe operation, please observe the following precautions: • Replace both batteries at the same time. Do not use - Sanyo DP46840 | Owners Manual (w/ GXEA remote) - Page 6
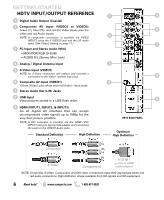
up to 1080p for the very best picture possible. NOTE: A DVI conection is possible via the HDMI (DVI) INPUT1 using an appropriate adapter and connecting the audio to the VIDEO3 Audio jacks. Standard Definition High Definition HDTV BACK PANEL Optimum High Definition Composite S-Video Component - Sanyo DP46840 | Owners Manual (w/ GXEA remote) - Page 7
a USB mass storage device to watch digital images (JPEG only.) HDMI (DVI) INPUT1 can be used to hookup a DVI device with the use of an appropriate DVI to HDMI cable or adapter. (VIDEO3 Audio In L/R jacks need to be hooked up to the DVI device as well.) NOTE: Audio/Video cables are not supplied - Sanyo DP46840 | Owners Manual (w/ GXEA remote) - Page 8
. PLUG IN AC POWER CORD 120V AC, 60Hz TURN ON TV (PRESS POWER BUTTON) Wait for on-screen instructions to set an Initial Energy Saving Mode, and perform an Initial Channel/Signal Search. TV SET LOCATION SELECTION: Select "Home Mode" by pressing the CHM key to set the HDTV's backlight to an Energy - Sanyo DP46840 | Owners Manual (w/ GXEA remote) - Page 9
Volume feature settings. • USB Key-Selects the USB input directly. • PIX SHAPE Key-Cycles through the available aspect ratios. The different settings either stretch, zoom, or fill the image on your screen. Bars may appear on top and bottom of your screen (or on left and right sides) depending on - Sanyo DP46840 | Owners Manual (w/ GXEA remote) - Page 10
loop. Use the CURSOR LM keys to select an AV input. Press ENTER to disable (uncheck) or enable (check) the highlighted input. NOTE: At least one input must and will remain checked. :Skip is for reference only. 10 Need help? www.sanyoctv.com 1-800-877-5032 MAIN MENU SCREEN CHANNEL SETTING SCREEN - Sanyo DP46840 | Owners Manual (w/ GXEA remote) - Page 11
signals to transmit. Use the CURSOR LM and keys to modify Font, Background, and Foreground of digital caption text. VIDEO2 SETTING SCREEN MENU LANGUAGE SCREEN DIGITAL CAPTION SCREEN Energy Saver Energy Saver settings control the LCD backlight brightness to reduce power consumption. • Level - Sanyo DP46840 | Owners Manual (w/ GXEA remote) - Page 12
TV will automatically turn on at the previously set Switch on Time. Light sensor This feature detects ambient room light brightness and uses that reading to control the panel brightness level and picture parameters to reduce the HDTV's power consumption. NOTE: When room lighting is dark, the panel - Sanyo DP46840 | Owners Manual (w/ GXEA remote) - Page 13
, and use the ENTER key to block or unblock the selected rating. NOTE:There may be more ratings than can be displayed on one screen. When vertical scroll bars appear, press CURSOR LM to gain access to the additional ratings. MORE INFORMATION Additional information about MPAA (Motion Picture - Sanyo DP46840 | Owners Manual (w/ GXEA remote) - Page 14
next/previous parameter without returning to the previous menu screen. Once adjustments are complete, press the EXIT key to return to normal TV viewing. MAIN MENU SCREEN PICTURE SCREEN (MANUAL) PARAMETER SELECTION SCREEN VALUE ADJUSTMENT SCREEN EXAMPLES 14 Need help? www.sanyoctv.com 1-800-877 - Sanyo DP46840 | Owners Manual (w/ GXEA remote) - Page 15
. Once adjustments are complete, press the EXIT key to return to normal TV viewing. MAIN MENU SCREEN MANUAL PARAMETER SCREEN DETAILED SETTING SCREEN 1 Audyssey Dynamic Volume solves the problem of large variations in volume level between television programs, commercials, and between the soft - Sanyo DP46840 | Owners Manual (w/ GXEA remote) - Page 16
(F5, F7, F8, etc) should cycle through different display modes between the laptop and the HDTV. Modes may include displaying only on the laptop screen, on both the laptop and the HDTV, or displaying only on the HDTV. PC SETTING SCREEN PC Picture and Sound Standard - Sets predetermined values to the - Sanyo DP46840 | Owners Manual (w/ GXEA remote) - Page 17
are separate configurations from the settings in TV and AV inputs. THUMBNAIL VIEW SCREEN NOTE: A thumbnail hide icon will appear if a picture cannot be decoded or if no thumbnail data is available. FULL VIEW OPTIONS MENU SLIDE SHOW SETUP MENU USB MAIN MENU SCREEN Need help? www.sanyoctv.com - Sanyo DP46840 | Owners Manual (w/ GXEA remote) - Page 18
(SMC) warrants this TV to be free from manufacturing defects in materials and workmanship under normal use and conditions for parts and labor. For the FIRST 90 DAYS from the date of original retail purchase, Sanyo Manufacturing Corporation will replace any defective TV via exchange at the - Sanyo DP46840 | Owners Manual (w/ GXEA remote) - Page 19
(O LA TAPA TRASERA). NO HAY PARTES ADENTRO QUE LAS PUEDA REPARAR EL USUARIO sale del aparato. 11. Sólo use anexos o accesorios especificados por el fabricante. 12. Use únicamente con el carro, estante, tripie, soporte o mesa especificada por el fabricante, o vendida con el aparato. Cuando se use - Sanyo DP46840 | Owners Manual (w/ GXEA remote) - Page 20
mites para un aparato digital Clase B, en acorde a la Parte 15 de las Reglas FCC. Estos límites están diseñados HDMI Licensing LLC en los Estados Unidos y otros países. RESOLUCIONES DE PC Como un Asociado de ENERGY STAR®, Sanyo Manufacturing Corporation, ha determinado que este producto cumple con - Sanyo DP46840 | Owners Manual (w/ GXEA remote) - Page 21
70,4 65,3 30,7 12,1 DP46840 111 sin base 77,9 71,4 32,4 12,1 NOTA: Las dimensiones están en centímetros. Favor de leer antes de operar su HDTV! PROTEGER LA PANTALLA LCD PRECAUCIÓN: La pantalla podría dañarse si no se le da un mantenimiento adecuado. • NO use objetos duros como trapos gruesos - Sanyo DP46840 | Owners Manual (w/ GXEA remote) - Page 22
HDTV DE LCD • con unas de tipo incorrecto. • No exponga el Control Remoto a calor o humedad. • Asegúrese que las marcas "+" y "-" de las baterías correspondan con las del control la base al quitar el último tornillo. 2 Use los tornillos que remueva al quitar la base y úselos para montar la TV al - Sanyo DP46840 | Owners Manual (w/ GXEA remote) - Page 23
. • Tecla RESET-Presione dos veces seguidas para restaurar la TV a configuraciones de • Tecla PICTURE-Selecciona uno de los diferentes modos de imagen. • Tecla SOUND-Selecciona uno Xacti de Sanyo al estar habilitada la función HDMI-CEC tanto en la HDTV como la cámara (ver función de Enlace HDMI en - Sanyo DP46840 | Owners Manual (w/ GXEA remote) - Page 24
Despliegue fotos en pantalla desde su memoria USB. 9 9 Entradas HDMI (INPUT1, INPUT2 ó INPUT3) Interfase completamente digital que acepta señales de video sin compresión hasta de 1080p para obtener la mejor calidad de imagen posible. PANEL TRASERO DE LA HDTV NOTA: Una conexión DVI es posible - Sanyo DP46840 | Owners Manual (w/ GXEA remote) - Page 25
reproductor DVD que no cuente con salidas de Componente. NOTA:Siempre haga coincidir el color de las salidas de su aparato externo con las entradas de su la HDTV) MEMORIA USB Utilice la entrada USB para conectar una memoria USB para desplegar imágenes JPEG en la HDTV. HDMI (DVI) INPUT1 puede - Sanyo DP46840 | Owners Manual (w/ GXEA remote) - Page 26
CANALES INICIAL Antes de continuar, asegúrese de conectar correctamente su antena o conexión de TV por cable y todos los dispositivos a su HDTV. CONECTE EL CABLE DE CORRIENTE 120V AC, 60Hz ENCIENDA LA TV Siga instrucciones en pantalla para configurar el Modo de Ahorro de Energía inicial y realizar - Sanyo DP46840 | Owners Manual (w/ GXEA remote) - Page 27
canales recientemente encontrados a la base de datos de canales. NOTA: La función de Adición Digital no es disponible si el modo de TV es Cable. PANTALLA DE ciclo de entradas (INPUT) aquellas que no se estén utilizando. Use el CURSOR LM para elegir una entrada. Presione ENTER para habilitar (marcar - Sanyo DP46840 | Owners Manual (w/ GXEA remote) - Page 28
ón de texto oculta, transmitida junto con la imagen y sonido. El activar Use el CURSOR LM y para modificar la letra, el fondo y el primer plano de los subtítulos digitales. Ahorrador de Energía PANTALLA DE CONFIGURACIÓN DE SUBTÍTULOS DIGITALES Control del brillo de las lámparas del panel - Sanyo DP46840 | Owners Manual (w/ GXEA remote) - Page 29
Control paternal) Utilice esta función para bloquear automáticamente programación con contenido que crea inapropiado para ser visto por sus hijos. NOTA: Esta función está diseñada para cumplir con con señales que originen de otros países. ADJUSTING THE V-CHIP SETTINGS opciones. Use ENTER para - Sanyo DP46840 | Owners Manual (w/ GXEA remote) - Page 30
habilita, la TV automáticamente panel y/o los parámetros de imagen tales como brillo y contraste son reducidos. Cuando la habitación es más iluminada, los parámetros se afectan de manera contraria. Enlace HDMI NOTA: Diseñado para utilizarse con una cámara digital Xacti de Video/Película marca Sanyo - Sanyo DP46840 | Owners Manual (w/ GXEA remote) - Page 31
. Presione ENTER. Puede elegir entre Intenso, Moderado y Normal, los cuales tienen valores fijos y predeterminados para los diferentes parámetros. O puede elegir la opción de Manual para ingresar valores personalizados. NOTA: Cada entrada de AV puede tener su propio modo de imagen (predeterminado - Sanyo DP46840 | Owners Manual (w/ GXEA remote) - Page 32
regresa todos los parámetros a su configuración original de fábrica. PANTALLA DE PARÁMETROS MANUALES AJUSTES A LOS PARÁMETROS DE SONIDO Utilice las PARÁMETROS MANUAL (AVANZADO) 1 Audyssey Dynamic Volume soluciona el problema de diferencias marcadas en el volumen entre programas de TV, anuncios y - Sanyo DP46840 | Owners Manual (w/ GXEA remote) - Page 33
REPRODUCTOR DE IMÁGENES Despliegue fotos en su HDTV con el uso de un dispositivo de memoria USB. MEMORIA USB NOTA: La HDTV se cambia a la entrada USB cuando se detecta una memoria en el puerto USB. FUNCIONAMIENTO Presione ENTER sobre una foto en vista miniatura para abrir las funciones de Rotar - Sanyo DP46840 | Owners Manual (w/ GXEA remote) - Page 34
PANEL TRASERO HDTV SALIDA SALIDA ANÁLOGA RGB DIGITAL DVI Cable estéreo audio mini PC o LAPTOP Cable de monitor RGB Sanyo recomienda utilizar un cable de monitor con ferrita. Pantalla Laptop Si utiliza su HDTV Sanyo los parámetros de Imagen y Audio. Manual - Ajuste los parámetros de Contraste, - Sanyo DP46840 | Owners Manual (w/ GXEA remote) - Page 35
la apropiada aplicación de la garantía, conserve el recibo original de compra fechado como evidencia de compra. Regrese la TV defectuosa al vendedor junto con su recibo de compra además de todos los accesorios incluídos, como el control remoto. La TV defectuosa será cambiada por una del mismo modelo - Sanyo DP46840 | Owners Manual (w/ GXEA remote) - Page 36
fente large de la prise, puis enfichez à fond. Ceci est une mesure de sécurité conçue pour ne brancher la fiche que d'une seule façon sur une prise électrique. table ou un support recommandé par le fabricant ou vendu avec l'appareil. Lors de son installation, suivez les instructions du fabricant et - Sanyo DP46840 | Owners Manual (w/ GXEA remote) - Page 37
HDMI Licensing, LLC aux États-Unis et dans d'autres pays. En tant que partenaire d'ENERGY STARMD, Sanyo sans base 1012 DP46840 sans base 1111 HAUTEUR 704 653 779 714 PROFONDEUR 307 121 324 121 GUIDE V le système d'emission de Guide V canadien, donc, les instructions ne sont pas fournies pour - Sanyo DP46840 | Owners Manual (w/ GXEA remote) - Page 38
DES MATIÈRES 38 PRÉCAUTIONS DE MANIEMENT 38 PLACER LA TVHD ACL 38 ENLEVER LA BASE ET INSTALLER SUR LE MUR . . . . . .39 POUR COMMENCER- Placez les digital 45 Économiseur d'énergie 45 Temporisateur d'horloge 46 Capteur de lumiére 46 Liaison HDMI 46 Image 47 Réglages manuels de l'image 47 - Sanyo DP46840 | Owners Manual (w/ GXEA remote) - Page 39
D'ANTENNE AÉRIENNE OU CÂBLE Branchez votre antenne ou service de câble, à l'entrée ANT de votre HDTV Enlevez les quatre (4) vis qui maintiennent la base de support. PRECAUTION : maintenez fermement le socle en enlevant la con- nexion directe de TV par câble. Besoin d'aide? www.sanyoctv.com - Sanyo DP46840 | Owners Manual (w/ GXEA remote) - Page 40
audio/vidéo (VIDEO1 Composite) 4 Jaune (vidéo), blanc et rouge (audio). 7 Sorties d'audio analogique (G/D) 8 Entrée USB Voir des photos sauvegardées dans un dispositif USB. 9 9 Entrée HDMI 1, 2 & 3 Interface complètement numérique qui accepte des signaux vidéos sans compression pour obtenir - Sanyo DP46840 | Owners Manual (w/ GXEA remote) - Page 41
un amplificateur stéréo externe (ne branchez pas des haut-parleurs externes directement à la TVHD). DISPOSITIF USB L'entrée USB est utilisée pour brancher une mémoire de masse USB pour voir des photos JPEG. HDMI (DVI) INPUT1, il peut être utilisé pour brancher un dispositif DVI avec l'utilisation - Sanyo DP46840 | Owners Manual (w/ GXEA remote) - Page 42
votre HDTV. BRANCHEZ LE CORDON D'ALIMENTATION CA 120V CA, 60Hz ALLUMER TV Suivez les instructions dans l'écran pour configurer le mode Économiseur d'énergie initiale et effectuer la éo que vous souhaitez voir. ÉCRAN DE LISTE DE CHAÎNES/SIGNAUX 42 Besoin d'aide? www.sanyoctv.com 1-800-877-5032 - Sanyo DP46840 | Owners Manual (w/ GXEA remote) - Page 43
(intervalles de 30 minutes). • Touche PICTURE-Changer entre les différentes manières d'image. • Touche SOUND-Changer entre les différentes manières numérique Xacti Sanyo, en habilitant la fonction HDMI-CEC de la HDTV et de l'appareil photo numérique (voir Liaison HDMI dans la p. 46) Besoin d'aide? - Sanyo DP46840 | Owners Manual (w/ GXEA remote) - Page 44
les chaînes numériques d'air et ajoute à la base de données les nouvelles chaînes numériques trouvées Mémoire de Chaînes liste toutes les chaînes analogiques et numériques trouvées. Liste aussi les chaînes supprimer les entrées AV non utilisées du cycle d'entrées (INPUT). Utilisez le CURSEUR LM - Sanyo DP46840 | Owners Manual (w/ GXEA remote) - Page 45
ée transmise avec l'image et le son. Si le sous-titrage est activé, (appuyer sur la touche CAPTION tandis que vous voyez la télé), la TV ouvre ces sous-titres (numériques ou analogiques) et les superpose à l'écran. REMARQUE: Les diffuseurs locaux décident quels sous-titres transmettre. Utilisez les - Sanyo DP46840 | Owners Manual (w/ GXEA remote) - Page 46
pour réduire la consommation d'énergie de la TV. REMARQUE: Quand la chambre soit foncée, la HDMI REMARQUE: Il est conçu pour être utilisé avec un appareil photo numérique Xacti de vidéo/film. Quelques fonctions de HDMI-CEC ne sont pas supportées par d'autres équipements. Utilisez la Fonction HDMI - Sanyo DP46840 | Owners Manual (w/ GXEA remote) - Page 47
FONCTIONNEMENT DU MENU À L'ÉCRAN IMAGE Montre le Menu dans l'écran et utilise les touches CURSEUR LM pour choisir Image. Appuyer sur ENTER. Vous pouvez choisir entre Vivant, Doux, et Normal, lesquels ont des valeurs prédéterminées pour l'image. Ou, on peut choisir l'option manuel avec des valeurs - Sanyo DP46840 | Owners Manual (w/ GXEA remote) - Page 48
menu. ÉCRAN PARAMÈTRES MANUELS AVANCÉS 1 Audyssey Dynamic Volume résout le problème de différences marquées dans le volume entre des programmes de TV, annonces et entre les sections de haut et sous volume d'un film. Audyssey Dynamic EQ est intégré avec Dynamic Volume pour adapter le volume - Sanyo DP46840 | Owners Manual (w/ GXEA remote) - Page 49
présentation depuis la photo choisie. MENU DU REPRODUCTEUR Pour montrer le menu USB, appuyez sur MENU en étant sur Vu complète ou Voir pré . REMARQUE: Les ajustements d'image sont indépendants des ajustements des entrées TV et AV. ÉCRAN VU MINIATURE REMARQUE: Une icône de vu miniature appara - Sanyo DP46840 | Owners Manual (w/ GXEA remote) - Page 50
DE LA TVN SORTIE RGB SORTIE DVI Câble audio stéreo mini PC OU LAPTOP Câble RGB Sanyo recommande d'utiliser un câble RGB avec de ferrite. Écran PC portable Si vous utilisez votre TV HD Sanyo pour voir l'image d'un PC portable, il faut d'appuyer sur la touche Fn (ou FN) plus la - Sanyo DP46840 | Owners Manual (w/ GXEA remote) - Page 51
uvre dans des conditions d'utilisation normale, tant pour les pièces que pour la main-d'œuvre. Pendant les 90 PREMIERS JOURS à compter de la date d'achat chez le revendeur d'origine, Sanyo Manufacturing Corporation remplacera tout téléviseur présentant des défauts par un échange chez le détaillant - Sanyo DP46840 | Owners Manual (w/ GXEA remote) - Page 52
-
 1
1 -
 2
2 -
 3
3 -
 4
4 -
 5
5 -
 6
6 -
 7
7 -
8
-
9
-
10
-
11
-
12
-
13
-
14
-
15
-
16
-
17
-
18
-
19
-
20
-
21
-
22
-
23
-
24
-
25
-
26
-
27
-
28
-
29
-
30
-
31
-
32
-
33
-
34
-
35
-
36
-
37
-
38
-
39
-
40
-
41
-
42
-
43
-
44
-
45
-
46
-
47
-
48
-
49
-
50
-
51
-
52
 |
 |