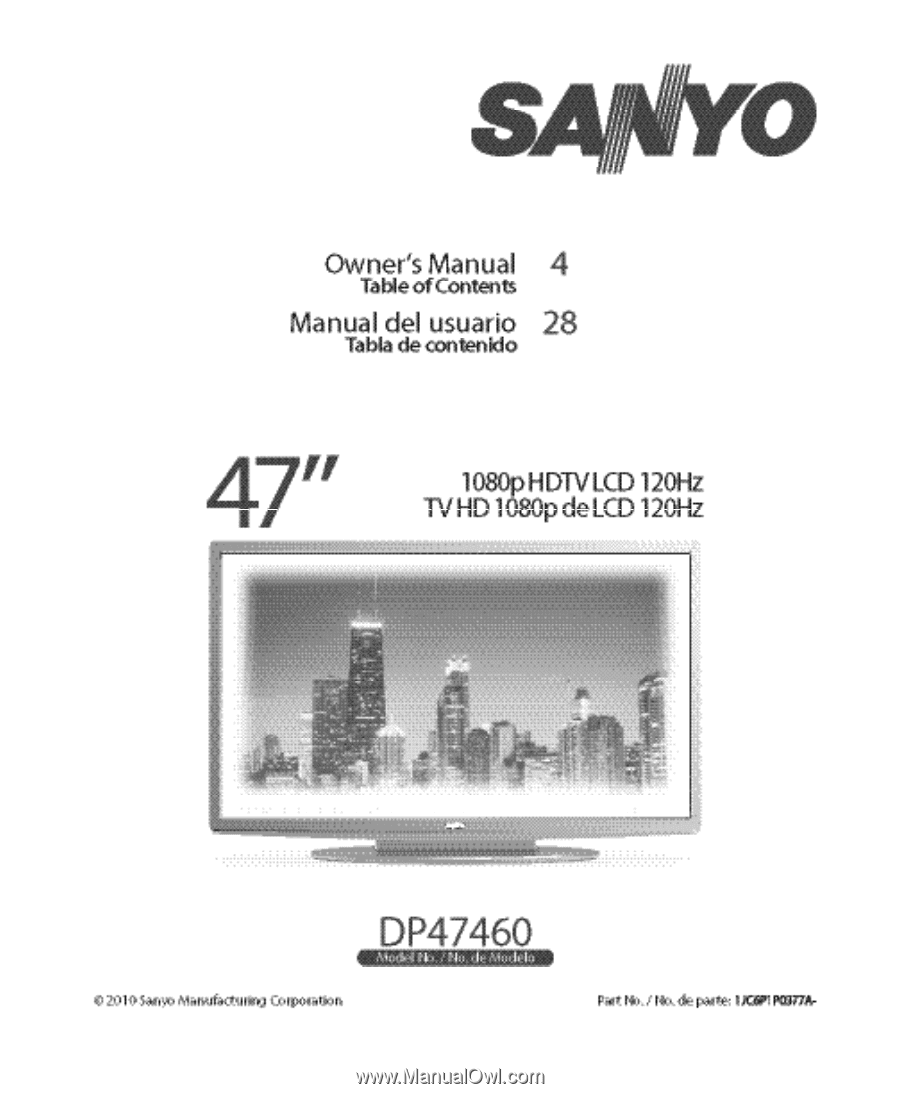
Sanyo DP47460 Owners Manual
Sanyo DP47460 - 47" Diagonal Internet Ready LCD HDTV Manual
 |
View all Sanyo DP47460 manuals
Add to My Manuals
Save this manual to your list of manuals |
Sanyo DP47460 manual content summary:
- Sanyo DP47460 | Owners Manual - Page 1
- Sanyo DP47460 | Owners Manual - Page 2
tip-over. 13. Unplug this apparatus during lightning storms or when unused for long periods of time. 14. Refer all servicing to qualified service personnel. Servicing is required when the apparatus has been damaged in any way, such as power-supply cord or plug is damaged, liquid has been spilled - Sanyo DP47460 | Owners Manual - Page 3
with the instructions, may cause harmful interference to radio communications. However, there is no guarantee that interference will not occur in a particular installation. If this equipment does cause harmful interference to radio or television reception, which can be determined by turning the - Sanyo DP47460 | Owners Manual - Page 4
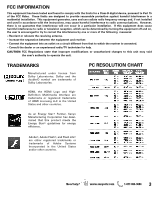
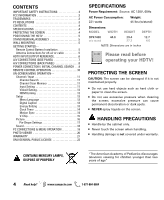
CONTENTS IMPORTANT SAFETY INSTRUCTIONS 2 FCC INFORMATION 3 TRADEMARKS 3 PC RESOLUTIONS 3 CONTENTS 4 SPECIFICATIONS 4 PROTECTING THE SCREEN 4 POSITIONING THE HDTV 5 STAND REMOVAL/ASSEMBLY 5 WALL MOUNTING 5 GETTING STARTED- Remote Control Battery Installation 5 Antenna Connections for off- - Sanyo DP47460 | Owners Manual - Page 5
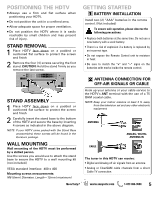
antenna or your cable service to the HDTV's ANT terminal with the use of a 75 OHM coaxial cable. NOTE: Keep your indoor antenna at least 3 ft. away from the television set and any other electronic equipment. ANTENNA CABLE ANALOG / DIGITAL ANTENNA IN The tuner in this HDTV can receive: • Digital - Sanyo DP47460 | Owners Manual - Page 6
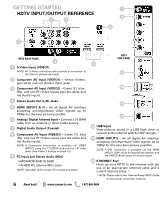
(See Video 3 Setting on page 12.) 9 PC Input and Stereo Audio (Mini) • MONITOR RGB (D-SUB) • AUDIO R/L (Stereo Mini Jack) NOTE: See page 19 for proper PC hookup and setup. 11 12 10 USB Input View pictures stored in a USB flash drive or connect to the internet with the WiFi dongle. * 11 HDMI (INPUT1 - Sanyo DP47460 | Owners Manual - Page 7
connections will accept SDTV, EDTV and HDTV video HDTV, or hookup a WiFi USB dongle (included) to connect your HDTV to the internet through your wireless network. NOTE: An active internet connection and wireless modem is needed to connect your USB FLASH DRIVE HDTV using the USB dongle. HDMI - Sanyo DP47460 | Owners Manual - Page 8
of the yellow Composite video input with the use of an S-Video cable connected from your device's S-Video output to the HDTV's S-Video input. STEREO AMPLIFIER HDMI SATELLITE RECEIVER (or similar device) Audio Output L/R are used to hookup an external stereo Amplifier. Connect your home stereo - Sanyo DP47460 | Owners Manual - Page 9
. PLUG IN AC POWER CORD 120V AC, 60Hz TURN ON TV (PRESS POWER BUTTON) Wait for on-screen instructions to set an Initial Energy Saving Mode, and perform an Initial Channel/Signal Search. TV SET LOCATION SELECTION: Select "Home Mode" by pressing the CHM key to set the HDTV's backlight to an Energy - Sanyo DP47460 | Owners Manual - Page 10
• RESET Key-Pressing it twice restores your HDTV to its factory settings. All user customized settings will be cleared. • SLEEP Key-Displays the "Off" Timer. While Off Timer is on-screen, press the "0" key to Set the amount of time (in 30 minute increments) at which the HDTV will turn off. • PICTURE - Sanyo DP47460 | Owners Manual - Page 11
channels, the database of antenna digital channels will be deleted. You will only be able to receive those ClearQAM channels your cable company provides. MAIN MENU SCREEN CHANNEL/INPUT SCREEN CHANNEL SCAN MEMORY SCREEN Input Setting Input Setting feature allows the removal of unused inputs from - Sanyo DP47460 | Owners Manual - Page 12
up to your HDTV's HDMI input, setting the HDMI-CEC Function to ON enables you the use of keys on your GXEC remote to operate your Xacti camera. NOTE: The HDMI-CEC function of the Xacti camera must also be turned ON to enable the Xacti-Link. VIDEO3 SETTING SCREEN HDMI LINKING SCREEN 12 Need help - Sanyo DP47460 | Owners Manual - Page 13
will be displayed. • English • Español • Français Press ENTER on the desired language. MAIN MENU SCREEN Digital Caption Captioning is textual information transmitted along with the picture and sound. Turning Captioning ON (by pressing the CAPTION key during normal TV viewing) causes the HDTV - Sanyo DP47460 | Owners Manual - Page 14
ON-SCREEN MENU OPERATION Light Sensor - Detects ambient room light brightness and uses that reading to control the panel brightness level and picture parameters to reduce the HDTV's power consumption. NOTE: When room lighting is dark, the panel brightness and/or the picture setting parameters such - Sanyo DP47460 | Owners Manual - Page 15
Additional information about MPAA (Motion Picture Association of America) and V-Chip rating can be found at: www.mpaa.org and www.v-chip.org, respectively. V-CHIP SETUP SCREEN MOVIE RATING ADJUSTMENT SCREEN TV RATING ADJUSTMENT SCREEN RRT5 ADJUST (ADVANCED) SCREEN Need help? www.sanyoctv.com - Sanyo DP47460 | Owners Manual - Page 16
next/previous parameter without returning to the previous menu screen. Once adjustments are complete, press the EXIT key to return to normal TV viewing. MAIN MENU SCREEN PICTURE SCREEN (MANUAL) PARAMETER SELECTION SCREEN VALUE ADJUSTMENT SCREEN EXAMPLES 16 Need help? www.sanyoctv.com 1-877-864 - Sanyo DP47460 | Owners Manual - Page 17
line may appear near edge of screen). Pix6 and Pix7 use is recommended only for PC signal through HDMI. Pix-Auto (AFD) Active Format Description. Data carried in the video stream includes coded picture frame information of the actual image, allowing the TV to adjust the Pix-Shape automatically - Sanyo DP47460 | Owners Manual - Page 18
/previous parameter without returning to the previous menu screen. Once adjustments are complete, press the EXIT key to return to normal TV viewing. MAIN MENU SCREEN MANUAL PARAMETER SCREEN DETAILED SETTING SCREEN 18 Need help? www.sanyoctv.com VALUE ADJUSTMENT SCREEN EXAMPLES 1-877-864-9604 - Sanyo DP47460 | Owners Manual - Page 19
vertically Power Saving - Enable the HDTV to turn to Standby Mode when computer is not in use. Stereo mini audio cable PC OR LAPTOP RGB Monitor cable Sanyo recommends using a monitor cable that includes a Ferrite Core. Laptop Display When using your Sanyo HDTV to display a Laptop's screen display - Sanyo DP47460 | Owners Manual - Page 20
screen menu. Picture Setting - Adjust Color, Tint, Contrast, Brightness, Sharpness and Dynamic Contrast. NOTE: Picture Settings are separate configurations from the settings in TV and AV inputs. FULL VIEW OPTIONS MENU SLIDE SHOW SETUP MENU 20 Need help? www.sanyoctv.com 1-877-864-9604 USB MAIN - Sanyo DP47460 | Owners Manual - Page 21
, such as the remote control. The defective TV will be exchanged for the same model, or a replacement model of equal value, if necessary. Replacement model will be contingent on availability and at the sole discretion of Sanyo Manufacturing Corporation. THE FOREGOING WARRANTY IS EXCLUSIVE AND IN - Sanyo DP47460 | Owners Manual - Page 22
everyone understands that there is no warranty for this free software. If the software is modified by someone else and passed on, we want its recipients to know that what they have is not the original, so that any problems introduced by others will not reflect on the original authors' reputations - Sanyo DP47460 | Owners Manual - Page 23
warranty; keep intact all the notices that refer to this License and to the absence of any warranty you distribute the same sections as part of a whole which is a to exercise the right to control the distribution of derivative or on a medium customarily used for software interchange; or, b) Accompany - Sanyo DP47460 | Owners Manual - Page 24
modules it contains, plus any associated interface definition files, plus the scripts used to control to patent issues), conditions software which is copyrighted by the Free Software Foundation, write to the Free Software Foundation; we sometimes make exceptions for this. Our decision will be guided - Sanyo DP47460 | Owners Manual - Page 25
COST OF ALL NECESSARY SERVICING, REPAIR OR CORRECTION. 12. IN NO EVENT UNLESS REQUIRED BY APPLICABLE LAW OR AGREED TO IN WRITING WILL ANY COPYRIGHT HOLDER, (C) year name of author Gnomovision comes with ABSOLUTELY NO WARRANTY; for details type `show w'. This is free software, and you are welcome to - Sanyo DP47460 | Owners Manual - Page 26
CHOQUE ELÉCTRICO ¡NO ABRIR! PRECAUCIÓN: PARA REDUCIR EL RIESGO DE CHOQUE ELÉCTRICO, NO QUITE LA CUBIERTA (O LA TAPA TRASERA). NO HAY PARTES ADENTRO QUE LAS PUEDA REPARAR EL USUARIO. REFIÉRASE A PERSONAL CALIFICADO PARA REPARAR EL APARATO. ESTE SÍMBOLO INDICA QUÉ VOLTAJES PELIGROSOS QUE CONSTITUYEN - Sanyo DP47460 | Owners Manual - Page 27
acuerdo a los límites para un aparato digital Clase B, en acorde a la Parte 15 de las Reglas FCC. Estos límites están diseñados para proveer una Unidos y otros países. Como un Asociado de ENERGY STAR®, Sanyo Manufacturing Corporation, ha determinado que este producto cumple con los lineamientos en - Sanyo DP47460 | Owners Manual - Page 28
HDTV 29 QUITAR / PONER LA BASE 29 MONTAJE EN PARED 29 PARA COMENZAR- Instalación de baterías al control 29 Conexión de antena aire/cable 29 OPERACIÓN DEL CONTROL de Video3 36 Enlace HDMI 36 Configuración 37 manual de imagen 40 Configuraciones Pix-Shape 41 Sonido 42 aaConfiguración manual - Sanyo DP47460 | Owners Manual - Page 29
HDTV. 2 Inserte con cuidado la base a la parte inferior de la HDTV, y asegúrela colocando los 4 tornillos como se muestra en la figura de arriba. NOTE: Si su HDTV del control remoto. CONEXIÓN DE ANTENA PARA SEÑALES DE AIRE O CABLE Conecte su antena o servicio de cable a la entrada ANT de su HDTV - Sanyo DP47460 | Owners Manual - Page 30
RESET-Presione dos veces seguidas para restaurar la TV la HDTV. • Tecla PICTURE- de aplicaciones Sanyo Net Apps. parte superior e inferior, o lado izquierdo y derecho, dependiendo en la señal o programa transmitido (ver pág 41). • Tecla USB-Selecciona directamente la entrada de USB. • Tecla RECALL - Sanyo DP47460 | Owners Manual - Page 31
/ digital - Conecte un cable de 75 OHM de una antena o del servicio de TV por Cable directo. 7 Salida de Audio Digital (Coaxial) 8 Entrada de video Componente 10 Entrada USB - Despliegue fotos en pantalla desde su memoria USB o conéctese al Internet usando el adaptador WiFi.* 11 Entrada HDMI INPUT1 - Sanyo DP47460 | Owners Manual - Page 32
memoria USB (no incluída) para desplegar imágenes JPEG en la HDTV, o conecte un adaptador WiFi (incluído) para conectar su HDTV al internet por medio de su red inalámbrica. NOTA: Una conexión activa a Internet y un módem inalámbrico son necesarios para conectar su HDTV usando el adaptador WiFi. HDMI - Sanyo DP47460 | Owners Manual - Page 33
un cable de S-Video conectado de la salida S-Video de su aparato a la entrada S-Video de la HDTV. NOTA: Cables de Audio y Video no vienen incluídos. AMPLIFICADOR ESTÉREO HDMI RECEPTOR SATELITAR (o aparato similar) La Salida de Audio Análogo (L/R) se utiliza para conectar un amplificador est - Sanyo DP47460 | Owners Manual - Page 34
DE CANALES INICIAL Antes de continuar, asegúrese de conectar correctamente su antena o conexión de TV por cable y todos los dispositivos a su HDTV. CONECTE EL CABLE DE CORRIENTE 120V AC, 60Hz ENCIENDA LA TV Siga las instrucciones en pantalla para elegir el Modo de Ahorro de Energía y realizar la - Sanyo DP47460 | Owners Manual - Page 35
La función de Adición Digital no es disponible si el modo de TV es Cable. PANTALLA DE MENÚ PRINCIPAL Memoria de Canales Esta función enlista visite www.antennaweb.org PANTALLA DE ESTABLECER CANALES INFO. IMPORTANTE: Esta HDTV mantiene una sola base de datos para canales digitales. Por lo tanto - Sanyo DP47460 | Owners Manual - Page 36
Con una cámara digital Xacti de Video/Película marca Sanyo conectada a la entrada HDMI de la HDTV, el configurar la Función HDMI-CEC a Encendido, habilita el uso de las teclas del control remoto GXEC para operar la cámara. NOTA: La función HDMI-CEC de la cámara Xacti también debe ser encendida para - Sanyo DP47460 | Owners Manual - Page 37
de texto oculta, transmitida junto con la imagen y sonido. El activar la función (al presionar la tecla CAPTION al ver televisión), la HDTV abre e interpreta esta información (digital o análoga) y sobreimpone los textos en pantalla. NOTA: Las transmisoras locales deciden que información transmitir - Sanyo DP47460 | Owners Manual - Page 38
que el televisor se prenda a determinada hora. Cuando la Función de encendido se habilita, la TV automáticamente se encenderá a la hora establecida. PANTALLA DE RELOJ TEMPORIZADOR Motion Sync. (120 Hz) Su HDTV desplegará todas las señales a una frecuencia de barrido de 120Hz. Motion Sync es una - Sanyo DP47460 | Owners Manual - Page 39
___________ V - Chip (Control paternal) Utilice esta funci deseado. PANTALLA DE CONFIGURACIÓN/V-CHIP Para clasificaciones V-Chip (TV) elija TV y presione ENTER. Use las teclas de CURSOR L ón para canales digitales por aire. Cuando la HDTV detecta datos RRT5 compatibles, se descargan y almacenan - Sanyo DP47460 | Owners Manual - Page 40
. Presione ENTER. Puede elegir entre Intenso, Moderado y Estándar, los cuales tienen valores fijos y predeterminados para los diferentes parámetros. O puede elegir la opción de Manual para ingresar valores personalizados. NOTA: Cada entrada de AV puede tener su propio modo de imagen (predeterminado - Sanyo DP47460 | Owners Manual - Page 41
Pix7 se recomienda sólo para una señal de PC por medio de HDMI. Pix-Auto (AFD) Descripción del Formato Activo. Datos enviados junto con el video incluyen información del formato de imagen, lo cual permite a la TV ajustar el Pix-Shape automáticamente. NOTA: Este modo de Pix-Shape sólo - Sanyo DP47460 | Owners Manual - Page 42
de graves y agudos. NOTA: La opción de Valores Originales regresa todos los parámetros a su configuración original de fábrica. PANTALLA DE PARÁMETROS MANUALES AJUSTES A LOS PARÁMETROS DE SONIDO Utilice las teclas de CURSOR LM para seleccionar el parámetro que desea ajustar. Presione la tecla ENTER - Sanyo DP47460 | Owners Manual - Page 43
HDTV como de la PC. Encienda la HDTV HDTV. Ver pág. HDMI y unos cables RCA de audio (ver entrada HDMI HDTV entrar en modo de espera mientras la PC no se utilice. PANEL LATERAL HDTV Sanyo recomienda utilizar un cable de monitor con ferrita. Pantalla Laptop Si utiliza su HDTV Sanyo AUDIO (MANUAL) - Sanyo DP47460 | Owners Manual - Page 44
datos de vista previa. NOTA: La HDTV se cambia a la entrada USB cuando se detecta una memoria en el puerto USB. FUNCIONAMIENTO Presione ENTER sobre una foto NOTA: Ajustes de imagen son configuraciones separadas a las de TV y entradas AV. 44 ¿Necesita ayuda? www.sanyoctv.com 1-877-864-9604 - Sanyo DP47460 | Owners Manual - Page 45
en un lugar seguro para su registro personal: No. de Modelo No. de Serie (Localizado en la parte posterior de la TV) Fecha de compra Precio de compra Lugar de compra Sanyo Manufacturing Corp. 3333 Sanyo Road, Forrest City, AR 72335 ¿Necesita ayuda? www.sanyoctv.com 1-877-864-9604 45 - Sanyo DP47460 | Owners Manual - Page 46
NOTES / ANOTACIONES 46 - Sanyo DP47460 | Owners Manual - Page 47
NOTES / ANOTACIONES 47 - Sanyo DP47460 | Owners Manual - Page 48
-
 1
1 -
 2
2 -
 3
3 -
 4
4 -
 5
5 -
 6
6 -
 7
7 -
8
-
9
-
10
-
11
-
12
-
13
-
14
-
15
-
16
-
17
-
18
-
19
-
20
-
21
-
22
-
23
-
24
-
25
-
26
-
27
-
28
-
29
-
30
-
31
-
32
-
33
-
34
-
35
-
36
-
37
-
38
-
39
-
40
-
41
-
42
-
43
-
44
-
45
-
46
-
47
-
48
 |
 |