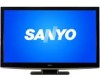
Sanyo DP55360 Owners Manual
Sanyo DP55360 - 55"Class LED LCD HDTV Manual
 |
View all Sanyo DP55360 manuals
Add to My Manuals
Save this manual to your list of manuals |
Sanyo DP55360 manual content summary:
- Sanyo DP55360 | Owners Manual - Page 1
- Sanyo DP55360 | Owners Manual - Page 2
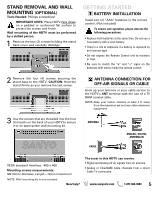
USER-SERVICEABLE PARTS INSIDE. REFER SERVICING TO QUALIFIED SERVICE PERSONNEL. THIS SYMBOL INDICATES THAT THERE ARE IMPORTANT OPERATING AND MAINTENANCE INSTRUCTIONS and supporting structure, Protect the power cord from being only with the cart, stand, tripod, bracket, When the MAINS plug is used as - Sanyo DP55360 | Owners Manual - Page 3
digital device, pursuant to Part 15 of the FCC Rules accordance with the instructions, may cause harmful determined by turning the equipment off and on, the user is encouraged dealer or an experienced radio/TV technician for help. CAUTION: FCC Star® Partner, Sanyo Manufacturing Corporation has - Sanyo DP55360 | Owners Manual - Page 4
Sync 14 V-Chip 15 Picture 16 Sound 17 PC CONNECTIONS & MENU OPERATION 18 PHOTO VIEWER 19 WARRANTY 20 SPECIFICATIONS Power Requirement: Source: AC 120V, 60Hz AC Power Consumption: 195 watts Weight: 75 lbs. Dimensions: MODEL WIDTH HEIGHT DEPTH DP55360 w/o stand 51.2 34.5 32.3 10 - Sanyo DP55360 | Owners Manual - Page 5
time. Do not use a new battery with a used battery. • There's a risk of explosion if a battery is replaced by an incorrect type. • Do not expose the Remote with marks inside the remote control. 2 Remove the four (4) screws securing the stand base to the HDTV. CAUTION: Hold the stand firmly as you - Sanyo DP55360 | Owners Manual - Page 6
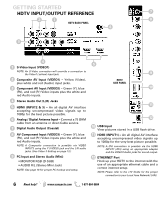
digital AV interface accepting uncompressed video signals up to 1080p for the very best picture possible. NOTE: A DVI connection is possible via the HDMI INPUT1 (DVI) using an appropriate adapter and the VIDEO3 Audio jacks for sound output. 12 ETHERNET Port Hook up your HDTV to the internet with the - Sanyo DP55360 | Owners Manual - Page 7
DVD PLAYER (or similar device) USB input jack is used to connect a USB mass storage device to display digital images on your HDTV. (JPEG only.) DVI NOTE: Audio/Video cables are not supplied. USB FLASH DRIVE HDMI (DVI) INPUT1 can be used to hookup a DVI device with the use of an appropriate DVI to - Sanyo DP55360 | Owners Manual - Page 8
are used to hookup your analog equipment such as a VCR or an older DVD player. Hook up you analog device's yellow video output jack and corresponding audio output jacks to the HDTV's Video Input 1 composite jacks. NOTE: Always match the color of your device's output jack, the connector and the - Sanyo DP55360 | Owners Manual - Page 9
HDTV. PLUG IN AC POWER CORD 120V AC, 60Hz TURN ON TV (PRESS POWER BUTTON) Wait for on-screen instructions to set HDTV's AV input jacks. ON SCREEN HELP (OPTIONAL) Press the CHM key if you wish to access an on screen trouble shooting guide. NOTE: On screen help is also accesible via the main video - Sanyo DP55360 | Owners Manual - Page 10
REMOTE CONTROL OPERATION • POWER Key-Turns your HDTV On or Off. • ECO Key-Modifies the Energy Saver level (see page 13.) • AUDIO Key-Selects the desired Audio mode. Stereo, Mono, or SAP (when available.) • ON TIMER Key-Displays the current switch on time (see Clock Timer on page 14.) • CAPTION Key- - Sanyo DP55360 | Owners Manual - Page 11
local digital channels, visit www.antennaweb.org IMPORTANT FACT: This HDTV maintains only one database of digital channels. Therefore, when you your cable company provides. MAIN MENU SCREEN CHANNEL SETTING SCREEN CHANNEL SCAN MEMORY SCREEN Input Setting Input Setting feature allows the removal of - Sanyo DP55360 | Owners Manual - Page 12
and power OFF process. Xacti-LINK With a Sanyo Xacti Digital Video/Movie Camera hooked up to your HDTV's HDMI input, setting the HDMI-CEC Function to ON enables you the use of keys on your GXEB remote to operate your Xacti camera. NOTE: The HDMI-CEC function of the Xacti camera must also be turned - Sanyo DP55360 | Owners Manual - Page 13
çais Press ENTER on the desired language. MAIN MENU SCREEN Digital Caption Captioning is textual information transmitted along with the picture and sound. Turning Captioning ON (by pressing the CAPTION key during normal TV viewing) causes the HDTV to open these captions (digital or analog) and - Sanyo DP55360 | Owners Manual - Page 14
This feature allows you to set a Current Time for your HDTV and enable a Switch On Time for the HDTV to turn on at a specific time of day. When On Timer Function is set to ON, the TV will automatically turn on at the previously set Switch on Time. Motion Sync Your HDTV will display all signals at - Sanyo DP55360 | Owners Manual - Page 15
system for digital channels that are received with an antenna. When the HDTV detects compatible RRT5 data, it's downloaded & stored in memory, and the additional ratings. MORE INFORMATION Additional information about MPAA (Motion Picture Association of America) and V-Chip rating can be found at: - Sanyo DP55360 | Owners Manual - Page 16
Picture option returns all picture parameters to their original factory settings. ADJUSTING A PICTURE SETTING Use the CURSOR LM keys to highlight the picture the EXIT key to return to normal TV viewing. MAIN MENU SCREEN PICTURE SCREEN (MANUAL) PARAMETER SELECTION SCREEN VALUE ADJUSTMENT SCREEN - Sanyo DP55360 | Owners Manual - Page 17
not linked with any Picture option. MANUAL SOUND SETTINGS The Manual option provides different parameters that can be personally adjusted: • Bass • Treble • Detailed Setting - 4-Band Equalizer: Personalize audio highs and lows. NOTE: Default Sound option returns all sound parameters to their - Sanyo DP55360 | Owners Manual - Page 18
when the picture appears to flicker or is blurred. H-Position - Move the image horizontally V-Position - Move the image vertically Power Saving - Enable the HDTV to turn to Standby Mode when computer is not in use. Stereo mini audio cable RGB Monitor cable PC OR LAPTOP Sanyo recommends using - Sanyo DP55360 | Owners Manual - Page 19
to change picture. Press ENTER to show the full view options menu. SLIDE SHOW In the Slideshow Setup menu you may turn the Shuffle Picture Setting - Adjust Color, Tint, Contrast, Brightness, Sharpness and Dynamic Contrast. NOTE: Picture Settings are separate configurations from the settings in TV - Sanyo DP55360 | Owners Manual - Page 20
remote control. The defective TV will be exchanged for the same model, or a replacement model of equal value, if necessary. Replacement model will be contingent on availability and at the sole discretion of Sanyo March 1, 2007) Your Sanyo HDTV is registered at the time of purchase, please keep - Sanyo DP55360 | Owners Manual - Page 21
CHOQUE ELÉCTRICO ¡NO ABRIR! PRECAUCIÓN: PARA REDUCIR EL RIESGO DE CHOQUE ELÉCTRICO, NO QUITE LA CUBIERTA (O LA TAPA TRASERA). NO HAY PARTES ADENTRO QUE LAS PUEDA REPARAR EL USUARIO. REFIÉRASE A PERSONAL CALIFICADO PARA REPARAR EL APARATO. ESTE SÍMBOLO INDICA QUÉ VOLTAJES PELIGROSOS QUE CONSTITUYEN - Sanyo DP55360 | Owners Manual - Page 22
acuerdo a los límites para un aparato digital Clase B, en acorde a la Parte 15 de las Reglas FCC. Estos límites están diseñados para proveer una Unidos y otros países. Como un Asociado de ENERGY STAR®, Sanyo Manufacturing Corporation, ha determinado que este producto cumple con los lineamientos - Sanyo DP55360 | Owners Manual - Page 23
195 watts Peso: 34 kg. (con base) Dimensiones: MODELO ANCHO ALTO PROFUNDO DP55360 130 sin base 87,7 82,0 27,7 6,0 NOTA: Las dimensiones están en centímetros. Favor de leer antes de operar su HDTV! PROTEGER LA PANTALLA PRECAUCIÓN: La pantalla podría dañarse si no se le da un mantenimiento - Sanyo DP55360 | Owners Manual - Page 24
la base al quitar HDTV como de cualquier otro aparato electrónico. 3 Use los tornillos insertados en los 4 hoyos en la parte trasera de su HDTV HDTV puede sintonizar: • Señales aéreas digitales y análogas de una antena. • Canales de Cable análogos o sin codificar de una conexión directa de TV - Sanyo DP55360 | Owners Manual - Page 25
de video sin compresión de 1080p para obtener la mejor calidad de imagen posible. NOTE: Una conexión DVI es posible por medio de la entrada HDMI INPUT1 (DVI) utilizando un adaptador apropiado y conectando el audio a las entradas de audio de VIDEO3. 12 Puerto ETHERNET Conecte su HDTV al Internet - Sanyo DP55360 | Owners Manual - Page 26
PARA COMENZAR CONEXIONES DE AUDIO Y VIDEO (PANEL LATERAL) Use la salida de Audio Digital para transmitir la salida de Audio de la TV a un sistema externo. Conecte la salida Digital Audio Output de la HDTV a su sistema de cine en casa utilizando un cable tipo "phono" de Audio Digital. La conexión - Sanyo DP55360 | Owners Manual - Page 27
con los cables y las entradas de la HDTV. S-Video puede ser utilizada en lugar del conector amarillo de video usando un cable de S-Video conectado de la salida S-Video de su aparato a la entrada S-Video de la HDTV. NOTA: Cables de Audio y Video no vienen incluídos. AMPLIFICADOR ESTÉREO HDMI - Sanyo DP55360 | Owners Manual - Page 28
o conexión de TV por cable y todos los dispositivos a su HDTV. CONECTE EL CABLE DE CORRIENTE 120V AC, 60Hz ENCIENDA LA TV Siga las instrucciones en canales análogos y digitales se hayaron, así como entradas de video detectadas. Presionar la tecla CHLM finaliza el proceso de configuración. NOTA - Sanyo DP55360 | Owners Manual - Page 29
de video deseada Mantenga presionada la tecla para mostrar el menú de entradas. • Tecla de volumen VOL+ - -Aumentar o dis- minuir el nivel del volumen. • Teclas de canal CH L M -Navegar los canales en la base de datos de la memoria. • Tecla MUTE-Cancelar o restaurar el audio. • Tecla RECALL-Cambiar - Sanyo DP55360 | Owners Manual - Page 30
función de Adición Digital Aérea no es disponible si el modo de TV es Cable. Memoria de Canales Esta función enlista todos los canales encontrados, . IMPORTANTE: Esta HDTV mantiene una sola base de datos para canales digitales. Por lo tanto cuando busque canales de Cable, la base de datos de - Sanyo DP55360 | Owners Manual - Page 31
funciones específicas como el proceso automático de encendido y apagado. Xacti-LINK Con una cámara digital Xacti de Video/Película marca Sanyo conectada a la entrada HDMI de la HDTV, el configurar la Función HDMI-CEC a Encendido, habilita el uso de las teclas del control remoto GXEB para operar - Sanyo DP55360 | Owners Manual - Page 32
de texto oculta, transmitida junto con la imagen y sonido. El activar la función (al presionar la tecla CAPTION al ver televisión), la HDTV abre e interpreta esta información (digital o análoga) y sobreimpone los textos en pantalla. NOTA: Las transmisoras locales deciden que información transmitir - Sanyo DP55360 | Owners Manual - Page 33
de Encendido para que el televisor se prenda a determinada hora. Cuando la Función de encendido se habilita, la TV automáticamente se encenderá a la hora establecida. Motion Sync. (120 Hz) Su HDTV desplegará todas las señales a una frecuencia de barrido de 120Hz. Motion Sync es una función especial - Sanyo DP55360 | Owners Manual - Page 34
Estados Unidos de América. Esta función pudiera no activarse con señales que originen de otros países. ADJUSTING THE V-CHIP SETTINGS Elija Encendido y presione ENTER. Elija Ajustar y presione ENTER. Utilice las teclas de CURSOR L M y para nave- gar y la tecla ENTER para Bloquear o Desbloquear - Sanyo DP55360 | Owners Manual - Page 35
. Presione ENTER. Puede elegir entre Intenso, Moderado y Estándar, los cuales tienen valores fijos y predeterminados para los diferentes parámetros. O puede elegir la opción de Manual para ingresar valores personalizados. NOTA: Cada entrada de AV puede tener su propio modo de imagen (predeterminado - Sanyo DP55360 | Owners Manual - Page 36
de graves y agudos. NOTA: La opción de Valores Originales regresa todos los parámetros a su configuración original de fábrica. PANTALLA DE PARÁMETROS MANUALES AJUSTES A LOS PARÁMETROS DE SONIDO Utilice las teclas de CURSOR LM para seleccionar el parámetro que desea ajustar. Presione la tecla ENTER - Sanyo DP55360 | Owners Manual - Page 37
la imagen sólo en la laptop, tanto en la laptop como la HDTV, o desplegar sólo en la HDTV. PANTALLA DE CONFIGURACIÓN PC Imagen y Audio PC Estándar - Aplica valores predeterminados a los parámetros de Imagen y Audio. Manual - Ajuste los parámetros de Contraste, Brillo y Temperatura de color de la - Sanyo DP55360 | Owners Manual - Page 38
en conec- tarse será reconocido y habilitado. MEMORIA USB NOTA: La HDTV se cambia a la entrada USB cuando se detecta una memoria en el Contraste Dinámico. NOTA: Ajustes de imagen son configuraciones separadas a las de TV y entradas AV. MENÚ DE OPCIONES EN VISTA COMPLETA AJUSTES A PRESENTACIÓN - Sanyo DP55360 | Owners Manual - Page 39
variar de estado a estado. (EFECTIVO: Marzo 1, 2007) Su HDTV Sanyo es registrada al momento de la compra, por favor guarde su de Serie (Localizado en la parte posterior de la TV) Fecha de compra Precio de compra Lugar de compra Sanyo Manufacturing Corp. 3333 Sanyo Road, Forrest City, AR - Sanyo DP55360 | Owners Manual - Page 40
-
 1
1 -
 2
2 -
 3
3 -
 4
4 -
 5
5 -
 6
6 -
 7
7 -
8
-
9
-
10
-
11
-
12
-
13
-
14
-
15
-
16
-
17
-
18
-
19
-
20
-
21
-
22
-
23
-
24
-
25
-
26
-
27
-
28
-
29
-
30
-
31
-
32
-
33
-
34
-
35
-
36
-
37
-
38
-
39
-
40
 |
 |
