Sanyo EF10NZ Owners Manual
Sanyo EF10NZ - SXGA LCD Projector Manual
 |
View all Sanyo EF10NZ manuals
Add to My Manuals
Save this manual to your list of manuals |
Sanyo EF10NZ manual content summary:
- Sanyo EF10NZ | Owners Manual - Page 1
Multimedia Projector MODEL PLC-EF1OE PLC-EF10 PLC-EF1OEL (Without Lens) c-D 0 OWNER'S INSTRUCTION MANUAL - Sanyo EF10NZ | Owners Manual - Page 2
service requests were not caused by problems with our projectors. They were caused by problems that could have been prevented, if the owner had followed the instructions in the manual. You can often correct operating problems yourself. If your projector fails to work properly, see "TROUBLESHOOTING - Sanyo EF10NZ | Owners Manual - Page 3
, or injury to persons. Upon completion of any service or repairs to this projector, ask the service technician to perform routine safety checks to determine that the projector is in safe operating condition. Follow all warnings and instructions marked on the projectors. For added protection to the - Sanyo EF10NZ | Owners Manual - Page 4
THE PROJECTOR DIRECT OPERATION MENU OPERATION . „k:.::o00tQo0t4i6 S'M TURNING ON/OFF THE PROJECTOR DIRECT 1 or Mode 2) LAMP AGE °A EN I MEINTENANCE TEMPERATURE WARNING INDICATOR AIR FILTER CARE AND CLEANING LAMP REPLACEMENT CLEANING THE LENS TROUBLESHOOTING TECHNICAL SPECIFICATIONS 50-51 - Sanyo EF10NZ | Owners Manual - Page 5
and active matrix liquid crystal display (LCD) technology. The projector is ideal for high-performance business, projector comes with the parts listed below. Check to find all the parts are included. If any parts are missing, contact an authorized dealer or service station. • Owner's Manual - Sanyo EF10NZ | Owners Manual - Page 6
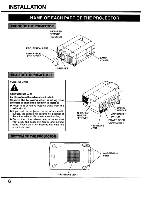
touch the cabinet near to the exhaust vent area, and especially screws and metallic parts. These parts will become hot while the projector is used. 0 0 0 0 0 LAMP COVER 0 INFRAR D REMOTE RECEIVER AIR INTAKE VENT cG 0 0 co co 0 or CARRY HANDLE MAIN ON/OFF SWITCH POWER CORD CONNECTOR A'S 6 OO - Sanyo EF10NZ | Owners Manual - Page 7
to the figure below as an example when positioning the projector to the screen. A THIS PROJECTOR SHOULD BE SET IN THE WAY INDICATED. NEVER HANG THE PROJECTOR, OR FALL DOWN ON ITS SIDE. IT MAY RESULT IN FIRE HAZARD. Maximum Zoom The projector should be placed in a room with limited light. Picture - Sanyo EF10NZ | Owners Manual - Page 8
• Do not drop or give a shock to the projector, otherwise damage or malfunction may result. • When carrying the projector, use a Sanyo recommended Carrying Case. • Do not transport the projector by using a courier or transport service in an unsuitable transport case. This may cause damage to - Sanyo EF10NZ | Owners Manual - Page 9
plug into any other type of power system. Consult your authorized dealer or service station if you are not sure what type of power is supplied to your building. Connect the AC power supply cord (supplied) to the projector. The socket-outlet must be near this equipment and must be easily accessible - Sanyo EF10NZ | Owners Manual - Page 10
from the computer to the SERIAL PORT TERMINAL (DB9) Used to connect a computer to the projector. WIRED REMOTE JACK When using the wired remote control, connect the remote cable to this jack. projector. 0 AUDIO MONITOR OUTPUT JACKS (R and L) Used to connect an audio input from audio equipment to - Sanyo EF10NZ | Owners Manual - Page 11
JACKS-1 (R and L) le Used to connect an audio source to the projector. VIDEO INPUT JACKS-2 (BNC TYPE x 3) Used to connect a video source to the projector. • S-VIDEO INPUT JACK-2 Used to connect a S-VHS video source to the projector. • AUDIO INPUT JACKS-2 (R and L) Used to connect an audio source to - Sanyo EF10NZ | Owners Manual - Page 12
terminal (MDR 20-pin). When using this input, Graphic Accelerator Board designed for this projector should be installed into your computer and set-up the computer configuration following instruction included in the Graphic Accelerator Board package. Refer to DIGITAL INPUT CONNECTION on page 15 - Sanyo EF10NZ | Owners Manual - Page 13
selected, this terminal outputs Computer 1 input information. An external monitor can be connected to the HDB15-pin (VGA) terminal on the projector. • Connect the monitor to this terminal using the VGA cable (not provided). iN ".1 111111111141 . , Pin NoJSignal 1 Red input 2 Green input 3 Blue - Sanyo EF10NZ | Owners Manual - Page 14
L O 0000 0 00 0 R Amp. 1 Speaker (L) COMPUTER AUDIO OUTPUT Speaker (R) NOTE: When connecting the cable, the power cords of both the projector and the external equipment should be disconnected from AC outlet. Turn the projector and peripheral equipment on before the computer is switched on. 14 - Sanyo EF10NZ | Owners Manual - Page 15
: Before using with digital connection, install (Plug in) Graphic Accelerator Board (included within projector) into PCI bus slot of the computer and set up the computer following instructions in the Graphic Accelerator Board package. COMPUTER MONITOR CABLE (NOT PROVIDED) GRAPHIC ACCELERATOR BOARD - Sanyo EF10NZ | Owners Manual - Page 16
PROVIDED) SPEAKER OUT L 0000 0 0000 0 Amp. R Speaker (L) Speaker (R) NOTE: When connecting the cable, the power cords of both the projector and the external equipment should be disconnected from AC outlet. Turn the projector and peripheral equipment on before the computer is switched on. 16 - Sanyo EF10NZ | Owners Manual - Page 17
bus slot of the computer and set up the computer following instructions in the Graphic Accelerator PC card package. INSTALL (PLUG) INTO the power cords of both the projector and the external equipment should be disconnected from AC outlet. Turn the projector and peripheral equipment on before the - Sanyo EF10NZ | Owners Manual - Page 18
R Set the dip switches as shown in the table below depending on the RESOLUTION MODE that you want to use before you turn on the projector and computer. SW1 - SW6 VGA/MAC ADAPTER Y., ON OFF OFF OFF OFF O TY' OFF OFF N OFF OFF OFF OFF 0 OFF OFF OFF OFF OFF NOTE - Sanyo EF10NZ | Owners Manual - Page 19
(R) Set the dip switches as shown in the table below depending on the RESOLUTION MODE that you want to use before you turn on the projector and computer. • X 4 Qi• 0 OFF OFF 4 OFF Of OFF kir 3 OFF OFF l:l, OFF OFF OFF OFF OFF OFF OFF OFF SW1 -. SW6 ON OFF VGA/MAC - Sanyo EF10NZ | Owners Manual - Page 20
CONNECTING THE PROJECTOR CONNECTING THE VIDEO EQUIPMENT Connect to the video outputs of a VCR, video disc player, DVD player, video camera, satellite TV tuner or other AV equipment. - Sanyo EF10NZ | Owners Manual - Page 21
go: M CONNECTING THE PROJECTOR ri VIDEO EQUIPMENT Video Cassette Recorder DVD Player Video Disc Player Satellite TV Tuner IME oo 0NN. AUDIO AMP. NOTE: When connecting the cable, the power cords of both the projector and the external equipment should be disconnected from AC outlet. Turn the - Sanyo EF10NZ | Owners Manual - Page 22
BEFORE OPERATION CONTROLS AND INDICATORS FRONT INDICATORS O co or. 0 TOP CONTROLS ratTAVr. i----- READY WARNING LAMP LAMP TEMP. REPLACE • • L VOLUME OOM A CUS L A SHIFT 0 -OFF O V V MODE MEMU I AUTO IMAGE ORMAL ELECT 22 - Sanyo EF10NZ | Owners Manual - Page 23
temperature is too high. READY INDICATOR Light is green when projector lamp is ready to be turned on. LAMP POWER INDICATOR Light is dim when the projector is on. Light is brightened when the projector is in stand-by mode. VOLUME BUTTONS Used to adjust volume. ZOOM BUTTONS Used to operate power - Sanyo EF10NZ | Owners Manual - Page 24
, 55 This remote control unit is not only able to operate the projector but also usable as a wireless mouse for a PC. One pointing pad mouse pointer is displayed on the screen. When the menu or indicator of the projector is displayed on the screen instead of the PC mouse pointer, the wireless mouse - Sanyo EF10NZ | Owners Manual - Page 25
(POINT UP/DOWN/LEFT/RIGHT BUTTON) When in use as a remote for the projector To select an item on the MENU that you want to adjust. To select , light goes off. FRONT CLICK BUTTON When in use as a remote for the projector Used to compress the image in D.ZOOM mode. When in use as a wireless - Sanyo EF10NZ | Owners Manual - Page 26
correct polarity (+ and terminal), be sure the battery terminals are in contact with the pins in the compartment. Point the remote control toward the projector (Receiver window) whenever pressing the buttons. Maximum operating range for the remote control is about 5m and 60° front and rear of the - Sanyo EF10NZ | Owners Manual - Page 27
mode. (Video 1 or Video 2 Input) O POWER ON/OFF BUTTON Used to turn projector on or off. Ck% tit COMPUTE VIDEO ON OFF O t0 4 VOLUME ZOOM FOCUS /LEFT/RIGHT buttons and the SELECT button to make adjustments to the projector's setting in MENU operation. POINT UP/DOWN/LEFT/RIGHT BUTTONS To - Sanyo EF10NZ | Owners Manual - Page 28
in the compartment. I 0 0 o 10 The remote control unit can be used as wireless or wired remote control. mo„:44 Point the remote control toward the projector (Receiver window) whenever pressing the buttons. Maximum operating range for the remote control is about 5m and 60° front and rear of the - Sanyo EF10NZ | Owners Manual - Page 29
by using one button without showing the MENU. In MENU OPERATION mode, you display menus where you can adjust the projector's settings. Follow the instruction for each control. I 7 regiF' 4/* Atigg:MOMMtg • AAAAii gl'aVtggi POWER ON-OFF X X:4 POWER ON-OFF A - 414r .450 POWER ON-OFF MODE - Sanyo EF10NZ | Owners Manual - Page 30
BEFORE OPERATION r:',XWAy f4, A V. 1,44. •IP MENU POINT LEFT/RIGHT SELECT POINT UP/DOWN SELECT 1. COMPUTERNIDEO MODE MENU POINT LEFT/RIGHT SELECT POINT UP/DOWN SELECT 3#,:r5e4 MENU POINT (LEFT/RIGHT) SELECT (REAR CLICK) POINT (UP/DOWN) SELECT (REAR CLICK) MENU MENU MENU Of POINT LEFT/ - Sanyo EF10NZ | Owners Manual - Page 31
MENU mode, the menus will disappear and the MENU operation will end. 2. You can use the REMOTE CONTROL UNIT or the TOP CONTROL OF THE PROJECTOR to operate the MENU operation. 31 - Sanyo EF10NZ | Owners Manual - Page 32
ON/OFF button on the remote control unit or on the projector to ON. The LAMP POWER indicator light will dim and the cooling fans will operate. authorized dealer or service station. Atez,..0 :4K:miffee. afeaft. Press the POWER ON/OFF button on the remote control unit or on the projector. The "Power - Sanyo EF10NZ | Owners Manual - Page 33
display will appear on the screen for a few seconds. MODE button COMPUTER button t".67:7F, A, .4.. VIDEO button A tqf Press the VOLUME buttons on the projector or on the remote control unit to adjust the volume. The volume display will be displayed on the screen for a few seconds. Pressing volume - Sanyo EF10NZ | Owners Manual - Page 34
the P-TIMER button to stop the timer. Then press the P-TIMER button to cancel the P-TIMER function. 00:0 Press the AUTO IMAGE button on the projector or on the remote control unit. The item(s) indicated "ON" in the AUTO IMAGE FUNCTION are adjusted automatically. If all the items in AUTO IMAGE - Sanyo EF10NZ | Owners Manual - Page 35
BASIC OPERATION WV - MENU OPERATION In MENU OPERATION mode, you can adjust the projector. You can use the TOP CONTROL OF THE PROJECTOR or the REMOTE CONTROL UNIT. TOP CONTROL OF THE PROJECTOR MENU MEMU BUTTON POINT UP BUTTON WIRELESS REMOTE CONTROL UNIT POINT RIGHT BUTTON NORMAL SELECT V - Sanyo EF10NZ | Owners Manual - Page 36
BASIC OPERATION •>"'"A% i r ',46 You can adjust the sound volume, treble, bass levels and Built-in SP., Sound Mute ON/OFF switch in the MENU display. 1. Press the MENU BUTTON and the MAIN MENU DISPLAY dialog box will appear. 2. Press the POINT LEFT/RIGHT BUTTON(s) to select SOUND and press the - Sanyo EF10NZ | Owners Manual - Page 37
major broadcast video standards: PAL, SECAM, NTSC, NTSC 4.43, PAL-M and PAL-N (COLOUR SYSTEMs). When the colour system is set to "Auto position", this projector can detect one of 4 systems (PAL, SECAM, NTSC or NTSC 4.43) automatically. However, if the video signal is not strong enough to detect the - Sanyo EF10NZ | Owners Manual - Page 38
VIDEO MODE sbAft Picture adjustments have been preset at the factory. If you want to change the setting, operate the projector as follows. 1. Press MENU BUTTON and the MAIN MENU DISPLAY dialog box will appear. 2. Press the POINT LEFT/RIGHT BUTTON(s) to select IMAGE and press - Sanyo EF10NZ | Owners Manual - Page 39
has the Wide function, which enables you to view a wider video image. WIDE function This projector is able to project not only a normal video image (with 4 x 3 aspect ratio), but also a wider video image by compressing 4 x 3 image. This feature enable you to - Sanyo EF10NZ | Owners Manual - Page 40
signal and project the proper image without any special setting. Although this will work in most cases, you may be required to manually set the projector for some computer signals. If the computer image is not reproduced properly, try the following procedure and switch to the computer display - Sanyo EF10NZ | Owners Manual - Page 41
.00 75030.4 50.00 (Interlace) 4,f.fo:a 58. HDTV 1920 x 1035 33.75 60.00 (Interlace) Specifications are subject to change without notice. NOTE: Basically this projector can accept the signal from all computers with the above mentioned V, H-Frequency and less than 200 MHz of Dot Clock. 41 - Sanyo EF10NZ | Owners Manual - Page 42
quit the MENU, point to Quit and then press the SELECT (REAR CLICK) BUTTON. 10.This setting is temporarily effective until you turn off the projector or change the input signal. NOTE: The fine sync., total dots and screen position of some computers may not be fully adjusted with the "Auto - Sanyo EF10NZ | Owners Manual - Page 43
MODE " 5" 5 HIP? WV; amurreameerl' 7.fer,"/ Picture adjustments have been preset at the factory. If you want to change the setting, operate the projector as follows. 1. Press the MENU BUTTON and the MAIN MENU DISPLAY dialog box will appear. 2. Press the POINT LEFT/RIGHT BUTTON(s) to select IMAGE - Sanyo EF10NZ | Owners Manual - Page 44
COMPUTER MODE 1. Press the MENU BUTTON and the MAIN MENU DISPLAY dialog box will appear. 2. Press the POINT LEFT/RIGHT BUTTON(s) to select POSITION and press the SELECT (REAR CLICK) BUTTON. Another dialog box POSITION SETTING DISPLAY will appear. 3. Press the POINT DOWN BUTTON and a red arrow will - Sanyo EF10NZ | Owners Manual - Page 45
image. And a flickering picture, a non-synchronized picture, a noncentered picture or a skewed picture may be projected instead. For those non-standard formats, this projector is provided with PC ADJUST, enabling you to precisely adjust several parameters to match with the input signal format. The - Sanyo EF10NZ | Owners Manual - Page 46
parameter data for the Mode you have selected is shown in this dialog box. 7. The parameters will be filled with the data determined by the projector according to the present signal input. 8. The function of the parameters and their values are summarized in the table as below. 9. Move the arrow to - Sanyo EF10NZ | Owners Manual - Page 47
COMPUTER MODE 17. Another dialog box "PC ADJUSTMENT DISPLAY 2" will appear and the parameter data for the Mode you have selected is shown in this dialog box. 18. Move the arrow to an item that you want to adjust by pressing the POINT UP/DOWN BUTTON(s). 19. To increase the level, point the arrow to A - Sanyo EF10NZ | Owners Manual - Page 48
COMPUTER MODE MODE FREE The Mode free function is provided to confirm or clear the parameter data produced by PC ADJUST. 1. Press the MENU BUTTON and the MAIN MENU DISPLAY dialog box will appear. 2. Press the POINT LEFT/RIGHT BUTTON(s) to select PC ADJUST and press the SELECT (REAR CLICK) BUTTON. - Sanyo EF10NZ | Owners Manual - Page 49
is modified to fit the screen size in the initial mode. • When the original image size is larger than the screen size (1280 x 1024), this projector becomes Digital Zoom mode automatically. • The maximum size in expand mode is 4 times as large as the original screen size. (When original image size is - Sanyo EF10NZ | Owners Manual - Page 50
. 0'0 Power management will be turn the projector Lamp off when the input signal is interrupted (Picture is not displayed) over projector by computer. NOTE: Before you control the projector by computer, install USB driver (optionally saled parts) and set up the computer following instruction - Sanyo EF10NZ | Owners Manual - Page 51
remote control video equipments are system-up and used together. When you change the code MODE 2, you must change both projector and Remote Control Unit. To change Projector code: Set REMOTE CONTROL in SETTING menu (below figure) to "MODE 2". To change Remote Control Unit code: Press both "MENU - Sanyo EF10NZ | Owners Manual - Page 52
red arrow will appear. 4. Move the arrow by pressing the POINT UP/DOWN BUTTON(s) to select Lamp age and then press the SELECT (REAR CLICK) BUTTON. When you reset the lamp replace monitor, "lamp replace monitor reset?" is displayed for confirmation. 5. Move the arrow to Yes and then press the SELECT - Sanyo EF10NZ | Owners Manual - Page 53
projector are blocked. In such an event, reposition the projector so that ventilation slots are not obstructed. 2. Air filter is clogged with dust particles. Remove dust from the air filter by following instructions authorized dealer or service station for the cleaning. AIR FILTER COVER o° O 53 - Sanyo EF10NZ | Owners Manual - Page 54
• For continued safety, replace with a lamp assembly of the same type. • Allow the projector to cool for at least 45 minutes before you open the lamp cover. The inside of the projector can become very hot. • Do not drop the lamp module or touch the glass bulb ! The glass can shatter and cause injury - Sanyo EF10NZ | Owners Manual - Page 55
don't use the projector, replace the lens cover. TROUBLESHOOTING Before calling your dealer or service station for assistance, check projector. Power the equipment back up in order of: Projector and computer) 6. If the problem still exists, check the following chart. - Sanyo EF10NZ | Owners Manual - Page 56
sure nothing is blocking between the remote control sensor and remote ▪.:4CM control unit. • Make sure you are not too far from the projector when using the remote control unit. (Maximum operate range 5 m). • Check the transmitted signal mode from the remote control unit. (See "OTHER FUNCTION - Sanyo EF10NZ | Owners Manual - Page 57
,segggggAaw k: 84 8224AAVX*344 1.421444A334 .„. 8, 99 8 . 34. Multi-media Projector 390 mm x 234 mm x 582 mm 99* 988 93)3 88 17.8 kg 50/60 Hz (Model PLC-EF10E/EF10EL) 110 - 120 V AC, 50/60 Hz (Model PLC-EF10) 3.6 A (Max. Ampere) Model PLC-EF10E/EF10EL 7.2 A (Max. Ampere) Model PLC-EF10 5°C - 35 - Sanyo EF10NZ | Owners Manual - Page 58
- Sanyo EF10NZ | Owners Manual - Page 59
- Sanyo EF10NZ | Owners Manual - Page 60
Printed in Japan Part No. 610 277 8298 (1AA6P1P1770-- P6VA) SANYO Electric Co., Ltd
-
 1
1 -
 2
2 -
 3
3 -
 4
4 -
 5
5 -
 6
6 -
 7
7 -
8
-
9
-
10
-
11
-
12
-
13
-
14
-
15
-
16
-
17
-
18
-
19
-
20
-
21
-
22
-
23
-
24
-
25
-
26
-
27
-
28
-
29
-
30
-
31
-
32
-
33
-
34
-
35
-
36
-
37
-
38
-
39
-
40
-
41
-
42
-
43
-
44
-
45
-
46
-
47
-
48
-
49
-
50
-
51
-
52
-
53
-
54
-
55
-
56
-
57
-
58
-
59
-
60
 |
 |
