Sanyo FWDP175F Quick Start Guide
Sanyo FWDP175F Manual
 |
View all Sanyo FWDP175F manuals
Add to My Manuals
Save this manual to your list of manuals |
Sanyo FWDP175F manual content summary:
- Sanyo FWDP175F | Quick Start Guide - Page 1
or issues with our product, please refer to the "TROUBLESHOOTING" section of this "SETUP MANUAL", or visit our website for the Online Owner's Manual at sanyo-av.com. See the Online Owner's Manual for details: sanyo-av.com TROUBLESHOOTING Problem No sound or picture. Tip • Check if the AC - Sanyo FWDP175F | Quick Start Guide - Page 2
important operating and maintenance (servicing) instructions in the literature accompanying the the mains (AC) plug to shut off when find trouble or not in use. The mains (AC) plug shall operate per Owner's Manual. TO OBTAIN ASSISTANCE... Contact the Customer Care Center at: sanyo-av.com 1 866
-
 1
1 -
 2
2
 |
 |
OUBLESHOOTING
TROUBLESHOOTING
If you have any questions or issues with our product, please refer to the
“TROUBLESHOOTING” section of this “SETUP MANUAL”, or visit our
website for the Online Owner’s Manual at
sanyo-av.com
.
Printed in China
E6U00UH
2VMN00188
★★★★★
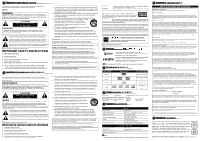
Best Connection to the TV
Better Connection to the TV
INSERT BATTERIES
Install 2 AAA (1.5V) batteries
(not supplied)
See the Online Owner’s Manual for details:
sanyo-av.com
ENGLISH
ESPAÑOL
1.
To turn the unit on or to turn the
unit into the standby mode.
(To completely turn off the unit, you
must unplug the AC power cord.)
Para encender la unidad o para
dejarla en el modo de espera.
(Para apagar completamente la
unidad, debe desconectar el cable
de alimentacion de CA.)
2.
To call up the setup menu.
Para recuperar el menú de configuración.
3.
To call up the title menu on a disc.
(DVD)
Para visualizar el menú de títulos
de un disco. (DVD)
4.
To move the cursor.
Press
s
/
B
to switch between
pages when a file list is displayed.
(CD / JPEG)
Press
s
/
B
to rotate the picture
during playback JPEG files. (JPEG)
To enter values in the input field.
Para mover el cursor.
Presione
s
/
B
para cambiar entre
páginas cuando se visualiza la lista
de archivos. (CD / JPEG)
Presione
s
/
B
para girar la imagen
en la reproducción de archivos
JPEG.
(JPEG)
Para especificar valores en el
campo de entrada.
5.
To search chapter, title, tracks, files
or time.
To select button in menu. (DVD)
Para buscar un capítulo, título,
pistas, archivos o tiempo.
Para seleccionar el bot
ón en el
menú.
(DVD)
6.
To start playback or resume playback.
Para iniciar o reanudar la reproducción.
7.
To search forward / backward through
a disc. (×2, ×4, ×8, ×20) (DVD / CD)
To begin slow forward playback in
the pause mode. (DVD)
Para buscar en avance/retroceso por
un disco. (×2, ×4, ×8, ×20) (DVD / CD)
Para comenzar la reproducción en
cámara lenta en el modo de pausa.
(DVD)
8.
To skip chapters, titles, tracks and
files.
While thumbnail is displayed, press
to switch between pages. (JPEG)
Para omitir capítulos, títulos, pistas y
archivos.
Cuando se visualice la miniatura, presione
el interruptor entre páginas.
(JPEG)
9.
To stop playback.
Para parar la reproducción.
10.
To play back repeatedly.
Para reproducir repetidamente.
11.
To repeat between your chosen
point of A and B. (DVD / CD)
Para repetir entre su punto A y B
seleccionado. (DVD / CD)
12.
To select audio language on a disc.
(DVD)
Para seleccionar lenguaje de audio en
un disco. (DVD)
ENGLISH
ESPAÑOL
13.
To select subtitle language on a
disc. (DVD)
Para seleccionar el idioma de
subtítulos de un disco. (DVD)
14.
To open or close the disc tray.
To turn on the unit.
Para abrir o cerrar la bandeja del
disco.
Para encender la unidad.
15.
To call up the menu on a disc. (DVD)
To display the thumbnail while a
disc with JPEG files is inserted and
a file is highlighted. (JPEG)
Para llamar el menú en un disco.
(DVD)
Para visualizar la miniatura cuando
insertó un disco con archivos JPEG y
algún archivo está resaltado. (JPEG)
16.
To select items or settings.
Para seleccionar opciones o valores
de configuración.
17.
To call up the menu when playing
back a disc. (DVD)
To return to the file list while
thumbnail is displayed. (JPEG)
Para volver al menú o pantalla
anteriormente visualizado. (DVD)
Para volver a la lista de archivos
mientras se visualiza la miniatura.
(JPEG)
18.
To pause disc playback.
To advance playback one frame at a
time. (DVD)
Para hacer una pausa en la reproducción.
Para avanzar la reproducción un
cuadro cada vez. (DVD)
19.
To display the current disc information.
Para mostrar la información del disco actual.
20.
To play back randomly. (CD)
Para reproducir al azar. (CD)
21.
To magnify part of a picture.
(×1.5, ×2, ×2.5)
(DVD / JPEG)
Para agrandar la parte de una imagen.
(×1.5, ×2, ×2.5)
(DVD / JPEG)
22.
To select camera angles on a disc.
(DVD)
Para seleccionar los ángulos de la
cámara en un disco. (DVD)
Problem
Tip
•
Check if the AC power cord is properly connected.
•
Unplug the outlet once, and wait for 5-10 seconds and
then plug it in again.
No sound or picture.
•
Check if the TV is switched on.
•
Check the video connection.
•
Check the audio / video cable connections to the TV.
•
Check whether the connected TV or other device
supports HDCP. (This unit will not output a video signal
unless the other device supports HDCP.)
•
Press and hold [
BF
(PLAY / PAUSE) ] on the front panel
for 5 seconds to change back to default output.
Distorted picture.
•
Sometimes a small amount of picture distortion may
appear.
This is not a malfunction.
•
Connect the unit directly to the TV.
Completely distorted
picture or black / white
picture with DVD.
•
Connect this unit directly to the TV.
•
Make sure the disc is compatible with the unit.
No sound or distorted
sound.
•
Adjust the volume.
•
Check that the speakers are connected correctly.
No DTS audio is
output.
•
This unit does not support DTS audio.
This is not a malfunction.
You need to set this unit to “Bitstream” in “Audio Out”
menu and also need to connect to the TV or amplifier
that supports DTS, then the audio will be output as DTS.
It is only available when connected via an HDMI cable.
Picture freezes
momentarily during
playback.
•
Check the disc for fingerprints / dirty and clean with a
soft cloth wiping from center to edge.
Disc cannot be played
back.
•
Clean the disc.
•
Ensure the disc is inserted in correct direction.
•
Insert a correct disc that plays back on this unit.
•
Check if the disc is defective by trying another disc.
•
Check if the parental exceed the levels you set
in “Movie Rating” setting. (for DVD only)
No return to start-up
screen when disc is
removed.
•
Reset the unit by switching off the unit, then on again.
The unit does not
respond to the remote
control.
•
Aim the remote control directly at the sensor on the
front panel.
•
Reduce the distance to the unit.
•
Replace the batteries in the remote control.
•
Re-insert the batteries with their polarities ( + / – signs) as
indicated.
Buttons do not work
or the unit stops
responding.
•
Please attempt to reset the unit to unplug the AC
cable from wall outlet and then plug it again after 5-10
seconds.
The unit cannot read
CD / DVD.
•
Use a commonly available cleaning CD / DVD to clean
the lens before sending the unit for repair.
Angle does not switch.
•
The angle cannot be switched for DVD which do not
contain multiple angles. In some cases multiple angles
are only recorded for specific scenes.
The password for
rating level has been
forgotten.
•
Enter the default password “4737”, then your forgotten
password will be cleared.
Problema
Solución
Sin alimentación.
•
Compruebe si el cable de alimentación está conectado
correctamente.
•
Desconecte el enchufe una vez, y espere 5-10 segundos y
vuelva a conectarlo.
Sin sonido o imagen.
•
Presione y sostenga [
BF
(REPRODUCCIÓN / PAUSA) ]
en el tablero frontal durante 5 segundos para regresar a
la salida predeterminada.
No se puede reproducir
el disco.
•
Limpie el disco.
•
Asegúrese que el disco esté insertado en la dirección
correcta.
La unidad no responde
al mando a distancia.
•
Dirija el mando a distancia directamente a la ventana del
sensor de infrarrojos del panel delantero.
•
Reduzca la distancia hasta la ventana del sensor de infrarrojos.
•
Sustituya las pilas del mando a distancia.
•
Vuelva a introducir las pilas con su polaridades
(signos
+ / –
) según se indican.
1
NNECTIONS
CONNECTIONS
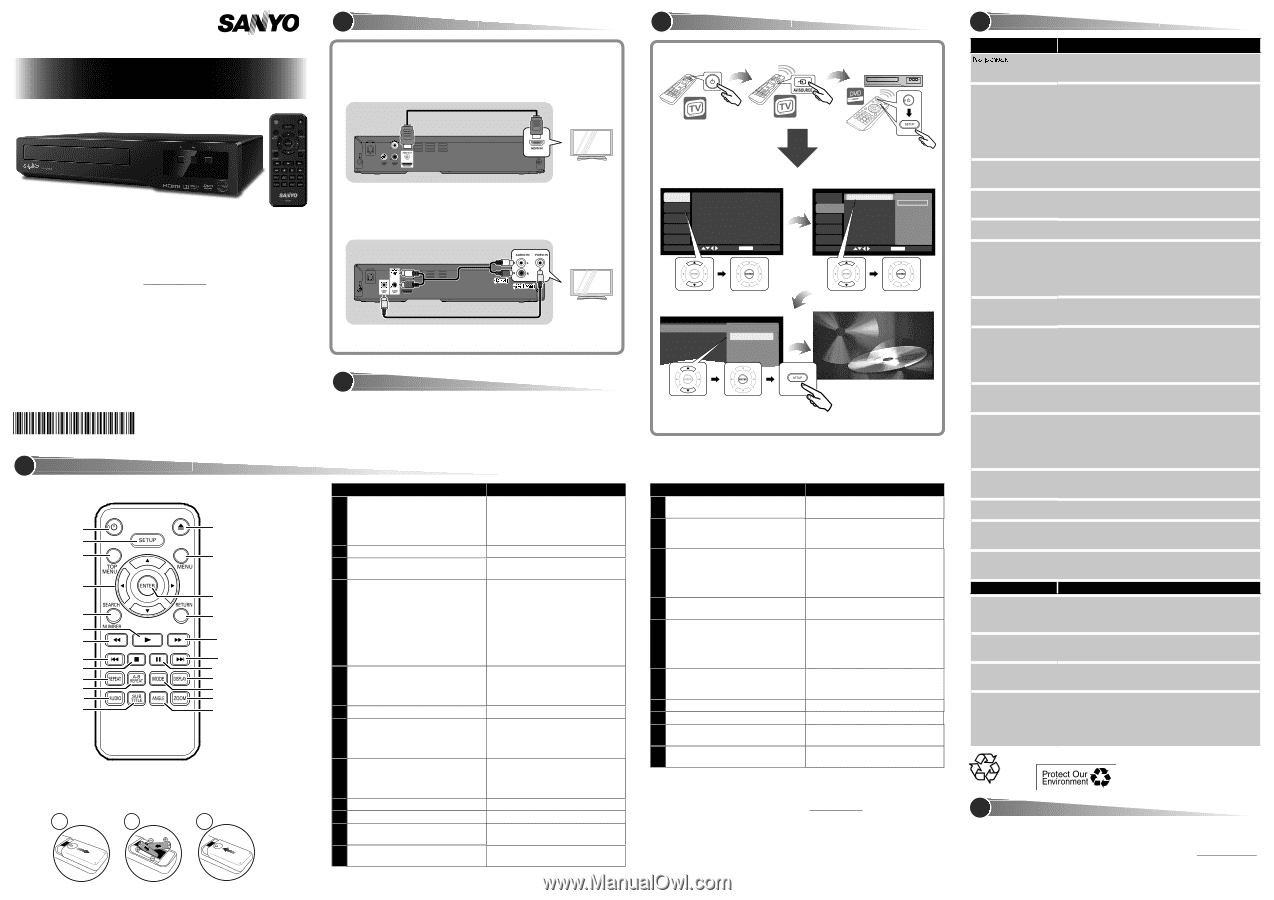
2
TIAL SETUP
INITIAL SETUP
Even if this unit becomes inoperative, do not open cabinet to repair by
yourself. There are no user-serviceable parts inside.
Turn off the unit, unplug the power plug and please visit
sanyo-av.com
for Online Support.
Before contacting us, please
check model name and serial number
pasted on the unit.
RVICING
SERVICING
E CONTROL
REMOTE CONTROL
*
2
V
M
N
0
0
1
8
8
*
1
2
3
19
22
17
1
8
20
1
4
9
7
2
11
15
16
5
14
13
3
12
10
6
8
7
8
21
ENTER
Auto(English)
English
Français
ENTER
TV Aspect
16:9 Widescreen
Resolution
Auto
HDMI CEC
Off
Menu
Auto(English)
Audio
English
Subtitle
Français
DVD Menu
Español
Español
Audio
Subtitle
DVD Menu
SYSTEM
AUDIO
VIDEO
OTHER
LANGUAGE
AUDIO
VIDEO
OTHER
LANGUAGE
Menu
SYSTEM
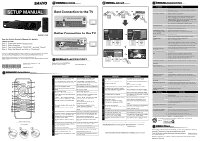
SETUP MANUAL
FWDP175F
See
the
Online
Owner’s
Manual
for
details
:
sanyo-av.com
Step 1
Please visit website
sanyo-av.com
Step 2 Select Download.
Step 3
Type in the Model # “FWDP175F”, and click “Search”.
Step 4
Select the Manual, and click on “Download”.
SANYO is a registered trademark of SANYO Electric Co., Ltd. and is used by Funai Electric
Co., Ltd. and Funai Corporation, Inc. under license from SANYO Electric Co., Ltd.
Any liability related to SANYO products, including design and quality, is the sole
responsibility of Funai Electric Co., Ltd. and Funai Corporation, Inc.
Please contact Funai Corporation, Inc. for any questions or claims related to SANYO products:
sanyo-av.com
Remote Control (NC087UH)
Audio / Video cables
SETUP MANUAL
PPLIED ACCESSORIES
SUPPLIED ACCESSORIES
For product recycling information, please visit - sanyo-av.com
Click on
© 2015 Funai Electric Co., Ltd.
Video cable (supplied)
Audio cable (supplied)
(White)
(Red)
(Yellow)
HDMI cable (not supplied)
(Red)
(Red)
(Red)
(Yellow)
(Yellow)
(Yellow)