Sanyo PDG-DHT8000L Owners Manual - Page 49
Setting, Language, SETTING MENU Language, Simple menu, Position, Display, Menu size
 |
View all Sanyo PDG-DHT8000L manuals
Add to My Manuals
Save this manual to your list of manuals |
Page 49 highlights
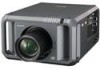
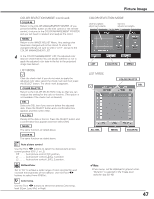
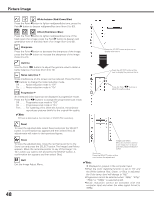
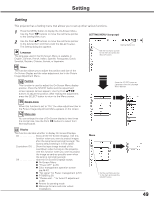
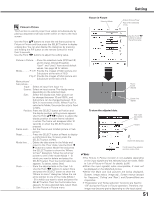
Setting Setting This projector has a Setting menu that allows you to set up other various functions. 1 Press the MENU button to display the On-Screen Menu. Use the Point 7 8 buttons to move the red frame pointer to the Setting Menu icon. 2 Use the Point ed buttons to move the red frame pointer to the desired item and then press the SELECT button. The Setting dialog box appears. Language The language used in the On-Screen Menu is available in English, German, French, Italian, Spanish, Portuguese, Dutch, Swedish, Russian, Chinese, Korean, or Japanese. SETTING MENU (Language) Setting Menu icon Set the red frame pointer to the item and press the SELECT button. Menu This function allows you to adjust the position and size of the On-Screen Display and the value adjustment bar in the Picture Image Adjustment Menu. Position This function is used to adjust the On-Screen Menu display position. Press the SELECT button and the adjustment screen appears (arrows appear). Use the Point ed7 8 buttons to adjust the position. After making the adjustment, press the SELECT button to return to the Menu screen. Press the SELECT button at Language, then the Language Menu appears. Simple menu When this function is set to "On," the value adjustment bar in the Picture Image Adjustment Menu appears on the screen. Menu size You can enlarge the size of On-Screen display to two times the normal size. Use the Point 7 8 buttons to select from (Normal/Double). Display This function decides whether to display On-Screen Displays. On Show all the On-Screen Displays. Use this function when you want to project images after the lamp becomes bright enough. The factory default setting is in this option. Countdown Off . . Show the input image instead of the countdown when turning on the projector. Use this function when you want to project the image as early as possible even when the lamp is not bright enough. Off Hide the On-Screen Displays except: ● On-Screen Menu ● "Power off?" (p.25) ● Color management operation screen (pp.46-47) ● "No signal" for Power management (p.57) ● P-TIMER (p.31) ● "Please wait...." for Auto PC adjustment (p.36) ● Arrows for panning mode ● Warnings for lens and color wheel installations. Menu Set the red frame pointer to the item and press the SELECT button. 49
-
 1
1 -
2
-
3
-
4
-
5
-
6
-
7
-
8
-
9
-
10
-
11
-
12
-
13
-
14
-
15
-
16
-
17
-
18
-
19
-
20
-
21
-
22
-
23
-
24
-
25
-
26
-
27
-
28
-
29
-
30
-
31
-
32
-
33
-
34
-
35
-
36
-
37
-
38
-
39
-
40
-
41
-
42
-
43
-
 44
44 -
 45
45 -
 46
46 -
 47
47 -
 48
48 -
 49
49 -
 50
50 -
 51
51 -
 52
52 -
 53
53 -
 54
54 -
55
-
56
-
57
-
58
-
59
-
60
-
61
-
62
-
63
-
64
-
65
-
66
-
67
-
68
-
69
-
70
-
71
-
72
-
73
-
74
-
75
-
76
-
77
-
78
-
79
-
80
-
81
-
82
-
83
-
84
-
85
-
86
-
87
-
88
-
89
-
90
-
91
-
92
-
93
-
94
 |
 |