Schwinn Airdyne AD6 Wind Screen International model Installation Guide
Schwinn Airdyne AD6 Wind Screen International model Manual
 |
View all Schwinn Airdyne AD6 Wind Screen International model manuals
Add to My Manuals
Save this manual to your list of manuals |
Schwinn Airdyne AD6 Wind Screen International model manual content summary:
- Schwinn Airdyne AD6 Wind Screen International model | Installation Guide - Page 1
Important Safety Instructions Schwinn® AD6 Airdyne® Wind Screen Installation Guide Installation Guide 8001397.111512.A This icon means a potentially hazardous situation which, if not avoided, could result in death or serious injury. Obey the following warnings: Read and - Schwinn Airdyne AD6 Wind Screen International model | Installation Guide - Page 2
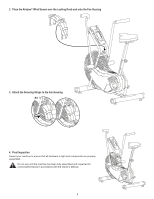
2. Place the Airdyne® Wind Screen over the Locking Knob and onto the Fan Housing 3. Attach the Securing Straps to the Fan Housing X4 4. Final Inspection Inspect . Do not use until the machine has been fully assembled and inspected for correct performance in accordance with the Owner's Manual. 2 - Schwinn Airdyne AD6 Wind Screen International model | Installation Guide - Page 3
Schwinn® AD6 Airdyne® Windschutz Aufbauanleitung Aufbauanleitung Wichtige Sicherheitshinweise Dieses Symbol Sie Sitz, Pedale und Tretkurbeln regelmäßig. Informationen zu Reparaturen ®erhalten Sie bei Ihrem Schwinn-Händler vor Ort. • Versuchen Sie nicht, das Design oder die Funktionalität des Gerä - Schwinn Airdyne AD6 Wind Screen International model | Installation Guide - Page 4
2. Legen Sie den Airdyne® Windschutz über den Sperrknopf und auf das Ventilatorgehäuse. 3. Befestigen Sie die Befestigungsriemen am Ventilatorgehäuse. X4 4. Abschlussinspektion Prüfen Sie, ob alle Schrauben festgezogen - Schwinn Airdyne AD6 Wind Screen International model | Installation Guide - Page 5
Guía de ®instalación del parabrisas Airdyne ®Schwinn AD6 Guía de instalación Instrucciones importantes de seguridad Este haya montado completamente y se haya inspeccionado su correcto rendimiento de acuerdo con el Manual del usuario. • Realice todos los pasos de montaje en la secuencia indicada. - Schwinn Airdyne AD6 Wind Screen International model | Installation Guide - Page 6
2. Coloque el parabrisas Airdyne® sobre el pomo de bloqueo y en la carcasa del ventilador. 3. Fije las correas de seguridad en la carcasa del ventilador. utilice el equipo hasta que se haya montado completamente y se haya inspeccionado su correcto rendimiento de acuerdo con el Manual del usuario. 6 - Schwinn Airdyne AD6 Wind Screen International model | Installation Guide - Page 7
Schwinn® AD6 - Guide d'installation du pare-brise ® Airdyne Guide d'installation Précautions de sécurité com - Service clientèle : Amérique du Nord (800) 605-3369, autres pays +01-360-859-5180 | Imprimé en Chine | © 2012 Nautilus, Inc. Référez-vous au manuel d'assemblage pour des instructions de - Schwinn Airdyne AD6 Wind Screen International model | Installation Guide - Page 8
2. Placez le pare-brise Airdyne® sur la molette de verrouillage et dans le boîtier du ventilateur 3. Arrimez les sangles au boîtier du ventilateur X4 4. Inspection finale Inspectez votre - Schwinn Airdyne AD6 Wind Screen International model | Installation Guide - Page 9
Monteringsvejledning til Schwinn® AD6 Airdyne® ventilatorskærm Monteringsvejledning Vigtige sikkerhedsanvisninger Dette symbol gør konstruktive eller funktionelle ændringer af dette udstyr. Ellers kan der opstå problemer med sikkerheden ved brug af udstyret, hvorved garantien bortfalder. • Før al - Schwinn Airdyne AD6 Wind Screen International model | Installation Guide - Page 10
2. Placer Airdyne® ventilatorskærmen hen over låseknappen og på ventilatorgitteret 3. Monter holderemmene på ventilatorgitteret X4 4. Afsluttende kontrol Kontroller, at alle monteringsdele er korrekt fastspændt, og at komponenterne er - Schwinn Airdyne AD6 Wind Screen International model | Installation Guide - Page 11
Schwinn® AD6 Airdyne® Schwinn Nautilus Schwinn www.bowflexinternational.com Nautilus, Inc., (800) NAUTILUS / (800) 628-8458, www.NautilusInc.com 800) 605-3369 01-360-859-5180 2012 Nautilus, Inc. 1 Airdyne® 11 - Schwinn Airdyne AD6 Wind Screen International model | Installation Guide - Page 12
2 Airdyne 3 X4 4 12 - Schwinn Airdyne AD6 Wind Screen International model | Installation Guide - Page 13
do pára-brisas Airdyne® SchwinnAD6® Guia de sido inspeccionado relativamente ao desempenho correcto de acordo com o Manual do Proprietário. • Realize todos os passos de ou problemas relacionados com o produto, contacte o distribuidor Schwinn® local. Para encontrar o distribuidor local, aceda a: www - Schwinn Airdyne AD6 Wind Screen International model | Installation Guide - Page 14
2. Coloque o pára-brisas Airdyne® sobre o manípulo de bloqueio e no compartimento da ventoinha 3. Prenda as tiras de fixação ao compartimento equipamento quando este estiver totalmente montado e tiver sido inspeccionado relativamente ao desempenho correcto de acordo com o Manual do Proprietário. 14 - Schwinn Airdyne AD6 Wind Screen International model | Installation Guide - Page 15
15 - Schwinn Airdyne AD6 Wind Screen International model | Installation Guide - Page 16
16
-
 1
1 -
 2
2 -
 3
3 -
 4
4 -
 5
5 -
 6
6 -
 7
7 -
8
-
9
-
10
-
11
-
12
-
13
-
14
-
15
-
16
 |
 |

1
1.
Route the Securing Straps through the Airdyne
®
Wind Screen
Schwinn
®
AD6
Airdyne
®
Wind Screen
Installation Guide
8001397.111512.A
Installation Guide
Refer to the Assembly Manual for complete safety instructions.
I
mportant Safety Instructions
This icon means a potentially hazardous situation which, if not avoided, could result in death or serious injury.
Obey the following warnings:
Read and understand all warnings on this machine.
•
Carefully read and understand the Assembly and Owner’s Manual.
•
Keep bystanders and children away from the product you are assembling at all times.
•
Do not try to change the design or functionality of this machine. This could compromise the safety of this machine and will void the warranty.
•
Before each use, examine this machine for loose parts or signs of wear. Do not use if found in this condition. Monitor the Seat, Pedals, and Crank Arms
closely.
Contact
your local Schwinn
®
distributor
for repair information.
•
Do not try to change the design or functionality of this machine. This could compromise the safety of this machine and will void the warranty.
•
If replacement parts are necessary use only genuine Nautilus
®
replacement parts and hardware. Failure to use genuine replacement parts can cause a risk to
users, keep the machine from operating correctly and void the warranty.
•
Do not use until the machine has been fully assembled and inspected for correct performance in accordance with the Owner’s Manual.
•
Do all assembly steps in the sequence given. Incorrect assembly can lead to injury.
If you have questions or problems with your product, please contact your local Schwinn
®
distributor.
To find your local distributor, go to:
www.bowflexinternational.com
Nautilus, Inc., (800) NAUTILUS / (800) 628-8458, www.NautilusInc.com - Customer Service: North America (800) 605-3369, outside U.S. +01-360-859-5180
| Printed in China | © 2012 Nautilus, Inc.